ROV Project Updates
As the design for this project evolves, files for the overall design and the panels will change and be updated. Because these updates are not captured by the “What’s New” page it would be very easy to miss an update to the design. This page will have an ongoing list of changes to the design. Think of it a bit like a version control page.

1st of June 2016
Finally, the other week there must have been a fortuitous alignment of stars and good fortune shone. I was able to test the ROV in New Zealand Diving and Salvage’s decompression chamber. Disappointingly the experiment indicated leaks at pressure and so I’m going to need to design some of the arrangements to be able to more reliably close the ROV electronics pod aand achieve a good seal.
This page describes the various tests, and presents the results.
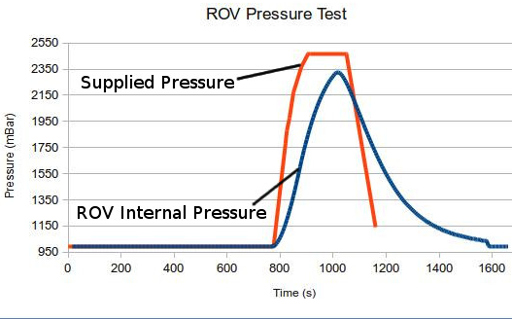
Pressure log from the experiment.
23 February 2016
In order to test the ROV shell and seals at design pressure it will be subjected to 5bar in a diving decompression chamber. Of course this means I will not be able to see if it leaks, so I have devised a simple logger to capture and record the ROV’s internal pressure during the course of the experiment. The logger is described here:
A Simple Pressure and Temperature Logger
3 February 2016
The ROV base station consists of the controller and a 12inch FPV Monitor. These are supplied from a 7.2Ah 12V lead acid battery. When flying some of my FPV aircraft I use the same screen and add a diversity receiver. I was a little concerned that running these rigs for extended periods was exhausting the battery and dropping it to levels that could potentially cause it permanent damage. I needed a battery monitor that could warn me when I had used more than the battery could comfortably deliver. This article describes the 12V battery monitor I devised for the purpose.
Base Station 12V Battery Monitor
19 January 2016
A local dive company, New Zealand Diving and Salvage have very kindly offered me use of their decompression chamber to pressure test the ROV, or as they described it, “give it a squeeze.” This means I will be able to simulate the 50m depth that the ROV is rated to without killing it if it fails. The challenge is that if it leaks it will not be full of water and so it will be hard to tell if it failed. So I am in the process of putting together a simple logger system to monitor the pressure in the ROV shell while it is in the decompression chamber.
You can find the development sketch and circuit description for a temperature only version on this page: A Simple Arduino Based Logger
2 December 2015
As mentioned below I have replaced the 10A HobbyKing car ESCs with HobbyWing EZRUN 18A ESCs. This has required reprogramming the ESCs and a new calibration system to be developed. Details of the process can be found on this page: Programming and Calibration the EZRUN 18A ESCs
24 November 2015
I finally dug out my ESC programming card the other day to adjust the voltage cut-off point to something more appropriate to the LiFePO4 batteries I am using. I found that the voltage cut out was disabled. This means that the ESCs were over heating a little during the latter part of the pool trial. I will need to use the HobbyWing EZRUN 18A ESCs instead. I have a bunch ordered from Aliexpress and will hopefully see them within the next week.
I have been busy over the last month learning about how to turn this ROV into a business. Unfortunately my calculations indicate that it probably isn’t a viable business (or at least not here in New Zealand). Ho hum! I’d better find a job then.
11 September 2015
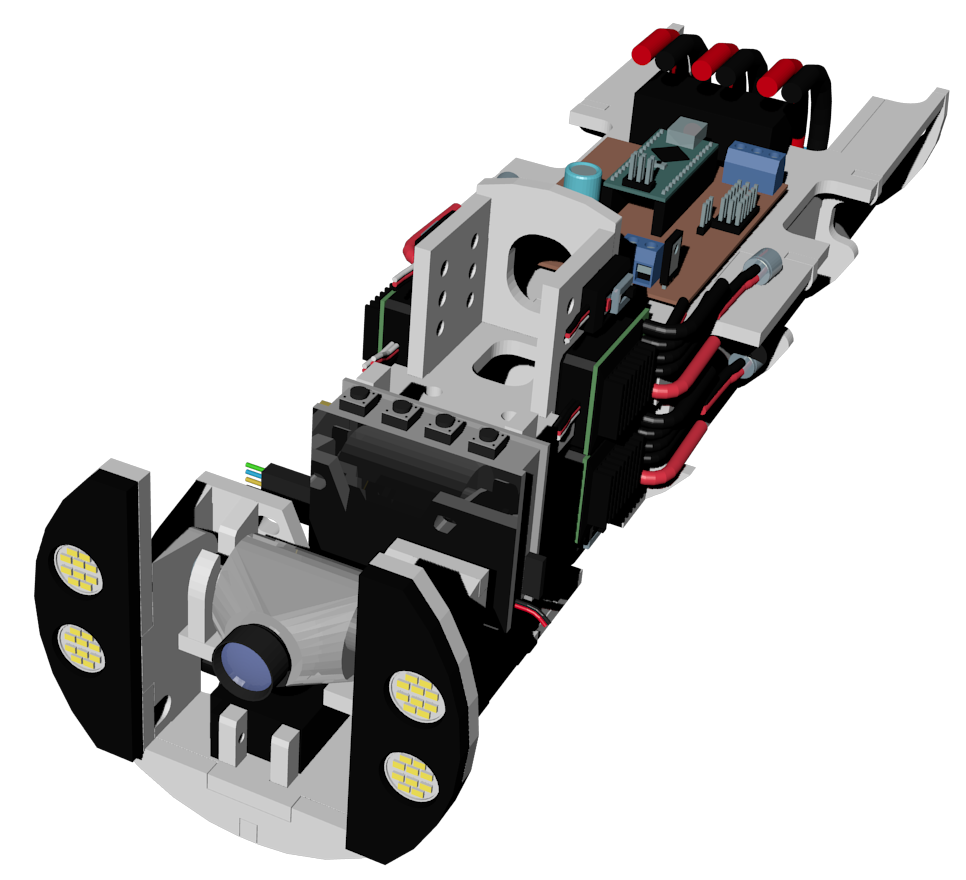
The blender models and CD models have been updated to reflect the modifications I have carried out to ensure all wires within the electronics pod can be installed easily. The changes also include the CAD model for the 12mm thick acrylic front plate, and the addition of a flange at the tail end to help keep the threaded rods around the central pod in line. All laser cutting files include these updates. If you have already cut the panels yourself, the modifications are easy enough to do by hand with a hacksaw and hand file.
The updated files are;
ROV Design file (Blender 2.57 format)
ROV Panels - in pdf format and the vectorgraphic formats of same.
Lasercut dxf and CAD files - Lasercutting dxf and CAD files
26 August 2015
The third edition of the Arduino sketches for remotely controlling the ROV have been developed and trialled with the full electronics system installed. This update corrects the motor directions, and ensures the correct operation of the Horyzon V3 camera. The complete video system is now all operating and providing good quality video to a monitor.
Find out more about it here.
ROV Control Sketches – Third Edition
3 August 2015
Several changes to the design have been carried out:
-
Firstly some of the panels around the camera cradle were adjusted by about 1mm to allow better assembly. This has been incorporated into the panel drawings and models, as well as the lasercutting files.
-
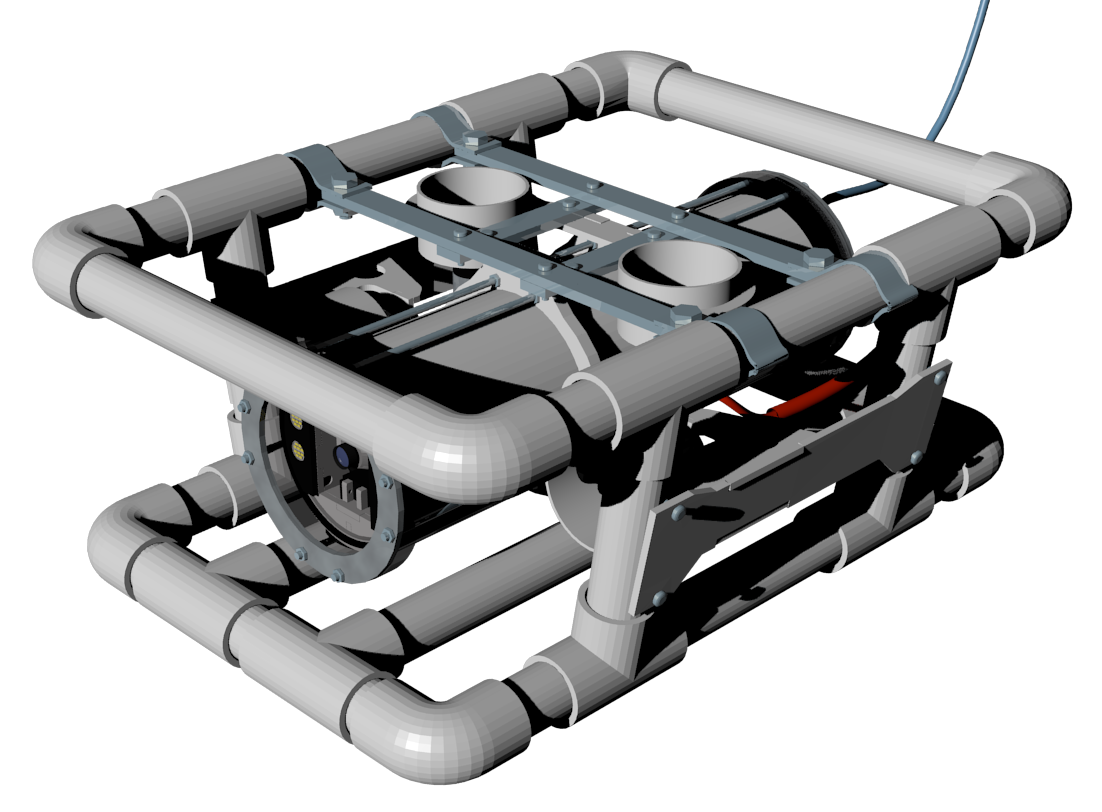
Secondly the whole ROV shell has been rotated 180 degrees so the thrusters are pointed backwards. This will allow better flow through the motors and hopefully some extra performance gains. Because of the near symmetric design, this makes no difference to the components. All that has happened is that the two electronics chamber end caps have swapped positions.
The updated files are;
ROV Design file (Blender 2.57 format)
ROV Panels - in pdf format and the vectorgraphic formats of same.
Lasercut dxf - Lasercutting dxf file
To protect the thruster motors from exposure to corrosive environments, I have upgraded them in the same manner as the OpenROV community. This is described here; Upgrading the ROV Thruster Motors
23 July 2015
Finally I have managed to produce a solution to seal bundles of wires using commonly available materials. It has been tested to the equivalent of 50m depth and appears to form a reliable seal with the cable glands.
The description of how the seal was produced and a selection of other methods that were tried is described on the page linked below.
Investigations into Wire Sealing Methods
15 June 2015
After far too long a time fluffing around trying to produce a test rig for the cable glands that will simulate the target depth, I have finally managed to manufacture something that I hope will work. This page describes the rig as well as some of the adventures along the way. A Cable Gland Test Rig
18 Feb 2015
OK, so I have got some parts lasercut….and found some annoying errors such as, poorly aligned holes, and things like that. To make it easier for anyone looking to make this I have corrected these errors and included them in the latest edition of the digital model, the lasercut dxf file, and the panel CAD files. I have also decided to beef up the webs supporting the shell, and so these have been designed to be double thickness. Amazingly I can still fit them onto the 600x600 sheet of acrylic for lasercutting.
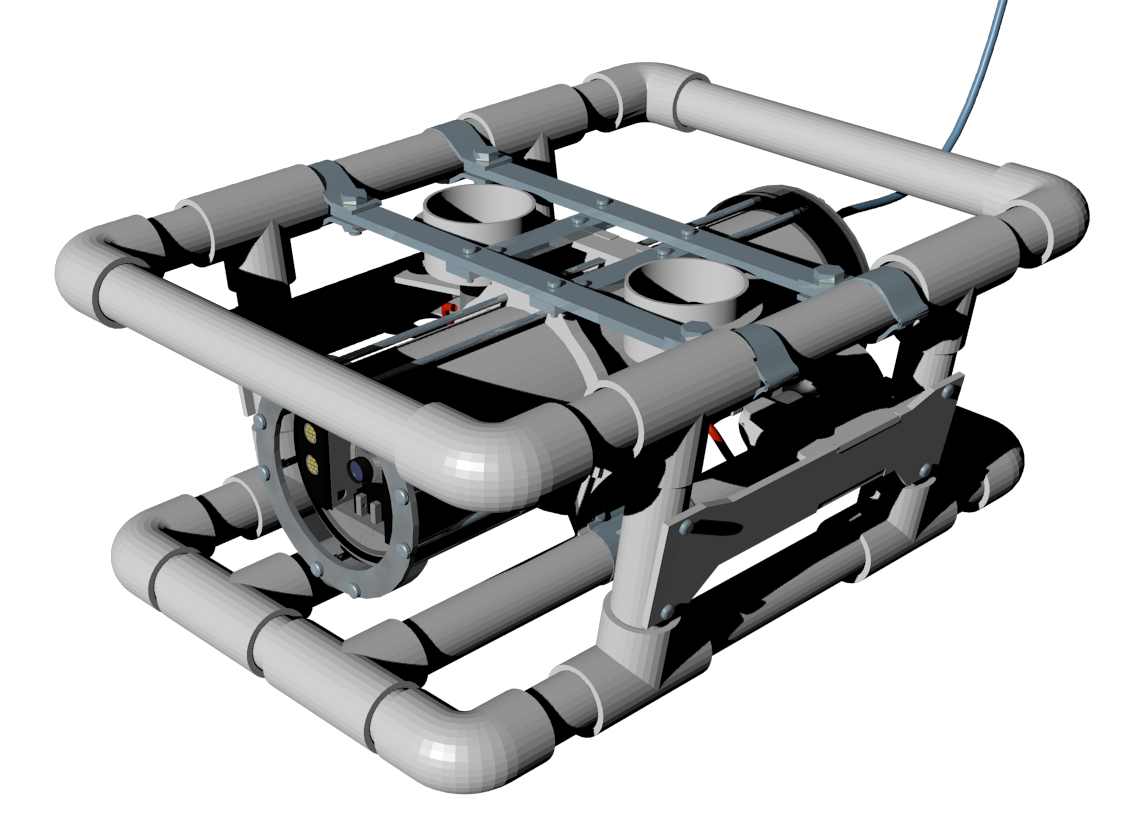
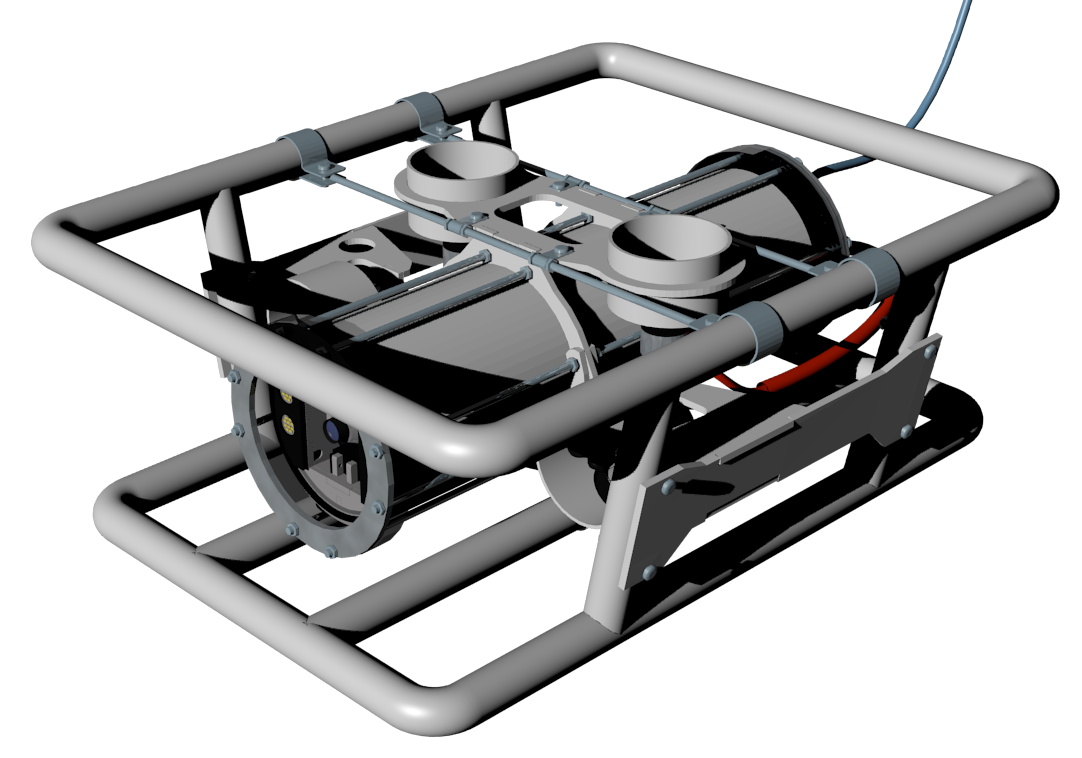
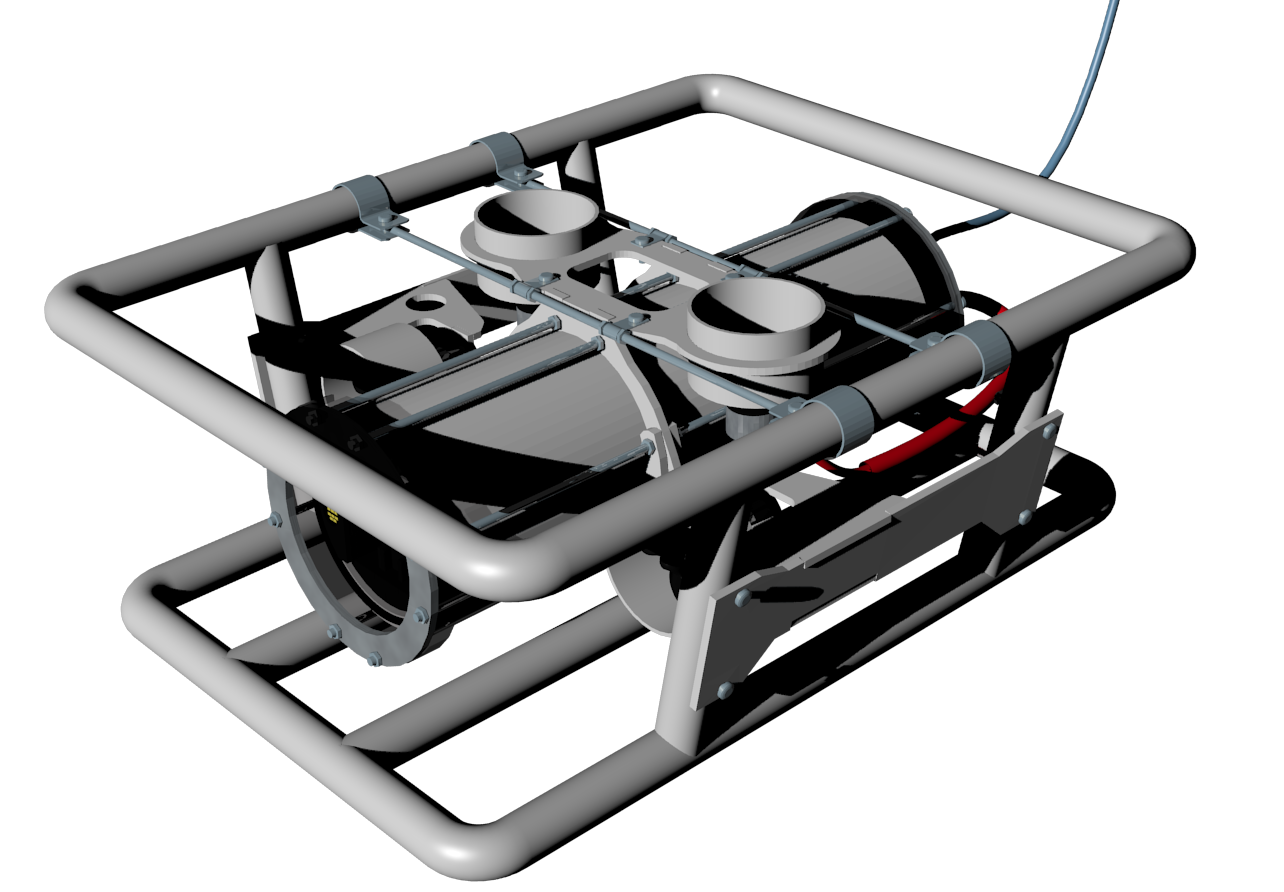
Also, there has been a step change in the structure supporting the top of the ROV shell. Rather than threaded rod and some dubious looking bits of metal, I have changed this to 20mm x 6mm aluminium flat bar, and standard pipe hangers. You will be able to see this in the photos on the Main ROV Page and in the Blender model. This was a lot easier to make and promises to be a lot stronger. I have been careful the line the aluminium with bike innertube rubber where it is in contact with the stainless steel pipe hangers so as to reduce the chance of galvanic corrosion occuring…..hopefully.
Now that I have built the PVC pipe frame structure, I have updated the blender model to reflect the actual sizes of the components.
Finally the electronics sketches and circuits are pretty much as developed as I feel they need to be, so this has been released. You can find out all about that on the ROV Control Sketches – Second Edition page.
Without further ado, here are the links to the latest edition of the ROV structure and panel models.
ROV v11 Design file (Blender 2.57 format)
ROV Panels - in pdf format and the vectorgraphic formats of same.
Some of the vectorgraphic formats may have been distorted through the export processes, but the TurboCAD verion will be reliable and the DWG format is likely to be OK.
Lasercut dxf - Lasercutting dxf file
4 Feb 2015
Minor updates have been done on the version 10 blender model, the lasercut DXF files, and the pdf showing the panels. These updated files are accessible through the following links. The reasons for the changes are to fix some minor errors identified when the panels were lasercut for me and I found that some items still needed to be adjusted for the 4mm panel thickness ( a couple of minutes work with a metal file to recify the problem). I have also reshuffled the pieces in the lasercutting dxf to leave 10mm clear around the edges of the 600 x 600 acrylic sheet.
ROV v10 Design file (Blender 2.57 format)
ROV Panels - in pdf format and the vectorgraphic formats of same.
Some of the vectorgraphic formats may have been distorted through the export processes, but the TurboCAD verion will be reliable and the DWG format is likely to be OK.
Lasercut dxf - Lasercutting dxf file
21 Jan 2015
The first edition of the circuits and Arduino sketches for remotely controlling the ROV have been developed and trialled successfully on dry land (or at least on the lounge floor with lots of stuff strewn everywhere.)
Find out more about it here.
ROV Control Sketches – First Edition
5 Jan 2015
The interior and exterior design has changed to standardise the panel materials as 4mm thick acrylic. This means all panel can be cut from a single sheet which will make things cheaper and easier. This design change also incorporates the end cap designs which make use of three 16mm cable glands. The current edition is version 10. This issue also includes a dxf suitable for laser cutting from a 600mm square sheet.
The new design files are;
ROV v 10 Design file (Blender 2.57 format)
ROV Panels - in pdf format and a variety of vectorgraphic formats.
Some of the vectorgraphic formats may have been distorted through the export processes, but the TurboCAD verion will be reliable and the DWG format is likely to be OK.
Lasercut dxf - Lasercutting dxf file
10 December 2014
Exterior panel designs have changed. Now version 9.
The new design files are;
ROV Design file (Blender 2.57 format)
ROV Panels - pdf and Vectorgraphic formats
The interior design file has been renamed to match the main file version name, but the design has not changed. You will need to download this updated file so that the main design file can link to it correctly.
The reason for this change was from thinking about how to reduce the drag on the ROV. Panels have been reduced in size and metal rods have been added to support main pod. There were also some holes missing in some of the panels. It’s much easier to include them rather than try to hand drill them later eh.
The design also makes use of Cable Glands (IP68 rated to 105m) for the tether and motor wire penetrations.