Pressure Testing the ROV
Well, pressure testing the ROV shell was always going to be a challenge. I tried it quite some time ago by putting lead weights into the ROV shell and tying it (less electronics pod) to my sea kayak. We dropped it into the sea in the deepest bit of the harbour, which is about 26m deep. In theory this would have been a good test and would have indicated problems with any of the seals.
![]()
The ideal test.
The day started out looking like one of the nice, still days that are very rare in Wellington, so it looked ideal for doing this test. Unfortunately by the time we had driven to the point closest to the deepest spot, unloaded the kayaks and got onto the water it was blowing the typical Wellington gale and what happened looked more like this.
![]()
Reality: The wind blows kayaks along very quickly … even with an ROV being dragged along behind.
So although it didn’t leak, the ROV shell was probably never more than 2m below the surface. So not much of a test. Likewise with the pool test, the ROV was never deeper than about 1.2m.
Many months ago, the local firm, New Zealand Diving and Salvage were interested in helping me with the project and kindly offered to put the ROV into their decompression chamber so that it could be subjected to the rated pressure equivalent to an depth of 50m. If it leaked it would not damage anything. Because the interior would be dry I devised the pressure and temperature logger to monitor the pressure inside the ROV shell during the test so that any leaks could be detected.
New Zealand Diving and Salvage have been busy around the country over the past couple of months and so the decompression chamber and staff member to drive it were always away. Finally, the other week there must have been a fortuitous alignment of stars and good fortune and NZDS gave me a ring to say the decompression chamber was back on their premises and they would be able to run the test for me. So I packed up the ROV, jumped in the car and went around there.
The test was quite simple, we would take the pressure up to the equivalent of 15m depth, hold for a little while and if everything looked good, continue to increase the pressure to the equivalent of 50m. I had placed the logger’s 4 digit display in the front window of the ROV so it could be seen from outside the decompression chamber.
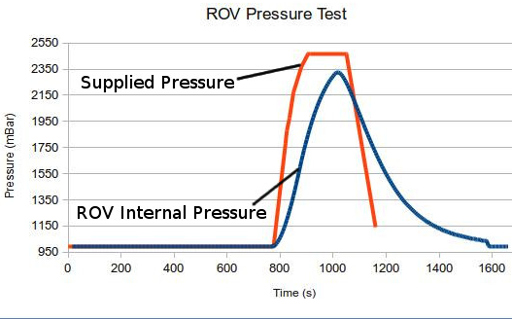
With the logger, doing it’s thing I sealed it up and we put it all in the decompression chamber. This included the tether reel as well because this cannot be removed from the ROV. With about 10 or 20kPa pressure applied I started to see a slight rise in the pressure being measured in the ROV shell. As the external pressure increased so the pressure within this ROV shell continued to rise. There was a definite leak in some of the seals. We got to 1.5 bar gauge pressure (eqivalent of 15m depth) and it was easy to see there was no point in going higher so we stopped the test at that point. This was pretty disappointing.
Here is the trace from the logger and the manually recorded exterior pressure trace.
You can download the data and analysis here:
And the raw CSV file from the logger. Pressure_Test_Log-20160524.csv
Because the interior was dry it was hard to determine which seal had leaked. There are three possibilities;
- The main o-ring seals. If the seals were not perfectly clean and the end plate not tightened up nice and square it could leak.
- The cable glands leaked. This is a possibility, but the seals were made using the technique that I had successfully tested to rated pressure.
- The tether wires. Ordinarily the tether reel would be above the water, and so there would not be any danger of a leak down the wire sheaths which are not sealed at either end. The outer casing of the CAT5 cable is sealed at the ROV end, but the wires and the insulation around each wire passes through the epoxy plug. Potentially then an air leak could run down the length of the tether wires in the minuscule space between the wire and the insulation around it. I have not carried out an estimate of how much air could enter the ROV through this route, but given that the wires are 100m long it would expect it to be small.
So what am I going to do about this?
The main seals have always concerned me because they are reliant on the user closing the ROV shell carefully and that the o-rings and seats are in good condition. Basically there are too many things that could go wrong.
My original business model for this was (naively) to convene a number of contractors to build batches of these ROVs as required. This dictated the need to use simple production methods, and consequently, less than ideal designs for the seals and penetrations. Having gained a little more knowledge about the steps I would need to make to manufacture these ROVs, I know my initial plan was wrong. I should have designed for proper industrial solutions that used techniques that are out of reach of people with minimal tooling. After all, industry have solved this problem many times over and there are industrial solutions. They can be expensive and they also involve welding, injection moulded parts, etc.
So I will look at using some industrial fittings to manufacture a much more secure shell and a quick, reliable closing method so the user can be comfortable that they have the shell sealed before they throw it into the water. I also intend to use some of the standard underwater connectors commonly used in the industry rather than the fairly awful cable gland and epoxy plug method I have used.
As I say, it is disappointing to have the ROV shell not perform as well as expected, but it is not unexpected. I just need to sit down and design a new arrangement for the shell.
luckily I have just started a new contract with the local library to help develop their STEMM (Science Technology, Engineering, Mathematics, and Manufacturing) activities. At least now I can afford to get some of these industrial bits for the ROV.