TM1637 4-digit Display Example Sketch
A useful data output for your Arduino project might be a simple 4-digit display of the type sold by http://www.dx.com or Seeedstudios with their “Grove” collection of sensors and things for their Arduinos. These displays make use of the TM1637 chip.
Avishorp has developed a library for the arduino to allow these displays to be connected to any digital pins you like. You will need to download this library and install it into your arduino/libraries directory. You can download the latest edition of this library from https://github.com/avishorp/TM1637.
You can also download the TM1637 library from the following webpage: A Collection of Arduino Libraries Used in This Project.
The Simple Example
This example is to show the most basic function of the TM1637 4-digit display, namely using it to display digits. In this case a variable value is displayed.
For the sake of making the sketch a tiny bit interesting, the variable is incremented using a for-loop and so the display will show a steadily increasing number.
For more a more complex example, use the example sketch that ships with the TM1637 library. This demonstrates changing the display brightness and also direct access to the LEDs making up each digit to produce lettering.
The Arduino Connections
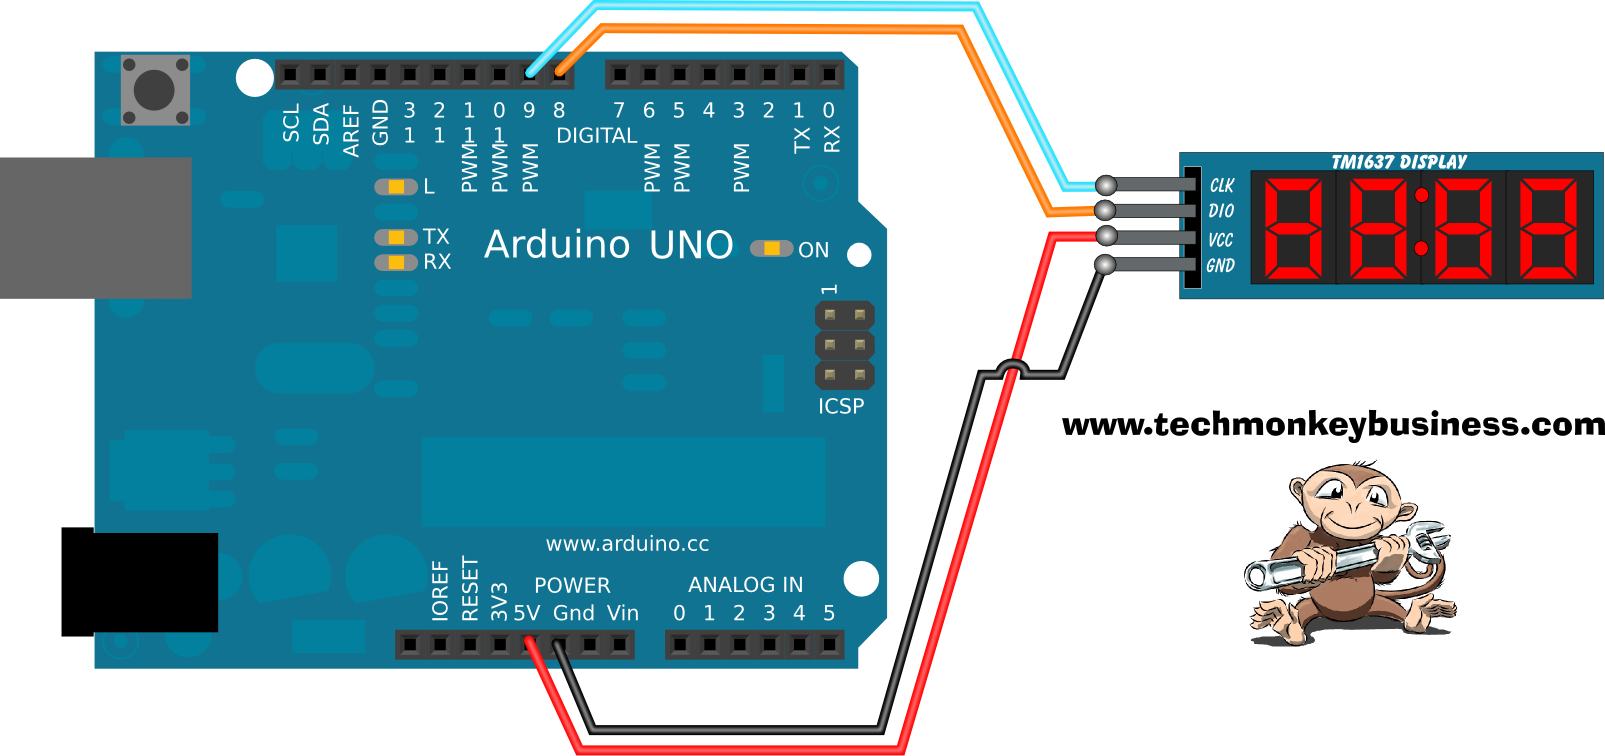
The connections between the display and the arduino are very simple and there is no need for any other components. Just plug ‘em together.
The connections to the CLK and DIO on the display can come from any of the digital pins. You will just need to adjust the sketch below to suit the pins you have selected.
Click on the image for a larger view.
The Sketch
You can download the sketch from here: TM1637_4_Digit_Display_Basics.ino
/* TM1637_4_Digit_Display_Basics.ino
The purpose of this sketch is to provide the basic
structure for using the TM1637 based 4-Digit Displays
like the Grove 4 digit display or other equivalents
available through the likes of www.dx.com.

This makes use of the TM1637Display library developed by avishorp.
https://github.com/avishorp/TM1637

This has been developed to run on any Arduino.

Pin assignments are:
CLK - D9
DIO - D8
5V or 3.3V supply to Display
GND to Display

The operation is very simple.  The sketch initialises the display
and then steps through the loop incrementing the value of a
variable which is then displayed on the 4-Digit display.
Essentially it is the most basic function you would want from
such a display.  If you want more sophisticated functionality
then use the example that ships with the library.

*/

#include <TM1637Display.h>

const int CLK = 9; //Set the CLK pin connection to the display
const int DIO = 8; //Set the DIO pin connection to the display


int NumStep = 0;  //Variable to interate

TM1637Display display(CLK, DIO);  //set up the 4-Digit Display.

void setup()
{
  display.setBrightness(0x0a);  //set the diplay to maximum brightness
}


void loop()
{
  for(NumStep = 0; NumStep < 9999; NumStep++)  //Interrate NumStep
  {
    display.showNumberDec(NumStep); //Display the Variable value;
    delay(500);  //A half second delay between steps.
  }
}