ROV Motor Upgrade

Upgrading the ROV Motors for Marine Use
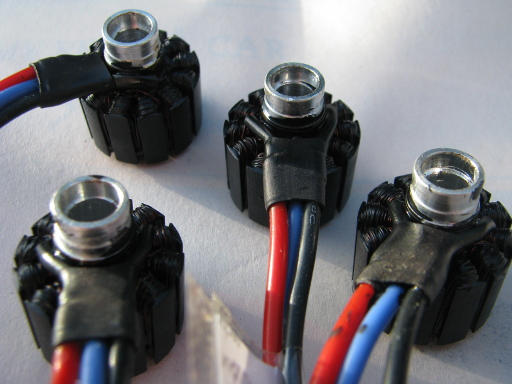
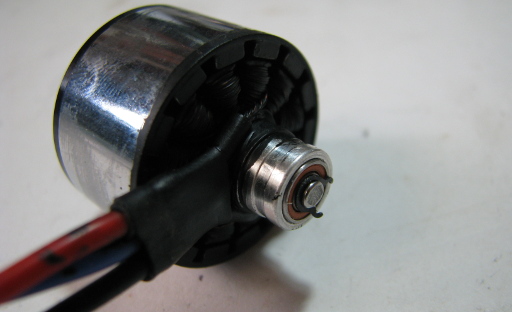
The ROV uses the same motors as the OpenROV, namely 2213N 800Kv brushless DC model aircraft motors. Because model aircraft tend not to be used underwater, the motors are not really designed for marine use. The OpenROV community came up with a solution to this problem and explain it very well in this guide. The solution was to swap out the standard bearings for ceramic and stainless steel hybrid bearings (incidentally these are used in fishing reels) and treat the windings and steel cores with a rust-proof paint.
Having observed some corrosion occurring on the motor I used in the bath for the thruster testing session, I thought I’d better get ahead on this and do the same with the motors used on this ROV. What follows is a description of what I did and the materials used.
Which Bearings?
The bearings I used were the same as those used in the OpenROV upgrade guide. These were a set of 3x7x3 bearings and a set of 3x8x4 bearings, both purchased through Aliexpress. The vendor was the HobbyBearingStore who also have an ebay outlet http://stores.ebay.com/HobbyismBearings. The details of the particular items purchased were;
10pcs 3x7x3 Hybrid Ceramic Stainless Lube Dry Fishing Reel Bearing SMR683C 2OS A7 LD
and
10pcs 3x8x4 Hybrid Ceramic Stainless Lube Dry Fishing Reel Bearing SMR693C 2OS A7 LD
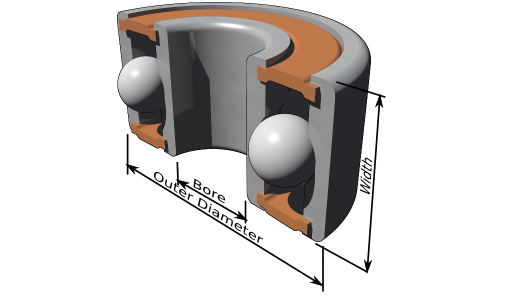
The basic specifications are;
|
3x7x3 Bearings |
3x8x4 Bearings |
|
Model No: SMR683C 2OS A7 LD |
Model No: SMR693C 2OS A7 LD |
|
Deep Groove, Single Row |
Deep Groove, Single Row |
|
Bore: 3mm |
Bore: 3mm |
|
Outside Diameter: 7mm |
Outside Diameter: 8mm |
|
Width: 3mm |
Width: 4mm |
|
Stainless Steel, Orange Rubber Seals, Ceramic Balls |
Stainless Steel, Orange Rubber Seals, Ceramic Balls |
|
Without Grease(Lubrication Dry) |
Without Grease(Lubrication Dry) |
Ideally I would have only needed to have bought a set of four, but seeing as there is an OpenROV kicking around here somewhere that we might get going one day I will upgrade its motors too. But hey, if I don’t use them on that maybe I can upgrade one of my planes for marine use – at least the water is a bit softer than the ground, right?
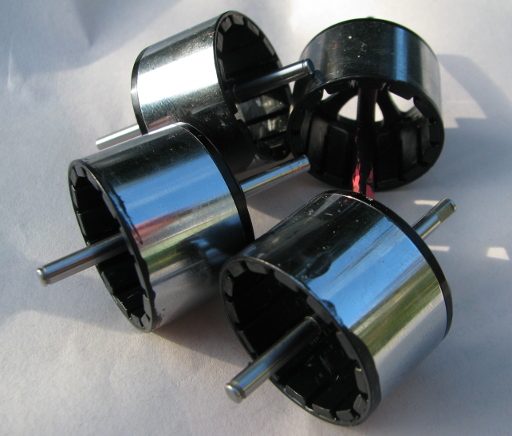
Removing the Existing Bearings
There appears to be a bit of variation in the manufacture of the motors, so be prepared to find that the bearings come out of one motor easily and are really tight in the next motor.
The steps are:
- Remove the base. This is just two small grub screws and should come off relatively easily.
- Remove the cir-clip on the tail end of the shaft. Try to retain it.
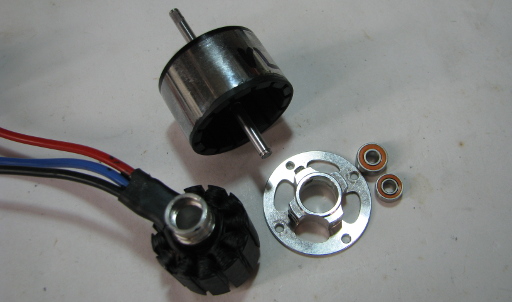
- Pull the bell off the motor to expose the two bearings, and the stator. You may find that the larger bearing race comes off with the bell. If this happens and you are unable to just slide it off the shaft, make a tool as described later to slip around the bearing and allow you to pull it out.
- Use a soft mallet and thin punch to gently tap out one of the bearings.
- Either use the same method to remove the other bearing or if you want to be especially gentle, find a bit of dowel to fit down the motor stator’s inner diameter and tap that with the soft mallet.
This video is useful for showing the bearing removal process used for the OpenROV. Bearing Removal Demonstration video
Proofing the Motor
The motor stator and bell suffer from corrosion even if they are only exposed to fresh water so it is worth water proofing them as a matter of course. This has the added benefit of providing a little more insulation should the glaze on the windings begin the fail.
The OpenROV motor upgrade process makes use of a spray on product called “Rustoleum crystal clear enamel”. We don’t have that here in New Zealand and so I figured a rust protection lacquer would do the job.
The products I used here were:
- Two coats of Wattyl Killrust Super Etch Primer.
- One coat of Red Enz High Heat Enamel with Rust Protection.
The Super Etch Primer is a lacquer based paint and so very tough and requires acetone to clean the brushes. The High Heat Enamel with Rust Protection is used for painting barbecues, wood stoves and the like. It is a turpentine based paint. Both are black, so you end up with these really mean looking motor coils.
Find a piece of shrink wrap and slip that over the motor shafts while you are splashing paint around the inside of the bells. Keeping the paint off the shaft will save you a great deal of fiddling around later.
I used a paint brush to apply both paints. This gave me good control over where the paint went, and also allowed me to slop it quite heavily onto the coils. Both of these paints penetrate deeply and so the paint fully entered the coils. As it dries the paint fits the underlying surface very closely and so it was very easy to get good coverage of the coils, magnets, and iron core without having to deal with paint runs causing problems.
Stators painted a nice steampunk black.
The motor bells with the magnets painted with rust prevention paint. The shrink wrap used to protect the motor shaft is still on the back right motor bell.
For the sake of finding equivalent paint products, here is the relevant information off each of the tins.
Wattyl Killrust Super Etch Primer
It is a single pack epoxy etch primer designed for direct application over mild steel, chrome, brass, copper, lead, and lead alloys, stainless steel, aluminium, and galvanised iron. It can be over coated with most finish types.
I have found that it also bonds extremely well to acrylic.
For more information go to the Wattyl website http://www.wattyl.com.au.
Red Enz High Heat Enamel with Rust Protection
Red Enz does not appear to produce this product any more but it is probably the same as “MEECO’S RED DEVIL 403 Hi-Temp Grill and Stove, Black” sold by Amazon.
It is originally designed for metal protection in high temperature applications such as stoves and barbecues. It can withstand temperatures of up to 540°C. It can be used on cast iron, steel, ferrous metals, cast aluminimum, and aluminium.
The instructions suggest it works better without a primer, but I was keen to use the Wattyl Primer described above to ensure good penetration and bind to the coils…..not that this paint wouldn’t do that satisfactorily by itself anyway.
Motors painted and ready for re-assembly
Installing the Bearings
Before installing the bearings, inspect the bearing seats to ensure they are clear of any paint.
The bearings are likely to press on quite easily using just your thumb, but there may be times when you need to press the whole lot down on a bench top. It it seems to be too hard the press in, pull it out and inspect the seat again, it maybe that there is a bit of metal that needs to be cleared from the bearing seat edge.

When the bearings are in place, install the motor bell. It should slide in easily. If it binds part way in, then it is likely to be paint on the shaft. Pull it out and inspect the shaft and clear any paint on it. You will probably find the 3x8x4 bearing is wedged on the shaft, so use the method described below to remove it.
Install the Circlip
That is so much easier to say than it is to do. I do not have a cir-clip installing tool so it was a fight with pliers to get these back on. What made it easier was that the cir-clips that came with it were pretty flimsy and so they did not have quite a same level of spring that typically sends cir-clips flying around the room.
Cir-clip reinstalled - mission accomplished!
Reinstall the Base
Put the base back on the motor and the process is finished.
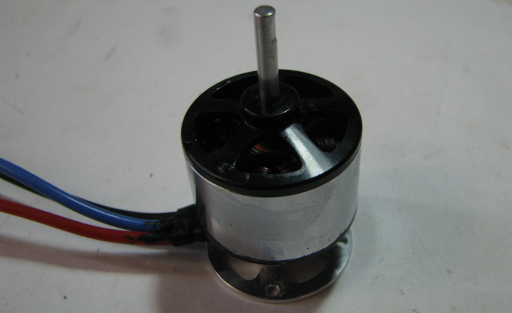
Water damage resistant motor
Tool for pulling reluctant 3x8x4 bearings off the shaft.
I found when I was having a go at treating the first motor, I neglected to take care not to get paint on the shaft. When I attempted to fit the motor bell over the stator, the 3x8x4 bearing would not allow the shaft to go fully through and became firmly wedged on the shaft. I was reluctant to give it a whack with the punch for fear of bending the motor shaft or damaging the bearings. To remove the bearings gently I cut two pieces of plastic from a waste plastic container, and with a hole punch made a roughly rectangular hole in the plastic that would fit over the bearing. Sliding one down each side of the bearing I then pinched the plastic tabs in a vice and gently but firmly pulled the bell up. This was able to provide a very nice straight pull to the bearing.
Here is a diagram of the “device”.
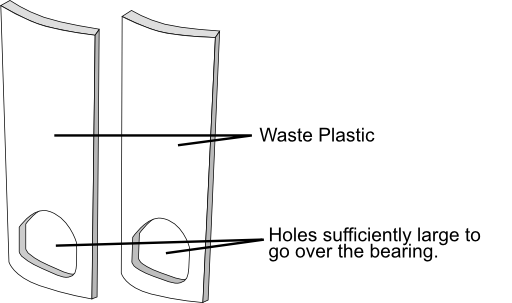
Bearing Puller Tool
It came off easily and immediately fell on the floor amongst a heap of pottery tools, basins of dried clay, old rags, ….. Sigh! I found it again after five minutes search and much swearing. To save yourself this, put something underneath the vice to catch the bearing if it escapes or have a tidier workspace than me.