Creating New Scenery for RC Desk Pilot

A little while ago I felt the desire to write an article on the various RC Flight Simulators that I have encountered and do some comparisons. I have yet to write that article, but in doing a look around to see what was out there I found one that impressed me for its professional looking finish and ease of use. This simulator is the R/C Desk Pilot. Not only is it a rather slick looking program it is also free.
When I use the various simulators I have to hand I like to fly in all sorts of locations. R/C Desk Pilot only has one scene, and so I started picking at it to see if it was possible to create new scenery for it. I found that it was. This guide is intended to help others build their own scenery and also remind myself of how I did it.
The new scene developed for this and associated tools can be downloaded from here - RC_DeskPilot_data_and_Scenery.zip.
Having built another scene and plans for doing a couple more, you can find this scene and some of my additional scenery sets here.
About R/C Desk Pilot
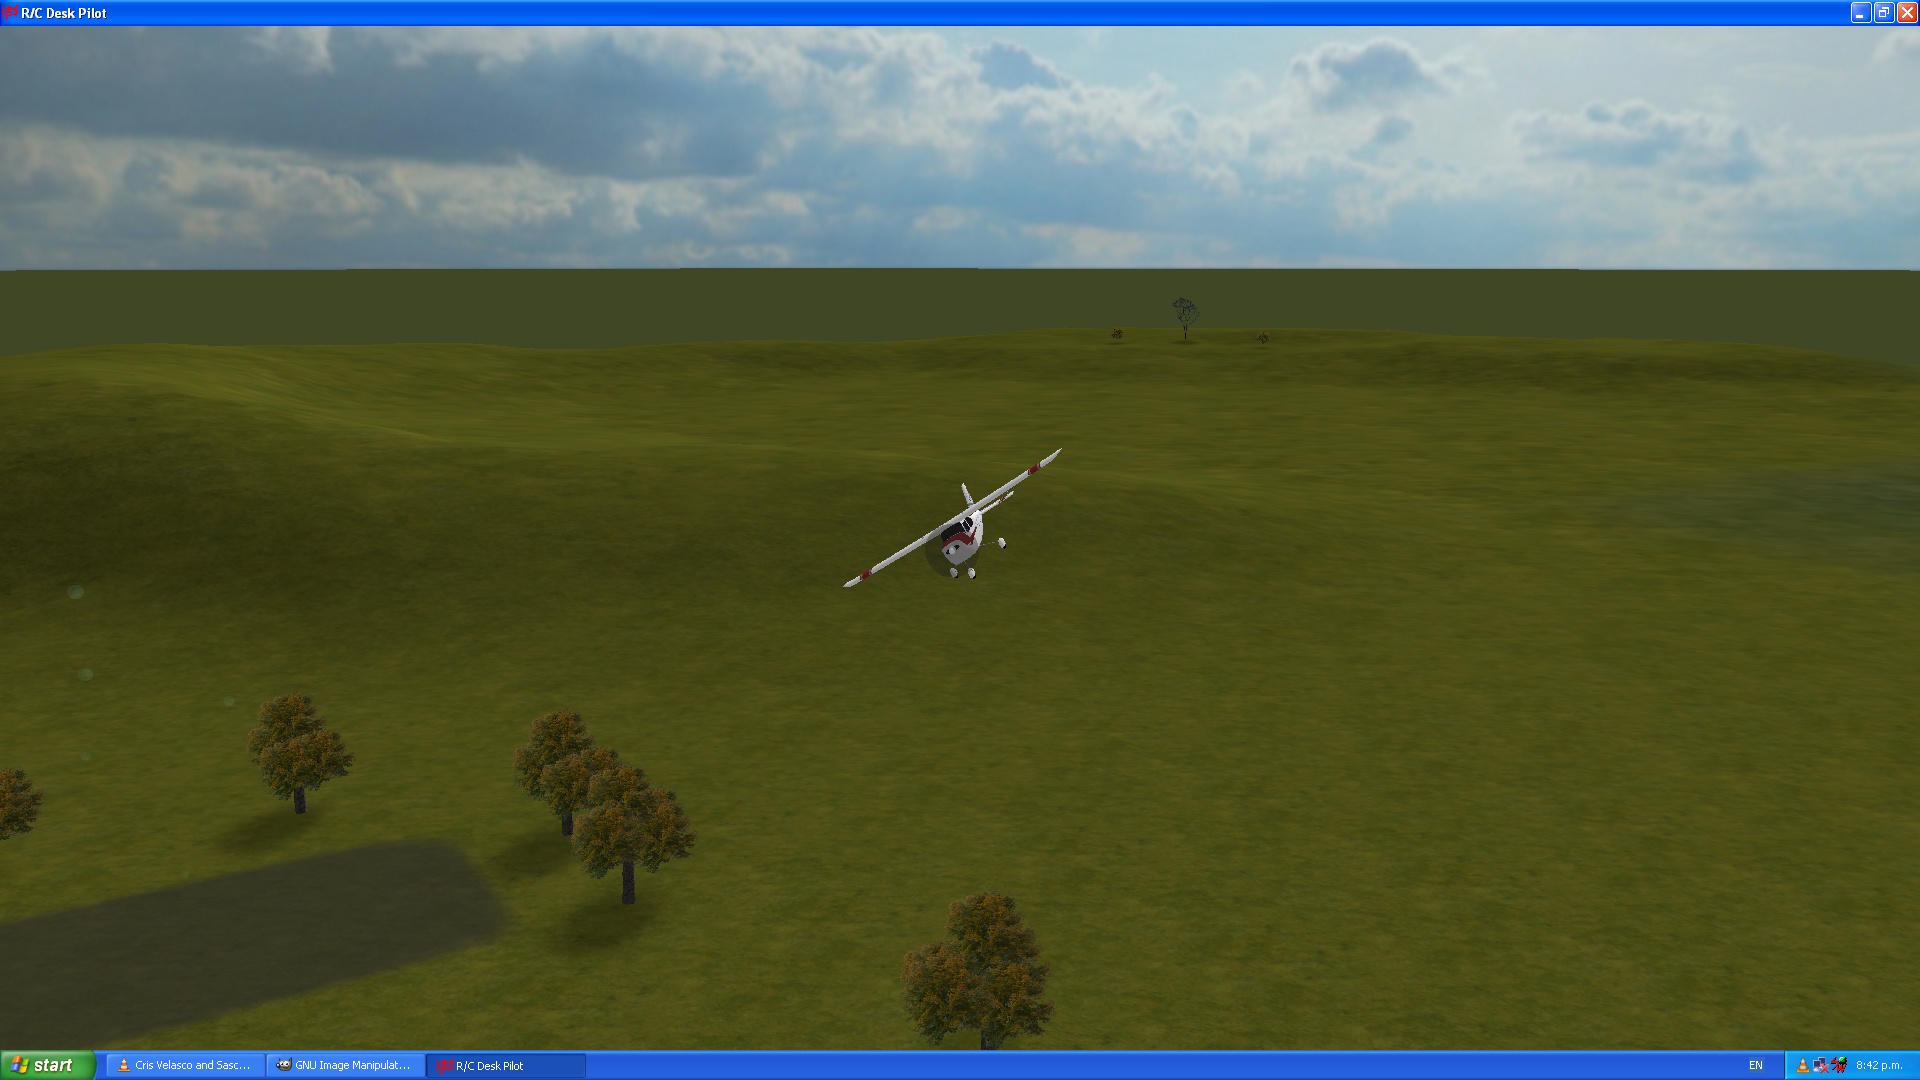
Here are a couple of screen shots of the simulator with its default scenery.
Some of the features that make this simulator attractive to me are;
- the planes handle reasonably realistically,
- there are opportunities for soaring,
- I can have a variety of different viewpoints including an FPV view,
- the scenery is a 3D environment rather than an image which means I can explore it,
- there is an anaglyphic display mode so that I see the 3D-ness of it all and look really goofy wearing anaglyphic glasses at the same time,
- I can control the time of day and wind conditions (god-like powers!),
- there are some very cool challenge modes (scarecrow and pylon racing),
- there are tools to build your own aircraft,
- and it seems to be able to handle whatever controller I connect up to the computer.
So these were all things that meant that it was worthwhile trying to get to grips with how to customise the scenery.
Rolling up the Sleeves
OK, so the scenery all lives in a directory called data/scenery/default. In there you will find a number of image files and two text files; default.par and terrain.def. The two text files are in an xml format and are the two files for defining the landform and its textures and to populate it with objects and features. In the /data/ directory a couple of levels above, you will find a bunch of model files in the .x format and associated model textures.
Default.par
This tells the simulator which image file defines the landscape, the landscape’s normal map, the four textures to go on the landscape, and also the minimum and maximum height of the landscape. While the original default.par uses the somewhat challenging .dds image format in places, I found that it seems to work with the common ones such as .jpg and .png formats just as easily.
Terrain.def
The Terrain.def is an xml list that defines the location of every tree, object, thermal, racing pylon, pilot location, plane starting point, angle of the sun, and the sky textures. It is all quite human readable so is quite easy to edit by hand – but don’t do that because I have some scripts that you can use to generate sections of xml that can be copied and pasted into this file.
Firstly create a copy of this default directory and put it aside as a backup.
The Terrain
The very first step is to sort out your landforms. R/C Desk Pilot requires an RGB height map in the form of a greyscale .png image. White is the highest elevation and black the lowest.
There are a heap of ways of generating a suitable heightmap; from hand painting them, to using a terrain creation tool, to using Digital Elevation Models (DEM)s of real terrain.
For my own scene I have used the landscape generator in Bryce to produce a greyscale bitmap with a resolution of 1024 pixels per side. The easiest way of pulling the height map from Bryce is to copy the bitmap image from the terrain editor and paste it into your favourite image editor. The image shows the terrain editor screen from Bryce 7. The terrain editor is pretty much the same for all of the older versions of Bryce.
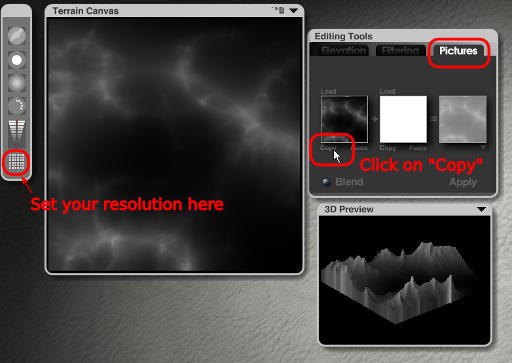
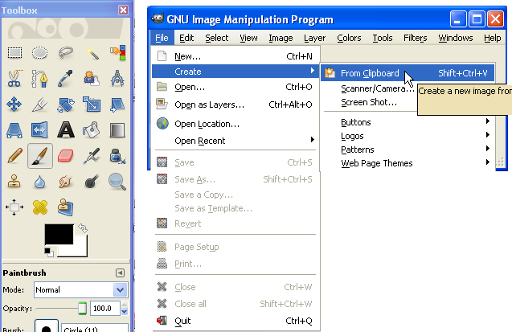
Once you have the heightmap image on your clipboard just paste it into your Image Editing software as a new image.
Your heightmap image may not cover the full range from black to white. This is not a problem, but if you are looking to make use of the full range of heights available or maybe create some flat areas at height level zero, it is worth tweaking the image by adjusting the colour levels. The available height range in R/C Desk Pilot is defined in the default.par file with the lines;
	<minimumheight>0</minimumheight>
	<maximumheight>70</maximumheight>
Black in your heightmap corresponds to the minimum height and white to the maximum height which in this case is 70. You can change these to suit your needs.
The height map used is 1024pixels, but the terrain model in R/C Desk pilot appears to be a 100x100 mesh, so in theory you will only need a 100 x 100 pixel heightmap. While you have the height map in your image editor produce a copy that is 100 pixels on a side because we will need this to better approximate how the R/C Desk Pilot terrain mesh is interpreting the height map when it comes to distributing objects across our scene.
So we now have a 1024pixels heightmap for use by R/C Desk Pilot to generate the terrain’s shape and also for use when we generate the Normal map which will help give the appearance of a higher definition terrain mesh than is actually there.
and a 100 x 100 pixel height map for use by the scripts introduced later to distribute objects across the scene. You could always use this file as the actual heightmap referred to in the default.par if you wanted.

Terrain Textures
The textures used in the terrain and how they are distributed across the terrain are all defined in the default.par file. By substituting in your own files, you change the terrain and its textures. All of the image files can be .jpgs or .pngs there is no need to put yourself through the pain of having to deal with .dds formats as used in the original scene.
Here is the full content of the original default.par.
<?xml version="1.0" encoding="utf-8" ?>
<scenery>
  <definition>
    <definition>data/scenery/default/terrain.def</definition>
    <heightmap>data/scenery/default/scenery_h.png</heightmap>
    <splathigh>data/scenery/default/scenery_s.dds</splathigh>
    <splatlow>data/scenery/default/splat_low.png</splatlow>
    <normalmap>data/scenery/default/scenery_l.png</normalmap>
    <texture1>data/scenery/default/grass1.jpg</texture1>
    <texture2>data/scenery/default/grass2.jpg</texture2>
    <texture3>data/scenery/default/dirt1.jpg</texture3>
    <texture4>data/scenery/default/road1.jpg</texture4>
    <minimumheight>0</minimumheight>
    <maximumheight>50</maximumheight>
  </definition>
</scenery>
The ground textures are simply bitmap tiles but the textures are distributed across the terrain by the files defined by the <splathigh> and <splatlow> parts of the default.par xml code. <splathigh> defines which textures go where when you are close to the ground while <splatlow> defines which textures are used for more distant landforms. There is no real reason that you could not use the same bitmap for both <splathigh> and <splatlow>.
The bitmaps used for <splathigh> and <splatlow> cover the whole terrain. The RGB + Black values in the <splathigh> and <splatlow> bitmaps define which texture image goes where on the terrain. White controls the lightness of the texture - so a slight pink will be a light coloured <texture1>. The table below demonstrates this using the original scene files as an example.
| Colour | RGB Value | XML"Slot" | File Used |
| Red | 255,0,0 | <texture1> | grass1.jpg |
| Green | 0,255,0 | <texture2> | grass2.jpg |
| Blue | 0,0,255 | <texture3> | dirt1.jpg |
| Black | 0,0,0 | <texture4> | road1.jpg |
| White | 255,255,255 |
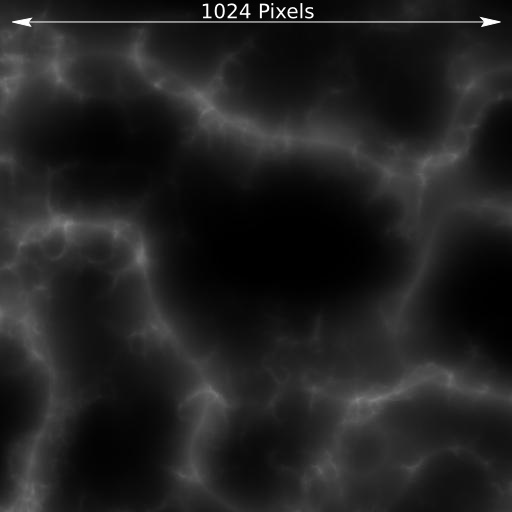
Blends of the colours creates blends of the textures. This means that from only four textures you can get a lot of variation and subtlety into your terrain texturing. For the <splathigh> and <splatlow> used in my custom made scene I simply handpainted the colours using the heightmap as a guide. Here is the result.
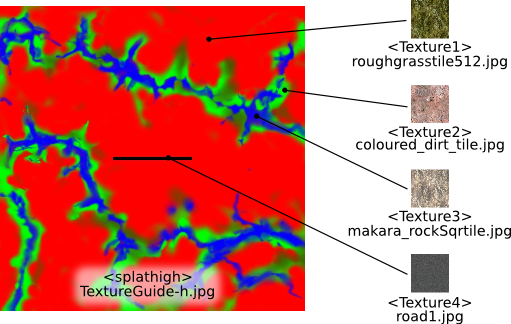
In the end I used this same image for <splatlow>.
There is nothing special about the textures you use. Ideally they should be tile-able. The image size used in the original scene are all 512 pixels on a side. The terrain texturing is done with four textures only. Below is the selection I used in my scene.

To use my selection of textures, all I did was change the filename in the default.par and as you will see, I used my new heightmap file called 2x2htmp.png, and the new images for <splathigh> and <splatlow> .
Here is the default.par file for my customised scene.
<?xml version="1.0" encoding="utf-8" ?>
<scenery>
  <definition>
    <definition>data/scenery/default/terrain.def</definition>
    <heightmap>data/scenery/default/2x2htmp.png</heightmap>
    <splathigh>data/scenery/default/TextureGuide-h.jpg</splathigh>
    <splatlow>data/scenery/default/TextureGuide-l.jpg</splatlow>
    <normalmap>data/scenery/default/2x2Norm-8bitu.png</normalmap>
    <texture1>data/scenery/default/roughgrasstile512.jpg</texture1>
    <texture2>data/scenery/default/coloured_dirt_tile.jpg</texture2>
    <texture3>data/scenery/default/makara_rockSqrtile.jpg</texture3>
    <texture4>data/scenery/default/road1.jpg</texture4>
    <minimumheight>0</minimumheight>
    <maximumheight>70</maximumheight>
  </definition>
</scenery>
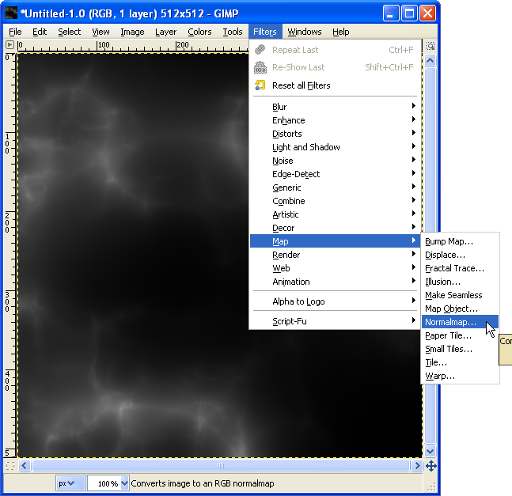
The interaction between the lighting on the terrain and the sun is created by the texture in the <normalmap> slot. The easiest way of getting the normal map is to use a plugin for a 2D graphics package. In this case I am using the GIMP for which there is a plugin available and is surprisingly called “gimp-normalmap”. It can be found here https://code.google.com/p/gimp-normalmap/. I believe it is a GIMP version of a normal map generator for Photoshop.
The normal map is generated from the heightmap image (the 1024x1024px version).
Here are the steps and settings I used;
First challenge: Finding where the plugin ended up. Filters>Map>Normalmap.
Second Challenge: Finding settings that don’t create shadows that appear on the lighted side of the hills. It looks kinda weird. Refer to the image below.
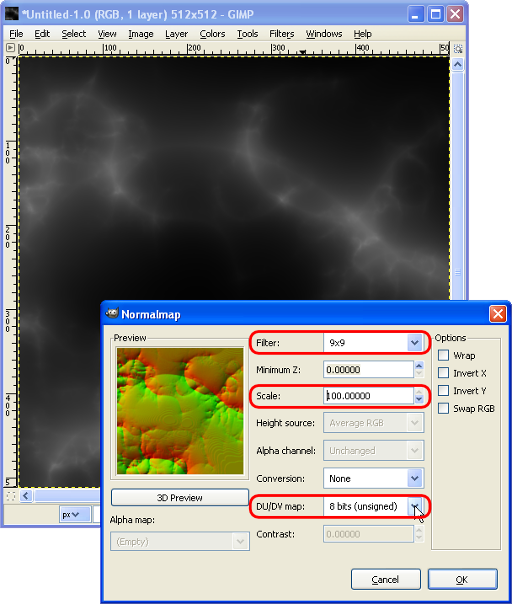
- The filter appears to affect the amount of detail the normal map ends up with. Setting it to 9x9 seemed to work for my terrain.
- Scale affects how deep the features are. Setting it to the maximum of 100 ensures a good strong normalmap.
- The DU/DV map (Whatever that is) affects the colours that appear on the normalmap. Only the “8 bits (unsigned)” choice produced a normal map that had the shadows going in the right direction.
Hitting OK will generate your Normalmap. In the case of my scene I called the file produced 2x2Norm-8bitu.png.
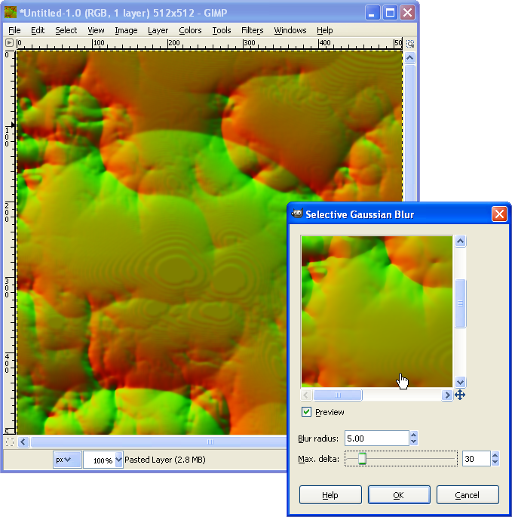
I found using a “Selective Gaussian Blur” was useful for smoothing some of the coarse steps that were in the Normalmap where the terrain gradient was low. This tool meant that the “sharper” features of the peaks and ridges were not blurred. You will see what I mean when you look at the image below which shows the un-blurred normalmap and the preview of the “Selective Gaussian Blur” applied to the normalmap.
Digging into the Terrain.def
The terrain.def file is used to define things like the location of the objects within the scene. It also has the information for locating the various ground positions for the pilot, the sun direction, sky texture, information about thermals, and a host of other things.
Sky and Sun
The sun direction and sky textures are defined in the terrain.def file. I have not done anything to these in my scene but to use a new sky I would just change the filenames referred to in the <Skies><Texture> part of the xml. The sky textures are 360° images of the sky hemisphere and are 4096x1024 pixel in size.
Also within the <Skies> sections you can find the sun positions, the sunlight direction, and ambient light direction as well as the light level controls.
Here is an example of the XML code for controlling the sky and sunlight.
  <Skies>
    <Name>Sunrise</Name>
    <Texture>sky_sunrise.jpg</Texture>
    <SunPosition xmlns:xsi="http://www.w3.org/2001/XMLSchema-instance" xmlns:xsd="http://www.w3.org/2001/XMLSchema">
      <X>0.15</X>
      <Y>0.10</Y>
      <Z>0.0</Z>
    </SunPosition>
    <AmbientLight xmlns:xsi="http://www.w3.org/2001/XMLSchema-instance" xmlns:xsd="http://www.w3.org/2001/XMLSchema">
      <X>0.4803922</X>
      <Y>0.4803922</Y>
      <Z>0.4803922</Z>
    </AmbientLight>
    <SunLight xmlns:xsi="http://www.w3.org/2001/XMLSchema-instance" xmlns:xsd="http://www.w3.org/2001/XMLSchema">
      <X>0.4803922</X>
      <Y>0.4803922</Y>
      <Z>0.4803922</Z>
    </SunLight>
    <TerrainAmbient>0.1</TerrainAmbient>
    <TerrainSun>0.6</TerrainSun>
  </Skies>
Pilot Positions
Ground positions for the pilots are defined in the XML using the <PilotPositions> block of XML. The position is measured from the centre of the terrain. You do not need to worry about the Y-axis position because the R/C Desk Pilot program places the pilot’s ground position viewpoint at virtual “eye-level” above the ground …. most of the time.
  <PilotPositions>
    <Name>Runway (default)</Name>
    <Position xmlns:xsi="http://www.w3.org/2001/XMLSchema-instance" xmlns:xsd="http://www.w3.org/2001/XMLSchema">
      <X>0.1</X>
      <Y>0</Y>
      <Z>-15.0</Z>
    </Position>
  </PilotPositions>
Thermals
Thermals are defined in the XML by location, size and strength as shown in the example below. As I understand it the strength is the vertical speed in m/s (or something like it) while the size is the radius of the thermal.
  <Thermals>
    <Position xmlns:xsi="http://www.w3.org/2001/XMLSchema-instance" xmlns:xsd="http://www.w3.org/2001/XMLSchema">
      <X>42.5</X>
      <Y>9.79</Y>
      <Z>272</Z>
    </Position>
    <Strength>1.5</Strength>
    <Size>45</Size>
  </Thermals>
Locating Stuff
So that’s all well and good but what about locating all the really interesting stuff like trees and mesh objects? These are all defined in much the same way but to make things easier to spread lots of them across the terrain I have developed some python scripts to help. More on this later in this document.
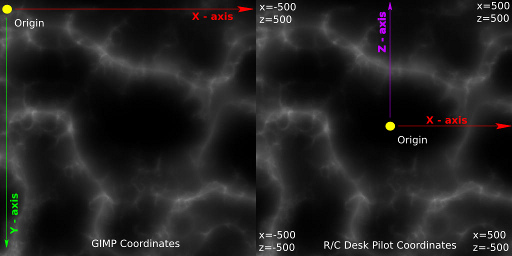
If you are looking to locate things in your scene it helps to have your heightmap handy so that you can identify the locations on that map where you want something to appear in the R/C Desk Pilot scene. What I do is use the GIMP to identify the pixel location on the heightmap where I want a feature to go. This is displayed as some coordinates down on the bottom left hand corner of the image window. The tricky thing is that the GIMP coordinates (and generally all image editor coordinates) do not match up with the R/C Desk Pilot coordinates particularly well. For this reason I made up a small spreadsheet to translate the coordinates from the image to the R/C Desk Pilot coordinates that go into the terrain.def.
Here are the link to download the spreadsheet.
Using the GIMP to find some image coordinates, and then using the spreadsheet to translate that into the R/C Desk Pilot coordinates for plugging into the terrain.def file is fine for locating one or two features in the scene but not for doing a forest or a line of power poles, or setting up a new pylon race course. That’s where the python scripts come into play.
The scripts make use of the 100x100 pixel terrain heightmap to calculate the vertical position of the objects as accurately as possible. To do this they rely on the matplotlib and Numpy libraries. The python installation you use to run these scripts must also have these libraries. These scripts were created on a Pyzo installation, but most other python distributions will include these libraries. Compared to some python distributions Pyzo is quite small and has a good bunch of libraries included with it. You can find Pyzo here http://www.pyzo.org/. At the moment the scripts are just command lines things and a bit naff to use but they work. I hope to make up a proper interface for them and even package them up as a standalone tool, but that is probably a long way off because I would have to teach myself GUI development and package deployment.
The scripts produce a text file with XML segments for your new additions to the scene. The XML can be cut and pasted into the terrain.def. The text files produced tend to end up under the user’s home directory in Linux systems and in the C:/Documents and Settings/YourUserName/ directory in Windows XP and who knows where on a Windows 7 system.
I am very aware that the scripts I have created are clumsily written with quite a bit of stuff repeated because I could not be bothered creating functions for them and I’m not a coder. “I could write better than that.” I hear the coders saying. To which I say “I’m sure you could……but……so what? Bite me.”
A brief note about trees:
In RC Desk Pilot scenes trees are handled a little different from other objects. They only need to be located in the X and Z directions. The vertical Y-direction is handled by the RC Desk Pilot program itself and it will very tidily sit them on the terrain. They do not have any orientation either because they orient themselves towards the camera.
As far as I can tell there are only four different types of trees; Trees, SimpleTrees, SimpleTallTrees, and SimpleSmallTrees. The ability to define the look of the trees appears to be coded into the RC Desk Pilot program itself. So, other than changing the various tree bitmaps, the only way of introducing new trees is as mesh objects for which the method in the next section would need to be used.
Typical XML for a SimpleTree:
  <SimpleTrees>
    <Position xmlns:xsi="http://www.w3.org/2001/XMLSchema-instance" xmlns:xsd="http://www.w3.org/2001/XMLSchema">
      <X>347.6513</X>
      <Y>3.03853321</Y>
      <Z>-439.099365</Z>
    </Position>
  </SimpleTrees>
A brief note about objects:
Objects and their texture files are located in the /data/ directory of R/C Desk Pilot. Objects are all in a .x format with the y-axis vertical. The <FileName> XML is where you can identify the model you want to use.
The XML for objects looks like this:
  <Objects>
    <FileName>PowerPole249.x</FileName>
    <Position xmlns:xsi="http://www.w3.org/2001/XMLSchema-instance" xmlns:xsd="http://www.w3.org/2001/XMLSchema">
      <X>175.05</X>
      <Y>18</Y>
      <Z>227.9</Z>
    </Position>
    <Orientation xmlns:xsi="http://www.w3.org/2001/XMLSchema-instance" xmlns:xsd="http://www.w3.org/2001/XMLSchema">
      <X>0</X>
      <Y>0</Y>
      <Z>0</Z>
    </Orientation>
  </Objects>
The elevation of your object needs to be defined (and can be calculated by the scripts) as does the orientation. The orientation is measured in radians.
The model scale appears to be about 1 Blender unit per meter in the model – roughly. The best check is to import one of the .x files (eg parkbench.x) that came with the original program and eyeball its size against the model you have created. You will need to rotate your model to have the y-axis as its vertical before you export it.
Random Scatter, Line Distribution, and Pylon Race Scripts.
Here are the scripts.
Download the Python Scripts Here:
Random Scatter Script - RCDesktopPilot_Object_Distribv3.py
The random scatter script is used for both trees and objects. After you have told it a filename to save to and what heightmap to use, it will let you choose to scatter trees or objects. You define a coordinate you wish to use as the centre for a circle of scattered objects. Provide it with a radius to define the area over which to scatter the trees or objects, and a number of items, and it will do the rest.
Random Scatter Script - RCDesktopPilot_Object_Distribv5.py
(8th Feb 2015) This variation of the random scatter script was developed to make it easier to process a large number of tree groups and objects. Basically I was getting frustrated keying in all of these coordinates and stuffing it up each time. The way this works is that you use the “ObjectWorld_Locator.ods” or “ObjectWorld_Locator.xls” spreadsheet or some other tool of your own devising to create a CSV file with the following columns.
|
Object or Tree Group Indicator |
Object Filename or Treegroup Type
|
RC Desk Pilot X-location |
RC Desk Pilot Z-location
|
RC Desk Pilot |
Number of objects to distribute. |
Orientation of the objects (radians) |
- Object or Tree Group Indicator: This indicates which process to use. The valid entries are; “
Object”, or “Tree Group” - Object Filename or Tree group Type: This is where the model file is identified or the tree group type is identified. If the tree group type is “
random” or spelled wrong, a group of random trees will be generated. The valid tree group types are; “Trees”,”SimpleTrees”,”SimpleSmallTrees”,”SimpleTallTrees” - RC Desk Pilot X-location: This is the RC Desk Pilot world X-coordinate of the centre point of the group.
- RC Desk Pilot Z-location: This is the RC Desk Pilot world Z-coordinate of the centre point of the group.
- RC Desk Pilot radius over which to spread the items: This is the RC Desk Pilot world radius of the circle within which the objects or trees will be distributed. In this scale it is in metres.
- Number of objects to distribute: How many objects or trees do you want to distribute in the group.
- Orientation of the objects (radians): This is only relevant for objects. Trees orient themselves based on the pilots view.
Line Distribution Script - RCDesktopPilot_ObjectLines_Distribv2.py
There’s nothing like a line of something to make things look like humans have had a go at it. This script allows you to run a line of objects or trees across your terrain in any direction. It’s ideal for power poles, and signboards indicating that the world ends beyond the boundary of the terrain. You define the coordinates of the start and end points and tell it what you want to distribute and how many, and it generates the XML to go into the terrain.def file.
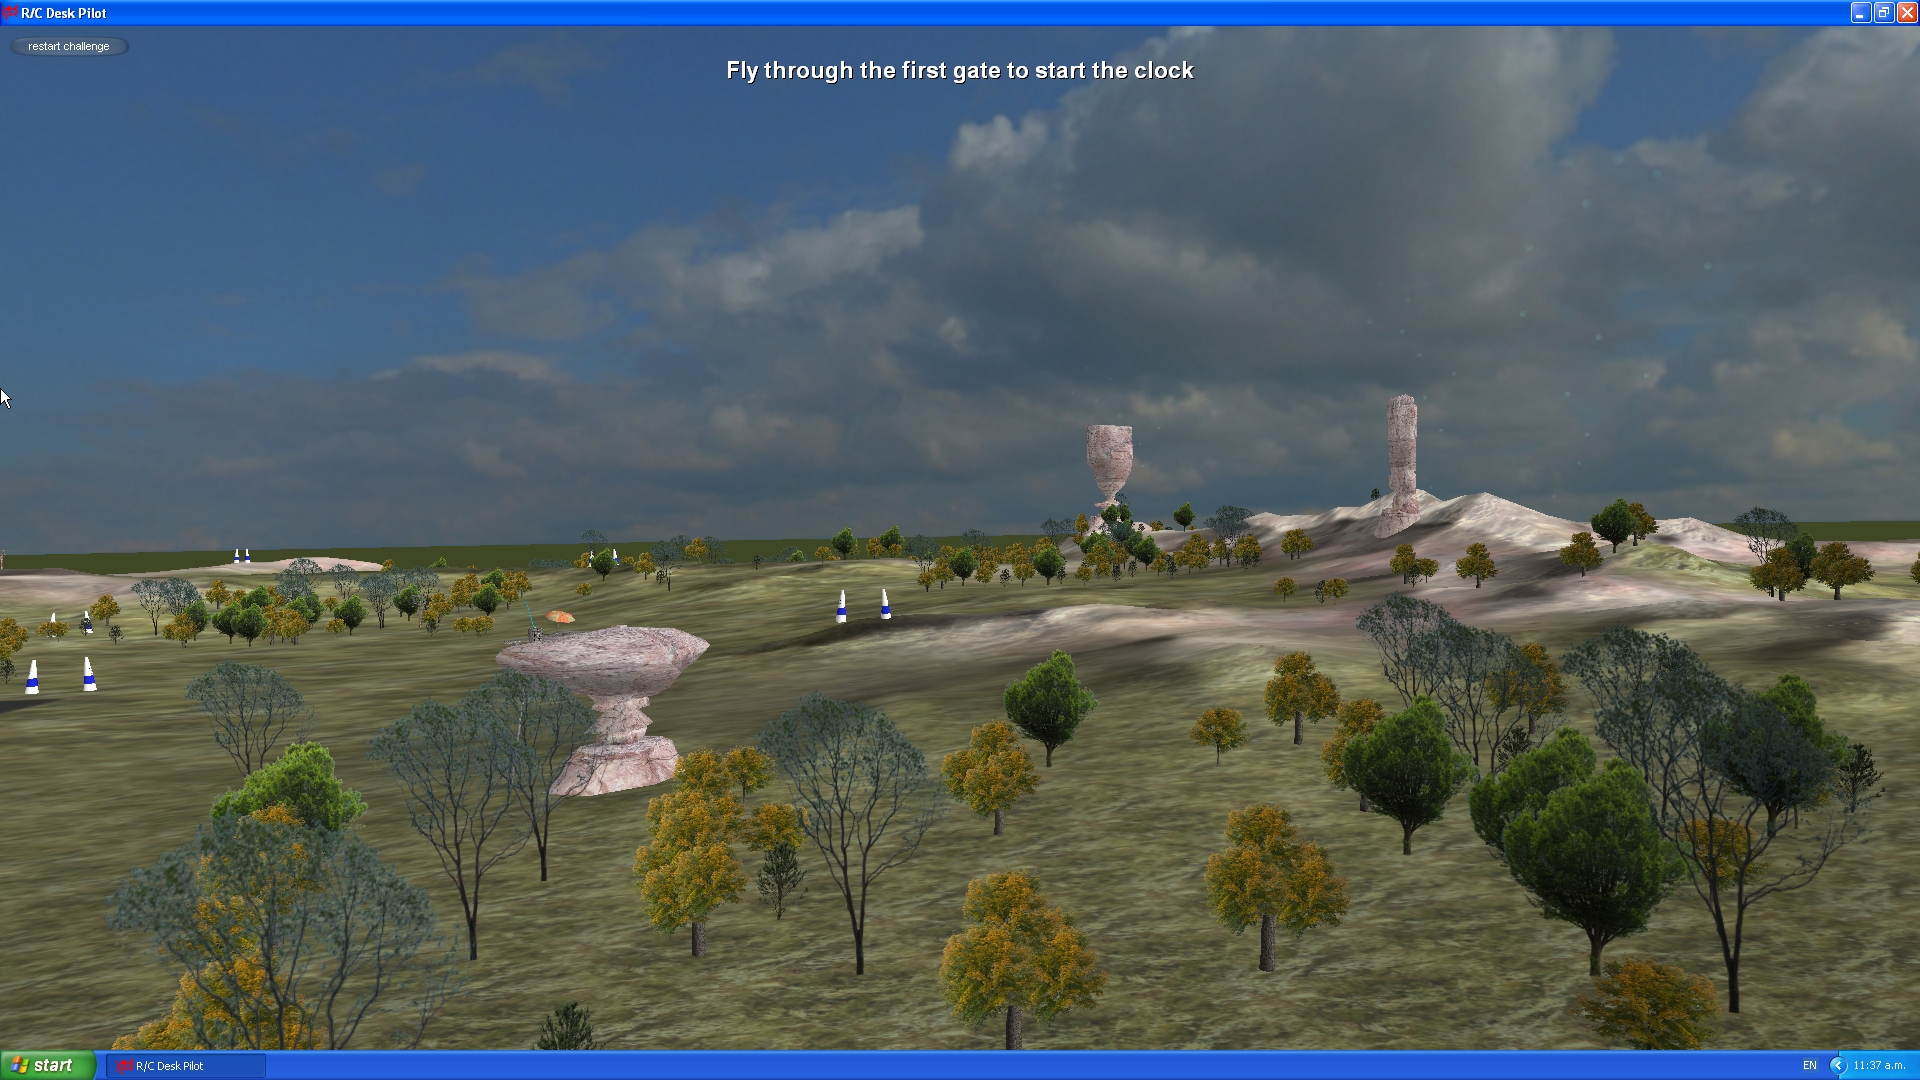
Pylon Races - RCDesktopPilot_Pylonsv2.py
One of the really cool features of R/C Desk Pilot is the challenges, particularly the pylon race. This script takes a .csv file list of coordinates (R/C Desk Pilot Coordinate System) and uses it to generate the locations of the pylon race gates. As with the other scripts, it makes use of the 100 x 100 pixel terrain heightmap. The CSV must contain the start and the end point coordinates which are the same point. The list below is the content of the CSV I provided to the script to generate the gate positions of the pylon race in my Desert Scene.
0,0
-83.01,5.86
-207.03,36.13
-346.68,57.62
-440.43,-12.7
-331.05,-232.42
-20.51,-221.29
330.08,-46.88
403.32,53.71
328.13,127.93
155.27,318.36
207.03,430.66
315.43,453.13
381.84,397.46
278.32,265.63
197.27,123.05
93.75,3.91
0,0
The pylon gate model is called gate.x. It is possible to overwrite this with a new gate model and texture to suit your own personal style. I have done this with my second more whimsical desert scene.
The Tractor
As you will see when you run R/C Desk Pilot, there is a nifty little tractor quietly plowing some fields in one part of the scene. This object is coded into R/C Desk Pilot itself and so cannot be removed as far as I can see. So you will find that the scene you build will include this tractor plowing whatever terrain you give it. Luckily it is very good at following the terrain and so it does not look out of place.
To Finish
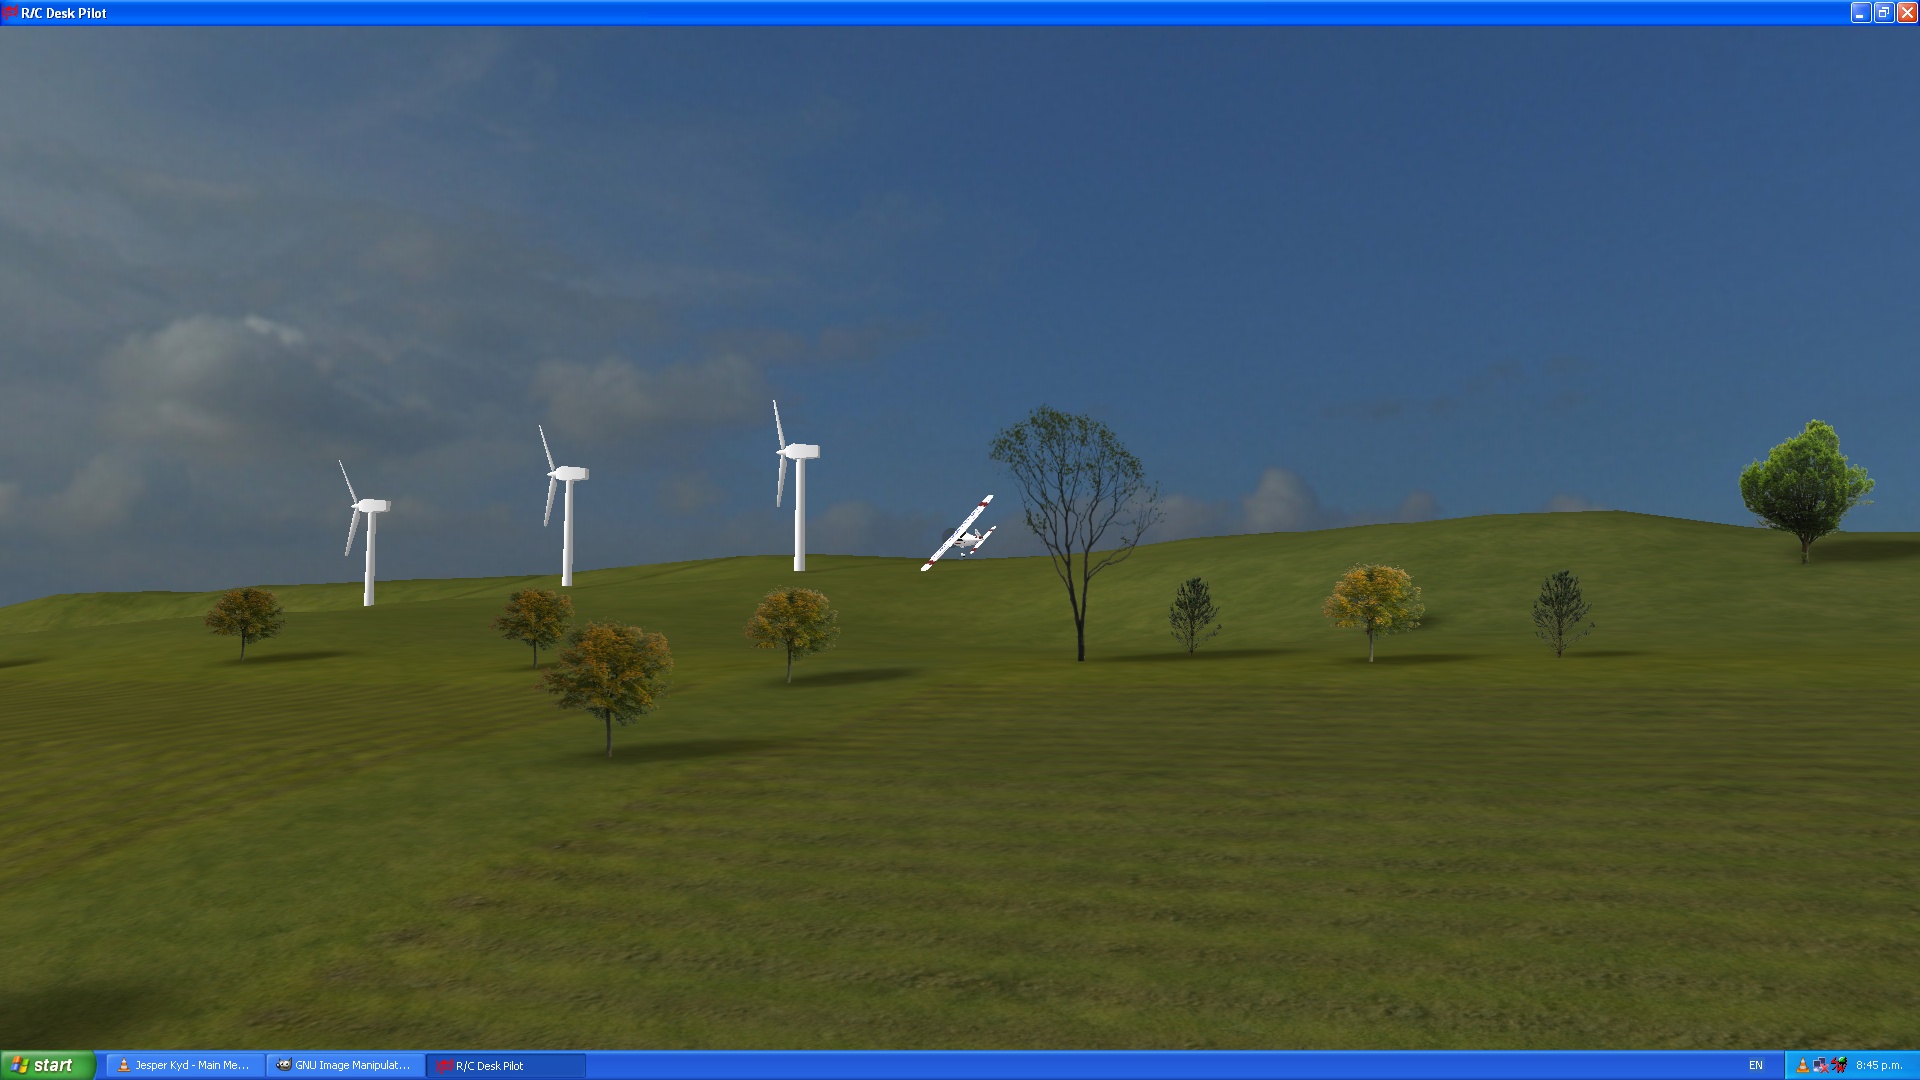
Here is the custom-made scene in R/C Desk Pilot.

Download the Custom Scene here: New Real Estate in R/C Desk Pilot
and also the slightly more whimsical Desert Scene: Desert and Flying Rock
Just unzip this into your R/C Desk Pilot /data/ directory to install it after you have created a backup of your original /scenery/default/ directory. The .x format models and their textures should end up in the /data/ directory. Please note that you can only install and run one scene at any one time. As far as I have been able to tell there is no way of selecting different scenes within the program itself.
The scene includes a new pylon race as well that is best attempted using the FPV view (unless you are some sort of radio control gamer genius and can guess where the plane is when it is out of sight.)
Good luck and have fun.