Steely Taws-No Quitsies

Quite few years ago I was a volunteer mentor at the Naenae Computer Clubhouse teaching Blender and general game design. I decided that a good way to teach the Blender Game Engine so that the kids could produce some really cool games was to make up a game that only used simple logic blocks, and used modular sections that they could reconfigure into new arrangements and new games. Unfortunately the fact that teaching Blender and game development could not be taught within their 30 second attention span meant that nothing became of it.
The game languished in my archives. I dusted it off the other day and got down to designing it as it should be to make it really playable and that meant moving away form the “simple logic block only” approach and making use of python scripts and all of the more sophisticate control that allowed. This page describes the upgraded project and provides downloads of the game.
At this stage the game-play is quite simple, but the essential control elements are all worked out and contained on a small number of game elements that can be easily transferred to other more sophisticated games and puzzles. Now that the basic mechanisms have been worked out, I have created a puzzle based games using this. The puzzle game and its description can be found here: Steely Taws Puzzle Game v1. The puzzle components are detailed on this page: Steely Taws Puzzle Components.. A third edition of the game has also been created and can be found here: Version 3 of the Steely Taws game.
The Inspiration
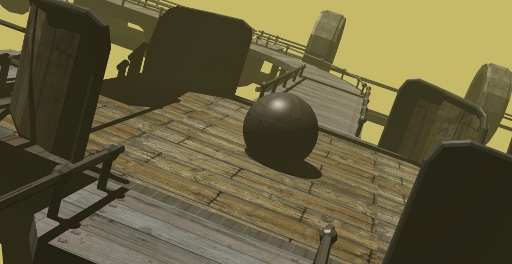
A game demo that inspired me greatly at the time was Switchball. At the time I did not have a web-connected Windows machine and so I was unable to get the full version. Instead I gazed at the screen-shots that were available and decided to make my own instead. I see now that Switchball and another similar one called Ballance are both available on Amazon as CDs.
Here are some shots of Switchball I have gathered off the Internet.

and
Pretty cool eh? So that was what inspired me.
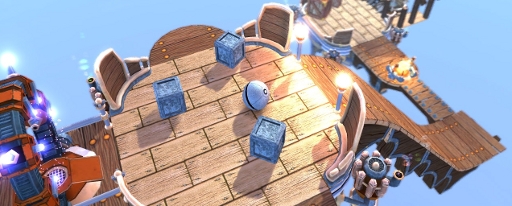
Here is how my basic one looks.

At this stage there is no puzzle element to the game. It is simply a drive-around-the-scene-and-try-not-to-fall-off type of game. The upgraded game was built in Blender 2.58, using the python in the Blender 2.73 API guide, so it will run happily on later versions of Blender.
Steely Taws – No Quitsies – Wassat mean?
I was struggling to come up with a cool sounding name for this game and the working name BallRun was not all that inspiring. My partner suggested that we should see what possibilities existed if we investigated what Marble Game jargon there was. This was after we ran through some quite rude names; “Care for your Balls”, “Don’t Lose Your Balls”, “Dropped Balls”, etc. So we looked up Wikipedia, and found a heap of really weird and wonderful Marble game specific terms, among them were;
- Steely – a marble made of metal which wasn’t a ball bearing.
- Taws – some Northern English marble playing game.
- No Quitsies – some rule about not being able to quit out of the game or some such thing like that.
All of these sounded good to us, and so the game has become “Steely Taws – no Quitsies”.
Downloads
For the impatient, here are the download links for the game.
The Blender file and texture files. You will be able to access the models and reconfigure them to your heart’s content. The download size is about 3Mb.
Download the Blender file and textures here. - BallRunv4_Blender.zip
A Windows Executable version.
A Windows exe version is available for download from Box.net. Just download the zip file, create a new directory and unzip it into that. The .exe in the directory will start the game. It has been tested in Windows XP. The download is about 24Mb. Download it from here - https://app.box.com/s/0bg1ip2it8bwf6qd2hr819ute5ntk75y.
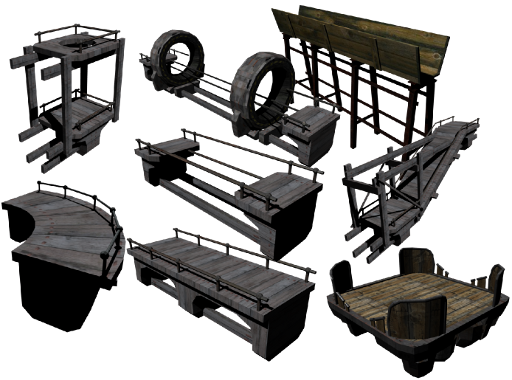
The basic elements of the game are; a ramp, a curved deck, a straight deck, a four way intersection deck, a deck that drops between levels, and a couple of decks with rails which you can fall off. Here is a collage of the components.
Controls
The game is purely based on applying forces on the ball and so the controls are very simple.
Getting the same started.
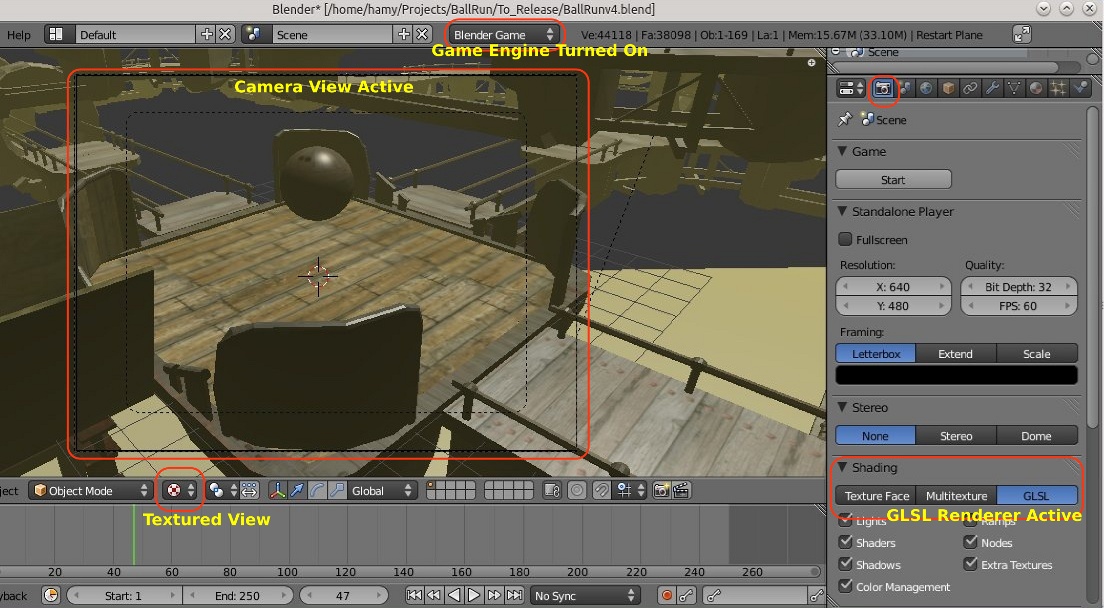
Assuming you have downloaded the Blender file and Textures rather than the executable, you will need to switch to the Blender Game Engine as the renderer, turn on the Textured View, configure the game for GLSL materials, and make the active view to be from the camera (numeric Keypad “0”). Maximise the window and hit “p” to start the game. If you are new to using Blender as a game engine, your window should look like this when you are ready to maximise the window and start the game.
Keyboard
The keyboard controls are just the cursor arrow keys. All controls are relative to the view and so forward is away from you, left is to your left etc. This is where the advances are in the new edition of the game. The previous logic block only game could only be set up to use global directions for the forces and so it was constantly a battle for the player to adjust their control of the ball to match the changing view.
Thanks to python this is problem is now fixed. A description of the fix is described in the sections below.
Joystick
The new versions of Blender appear to accept Joystick control much better than the old Blender 2.49 that I was originally using to develop games in. In this new edition, you can use a joystick to control the ball. Again the controls are view relative.
Game mechanisms.
The following section describes the logic blocks and coding used in this Blender Game Engine physics based game.
There are only a handful of objects in this game that include any coding and logic blocks. Everything else is static meshes. This makes it very easy to pull the active parts of the game into other sames that make use of the same sort of gameplay.
The objects of note are:
- The Ball – has Logic Blocks and python modules attached to it for control.
- The Empty object within the Ball – this is a target for the camera and only has logic blocks.
- The Camera – this has some basic logic blocks to help it track the ball.
- The Restart Plane – there is a plane that resets the player should they fall. This has a few special properties, logic blocks, and some python code.
The Ball
Obviously the focus of the game is the ball and so it is the most sophisticated of the objects in the game in terms of control and logic. Because is it a physics based game, all that you do to the ball is apply forces to it. Because the ball rolls and its local coordinates are tumbling all the time the real challenge was making the forces view-relative. This meant introducing some python programming to achieve this.
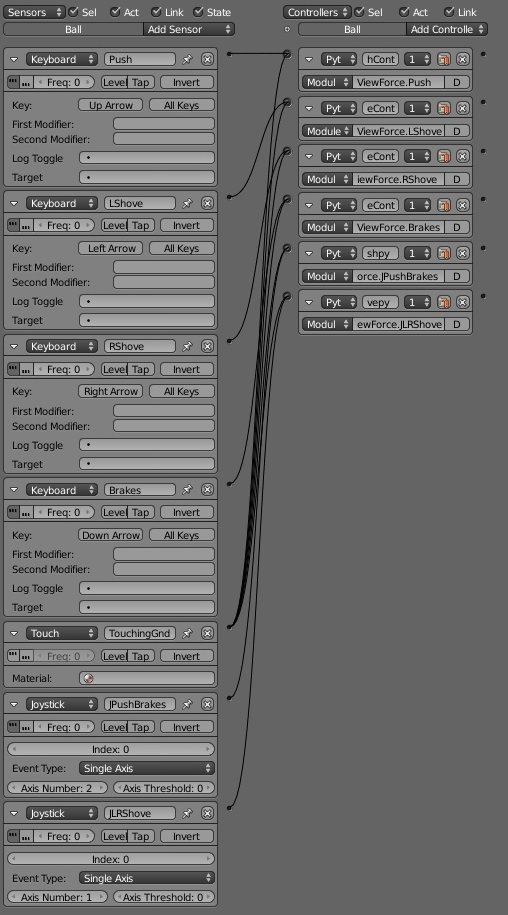
So here is the overview of the logic block side of things. As you can see it was all relatively simple; a set of inputs either from the keyboard or from the joystick, and a Touch sensor to ensure the forces could only be applied when the ball was touching anything. All of these fed to a python module which was used to apply the forces to the ball.

Here is are the logic blocks expanded to show the content. All of them except the Touch sensor were set to provide pulses. On the python controllers the screenshot shows the names of the python modules a little truncated – hopefully when you see the module content it will be fairly self-evident how it works.
The python code for ViewForce.py:
import bge
import mathutils
import math


cont = bge.logic.getCurrentController()
own = cont.owner

#A 90 degree transform matrix about Z looks like
#[0 1 0],[-1,0,0][0,0,1]
mat_rot = mathutils.Matrix(((0,1,0),(-1,0,0),(0,0,1)))


def Push(cont):

    sens = cont.sensors['Push']
    Contact1=cont.sensors['TouchingGnd']

    if sens.positive and Contact1.positive:
        Ball2Cam = own.getVectTo('Camera')
        #print(Ball2Cam)
        Ball2CamVecN=Ball2Cam[1] #pull out the world Vector component
        Ball2CamVecN2D=Ball2CamVecN.to_2d() # This cuts the vector down to just x and y

        #Normalise the vector back to a Unit vector
        Ball2CamVecN2D= Ball2CamVecN2D.normalized()

        #Add 0 into the z direction part of the vector

        Ball2CamVecN3D=Ball2CamVecN2D.to_3d()
        #print(Ball2CamVecN)
        BallForce = -10*Ball2CamVecN3D
        own.applyForce(BallForce,False)
        #print(BallForce)


def LShove(cont):

    sens = cont.sensors['LShove']
    Contact1=cont.sensors['TouchingGnd']

    if sens.positive and Contact1.positive:
        Ball2Cam = own.getVectTo('Camera')
        #print(Ball2Cam)
        Ball2CamVecN=Ball2Cam[1] #pull out the world Vector component
        Ball2CamVecN2D=Ball2CamVecN.to_2d() # This cuts the vector down to just x and y

        #Normalise the vector back to a Unit vector
        Ball2CamVecN2D= Ball2CamVecN2D.normalized()

        #Add 0 into the z direction part of the vector

        Ball2CamVecN3D=Ball2CamVecN2D.to_3d()


        #print(Ball2CamVecN3D)

        #Now make the vector perpendicular
        # around the Z axis, is a 90 degree rotation.

        Ball2CamVecN3D=Ball2CamVecN3D*mat_rot

        BallForce = -10*Ball2CamVecN3D
        own.applyForce(BallForce,False)


def RShove(cont):

    sens = cont.sensors['RShove']

    Contact1=cont.sensors['TouchingGnd']

    if sens.positive and Contact1.positive:
        Ball2Cam = own.getVectTo('Camera')
        #print(Ball2Cam)
        Ball2CamVecN=Ball2Cam[1] #pull out the world Vector component
        Ball2CamVecN2D=Ball2CamVecN.to_2d() # This cuts the vector down to just x and y

        #Normalise the vector back to a Unit vector
        Ball2CamVecN2D= Ball2CamVecN2D.normalized()

        #Add 0 into the z direction part of the vector

        Ball2CamVecN3D=Ball2CamVecN2D.to_3d()


        #print(Ball2CamVecN3D)

        #Now make the vector perpendicular
        # around the Z axis, is a 90 degree rotation.

        Ball2CamVecN3D=Ball2CamVecN3D*mat_rot

        BallForce = 10*Ball2CamVecN3D
        own.applyForce(BallForce,False)


def Brakes(cont):

    sens = cont.sensors['Brakes']

    Contact1=cont.sensors['TouchingGnd']

    if sens.positive and Contact1.positive:
        Ball2Cam = own.getVectTo('Camera')
        #print(Ball2Cam)
        Ball2CamVecN=Ball2Cam[1] #pull out the world Vector component
        Ball2CamVecN2D=Ball2CamVecN.to_2d() # This cuts the vector down to just x and y

        #Normalise the vector back to a Unit vector
        Ball2CamVecN2D= Ball2CamVecN2D.normalized()

        #Add 0 into the z direction part of the vector

        Ball2CamVecN3D=Ball2CamVecN2D.to_3d()
        #print(Ball2CamVecN)
        BallForce = 10*Ball2CamVecN3D
        own.applyForce(BallForce,False)

def JPushBrakes(cont):

    sens = cont.sensors['JPushBrakes']
    Contact1=cont.sensors['TouchingGnd']

    if sens.positive and Contact1.positive:
        Ball2Cam = own.getVectTo('Camera')
        #print(Ball2Cam)
        Ball2CamVecN=Ball2Cam[1] #pull out the world Vector component
        Ball2CamVecN2D=Ball2CamVecN.to_2d() # This cuts the vector down to just x and y

        #Normalise the vector back to a Unit vector
        Ball2CamVecN2D= Ball2CamVecN2D.normalized()

        #Add 0 into the z direction part of the vector

        Ball2CamVecN3D=Ball2CamVecN2D.to_3d()
        #print(Ball2CamVecN)
        PushpullF=sens.axisSingle/4000 #Read the Joystick sensor
        BallForce = PushpullF*Ball2CamVecN3D
        own.applyForce(BallForce,False)
        #print(BallForce)


def JLRShove(cont):

    sens = cont.sensors['JLRShove']
    Contact1=cont.sensors['TouchingGnd']

    if sens.positive and Contact1.positive:
        Ball2Cam = own.getVectTo('Camera')
        #print(Ball2Cam)
        Ball2CamVecN=Ball2Cam[1] #pull out the world Vector component
        Ball2CamVecN2D=Ball2CamVecN.to_2d() # This cuts the vector down to just x and y

        #Normalise the vector back to a Unit vector
        Ball2CamVecN2D= Ball2CamVecN2D.normalized()

        #Add 0 into the z direction part of the vector

        Ball2CamVecN3D=Ball2CamVecN2D.to_3d()


        #print(Ball2CamVecN3D)
        PushpullF=sens.axisSingle/4000 #Read the Joystick sensor
        #Now make the vector perpendicular
        # around the Z axis, is a 90 degree rotation.

        Ball2CamVecN3D=Ball2CamVecN3D*mat_rot

        BallForce = PushpullF*Ball2CamVecN3D
        own.applyForce(BallForce,False)
Yeah I know, it’s a bit repetitive and shows what an amateur I am when it comes to python programming. Too bad!
So what does this script do? Basically each module is more or less the same. The script checks to see that the keyboard or joystick has been activates AND that the ball is still in contact with something. If it is, then it takes the vector between the camera and the ball with the own.getVectTo('Camera') part of the script. This yields a distance, a world vector and a local vector. We are only interested in the world vector so we extract that with the Ball2Cam[1] component.
Now that we have a vector between the Ball and the Camera we can use it to apply View relative forces on the ball. First though, we need to eliminate the z-axis component because we are only interested in applying forces in the x-y plane. There are probably better ways of doing this but I chose to use the following method which converts the 3D vector to a 2D vector using the Ball2CamVecN.to_2d() method, normalising it with the Ball2CamVecN2D.normalized() method, and then popping it back up into three dimensions with the Ball2CamVecN2D.to_3d() method. Now we have a unit vector in the XY plane that points to the camera. This can be used to apply forces back on the Ball.
        BallForce = 10*Ball2CamVecN3D
        own.applyForce(BallForce,False)
Where the 10N force is directed along the Ball2CamVecN3D vector in the appropriate direction to match the control input. The “False” on the end of the “applyForces” method indicates that the forces are applied based on global coordinates.
For those forces applied to the side of the Ball a 90° rotation was applied to vector using the transformation matrix mat_rot. For the joystick parts of the module the analogue input from the joystick was scaled to provide a variable force in the direction of the Ball-Camera vector.
PushpullF=sens.axisSingle/4000
Otherwise the structure is the same as for the keyboard inputs.
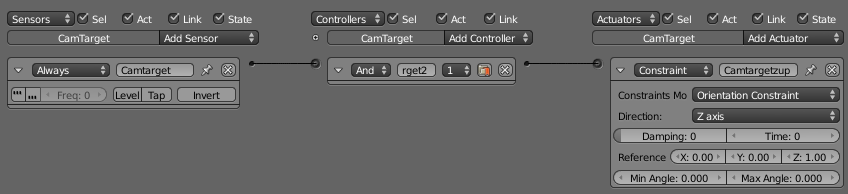
The Empty
The empty is located inside the ball and has the ball as its parent. Its set to have no collisions, and is constrained to stay with its vertical axis in the z-direction.
The empty was added to be something other than the ball that the Camera could track. I had found that when I had the camera tracking the ball there was a sort of nodding motion to the view which was a bit annoying. Adding this empty as a camera target eliminated the problem.
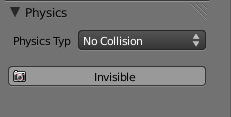
The images below show the logic blocks attached to the Camera Target Empty and the physics applied to it. Because the Empty is invisible anyway, there was no need to turn on the invisibility button under the Physics tab.
and the settings under the Physics tab.
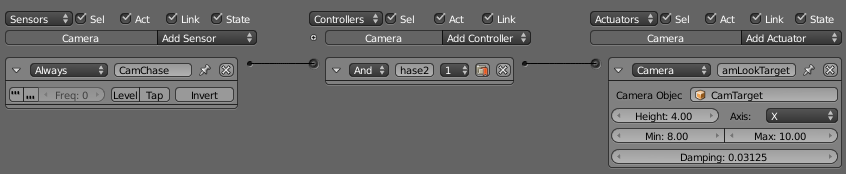
The Camera
The Camera is set up to look at and chase the ball, or more correctly to chase the Camera Target Empty described above. The Axis defines that it will get behind the object it is tracking, and the Height, Min, and Max all define how far away from the object the camera will stay.
The Reset Plane
Underneath the area where the action happens there is a wide plane which is set up to return the ball to the starting position should the ball fall over the edge of the geometry they are supposed to be moving about on. This saves the player having to restart the game each time they fall over the edge.
One method of approaching this is to use a logic block that restarts the game. I found that this was quite slow and interrupted the game play. The method described here relocates the ball back to a point above the original starting point and gives it some downward velocity. This process is very fast and does not interrupt game play. It also means that scores can be added at a later stage because the game is not being reset each time. The Camera Target Empty and the Camera are both associated with the ball and so when the ball is relocated the Camera Target Empty is also relocated. The Camera zips back to get back into position behind the ball, which gives a rather nice starting view angle.
In order to achieve this functionality a Python Script was required. Below shows the logic blocks used. As you can see the plane had a simple touch sensor on it which activates the python script. The plane was also set to be invisible in the Physics tab.
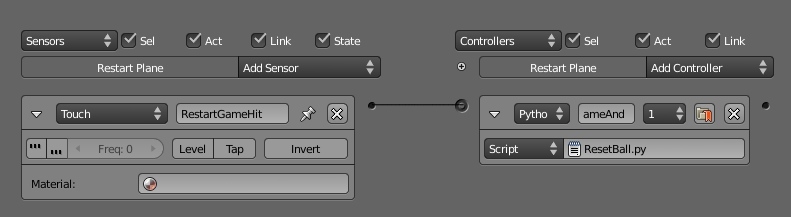
Below is the python code attached to the Reset Plane.
import bge
import mathutils

cont = bge.logic.getCurrentController()
scene = bge.logic.getCurrentScene()
own = cont.owner

ResetPozn = mathutils.Vector((0.0,0.0,8.0))
Zoom = mathutils.Vector((0.0,0.0,-6.0))

sens = cont.sensors['RestartGameHit']

objList = scene.objects

BallThing = objList['Ball']


if sens.positive:
    BallPoz = BallThing.worldPosition
    #print(BallPoz)
    #print(ResetPozn)
    BallThing.worldPosition=ResetPozn
    BallThing.setLinearVelocity((Zoom),False)
When triggered by the ball touching the plane, the script takes the ball back to the 0,0,8 position in the Global Coordinates and gives it a downward velocity of 6m/s.
The Downloads Again
Just in case you missed the links the first time here they are again.
The Blender file and associated Textures (3Mb download): Download here. - BallRunv4_Blender.zip
The Windows Executable version (24Mb Download): Download here. - https://app.box.com/s/0bg1ip2it8bwf6qd2hr819ute5ntk75y

Note:
The game presented here by Hamish Trolove is licensed under a Creative Commons Attribution-NonCommercial-ShareAlike 4.0 International License.

Apart from the Switchball images all images and artwork presented on this page are Copyright Hamish Trolove 2015.