Using Photographic Backgrounds in Blender

I have been quite keen to do some renderings of what the Planet Installations might look like for the Solar System model project. I have some photos of the different proposed locations and so by modeling some items to go at each location in Blender I hoped to be able to simulate what it really might look like.
Looking around the web to find out how to do it, I found plenty of hints and tips about getting images into the background of the working windows to act as reference material, and some on getting images into the background of a rendered image but nothing that brought to two together, so here is a rough tutorial on setting up a model to render over a photograph and make it look like the model kind of belongs there. Obviously the model and the photograph have nothing to do with the Solar system model.
This tutorial uses Blender 2.71.
There are four main stages in the process.
- Adding the image to the background of your working window so that you can match the camera orientation.
- Adding the image to the background of the rendered image.
- Adding shadow-catchers.
- Changing the lighting and shadows to match the image.
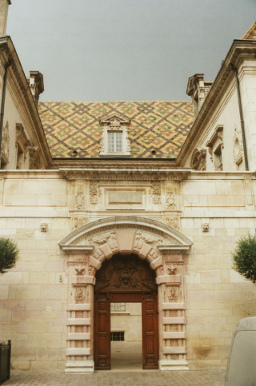
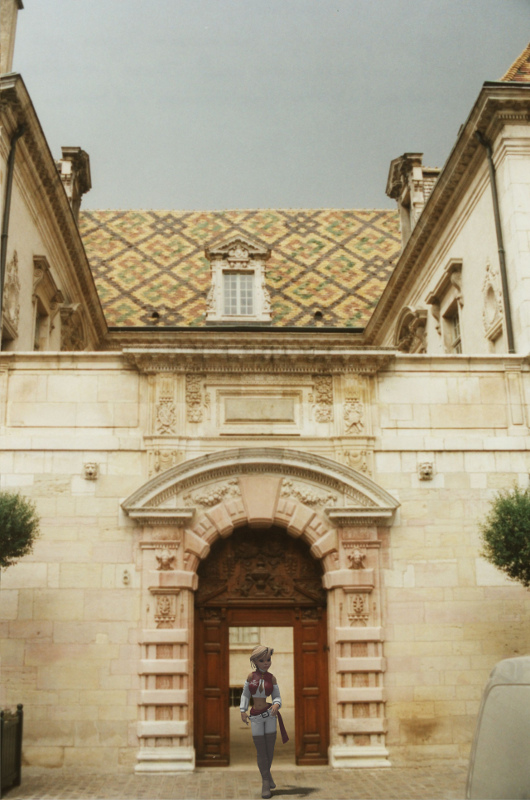
To start with we have a model to work with and in this case it is “The Girl 4” from Daz. The background photo is of a place in Dijon and should fit with the style of the clothing the character is wearing – well … a little bit anyway.

Background Image in the Working View
To add the background image to the working view hit “n” to bring up the view properties. Down near the bottom you will find a menu item called “Background Images” with a tick box.
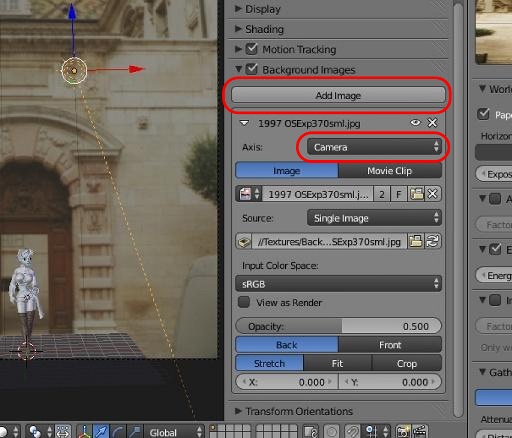
- Tick the box, and hit the “Add Image” button.
- Find your image by clicking on the folder icon and navigating to it.
- Under the Axis drop down you will find “Camera”. Select this.
- Switch your view to the Camera and you will now see your image in the background.
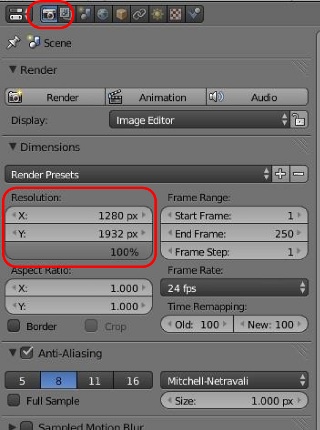
The image may be distorted. If this is the case, see what the pixel size of your image is, and then go to the Render tab (the little camera icon) under the Properties menu (that’s the panel on the right hand side of the working windows of the default layout.) Adjust the X and Y resolution to match your image. The distortion should be gone.
Background Image in the Rendered Image
To add the same background image into the Rendered Image, go to the World tab under the Properties menu and then click on the Texture tab directly. This will allow you to assign your texture to the World rather than to a material.
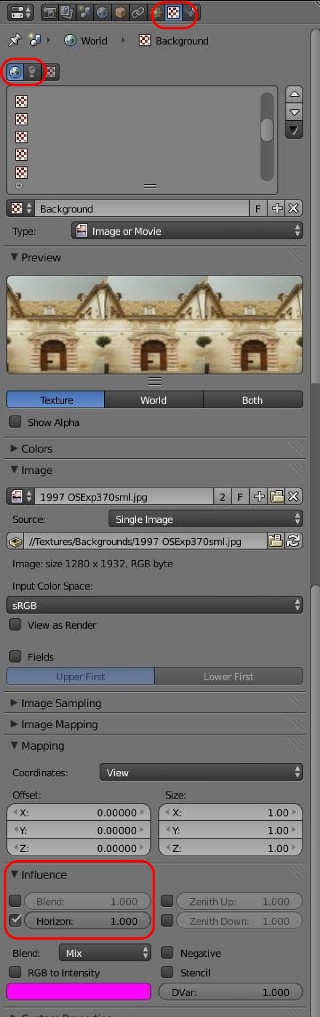
- Load up your image in the usual way.
- Under the Influence menu item “untick” the “Blend” and tick the “Horizon”.
- Back in the World Tab go down to the menu item “World” and tick “Paper Sky”.
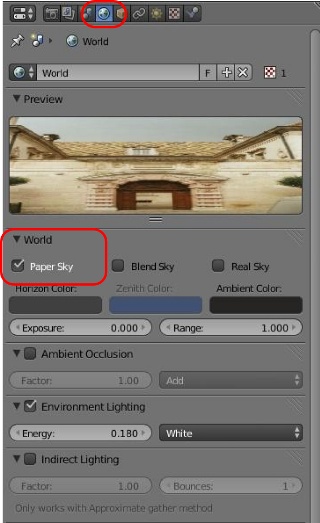
The image is now where it will render along with your models.
Adding Shadow Catchers
In order for your models to look like they belong in the image they need to be casting shadows and be subjected to lighting conditions that match the photo.
As with most modeling and animation packages Blender has a way of setting up objects in a scene so that they do not render but they will catch shadows from modeled objects. In this simple example the character is walking on a flat surface so the only extra geometry needed in the model is a plane to catch the shadow she casts. This will make it appear that the character is casting a shadow on the ground in the photo. With a more complex scene so the extra geometry can be more complex to ensure the shadow the characters and objects case is correctly shown on the final image.
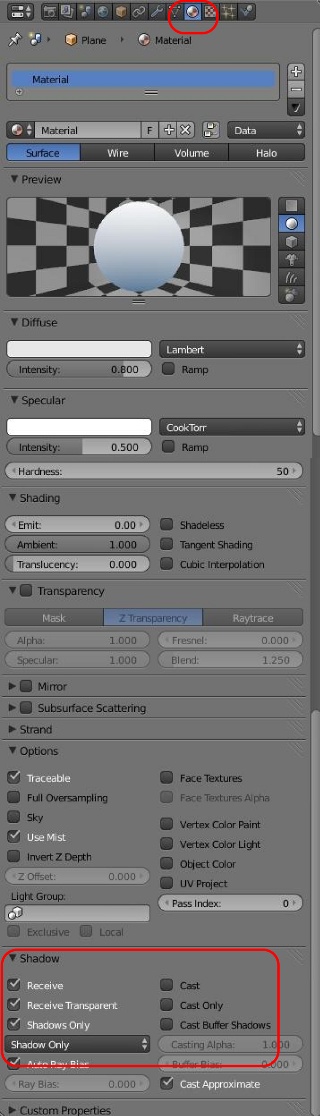
On the ground plane that has been added, create a new material. Don’t worry about any other settings on this material. The only ones we need look at are under the Shadow menu item.
- Tick the Receive Transparent Shadows (if you have any transparent materials in your renderable model).
- Tick the Shadows Only button and select “Shadows Only” from the drop down below the tick box.
- Untick the Cast Shows button.
Now if you render your image the character or model is rendered against your background and casts shadows on the image. You will need to match the models position to the background of course. Now all that remains is to sort out the lighting. This is a bit of a dark art and there are others around who are vastly more skilled at it than me, so if you are after a really spectacular lighting guide you will need to turn to your favourite search engine.
Lighting and Shadows
Anyway here is my basic method - please correct me if there is a better way. Look at your background image and decide where the light sources are in relation to the model. Adjust their direction, colour and energy to suit the conditions.
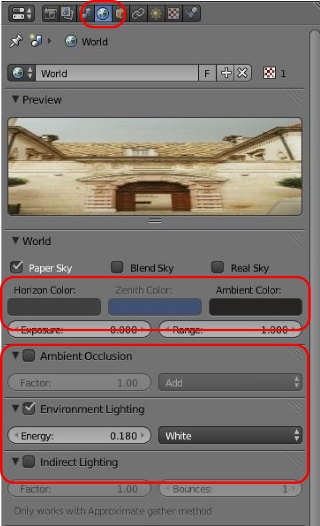
Use the Environment Lighting under the World tab to match the general ambient light. It may even pay to use the eyedropper tool attached to the colour selection window to take a sample from your background image to use as a starting point. Use extra lights to simulate the light coming off highly reflective surfaces.
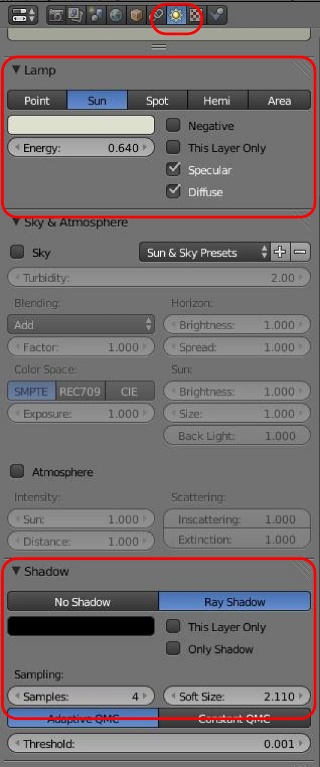
In the case of this picture there was some shadow cast by one of the trees, so I used that to estimate the direction of the sunlight, and also give me an idea of how diffuse the light was. This told me that I needed to soften the shadows.
You will see under the properties menu for your sunlight that there is a section on shadows. By playing around with the number of samples and the Soft Size I was able to get a similar level of softness to the shadow cast by the character as the tree was casting in the photo. The colour swatch here also allows you to change the colour of the shadow. In this case I left it black but in theory I should probably have tweaked it to a bluish black to simulate the effect of the skylight.
A little Ambient Occlusion in the image can give a subtle bit of depth as it deepens the shadows where objects are very close to each other. The Ambient Occlusion control is found under the World tab. Although not shown on the images of the dialogues I set this to Multiply.
And that is pretty much it. Here is the final rendered image. Admittedly the shadow could be slightly lighter to better simulate the greater ambient light from the pale walls, but it gives you an idea of what is needed to put modeled elements into a photographic background.
Some Backgrounds to Download
If you are looking for some background images to use in your own scenes, you can find a bunch of them in the Texture Galleries page.