A 3D Printed Flying Saucer

In a sudden fit of creativity, I decided I needed a flying saucer. A little one. A big one would be nice but I don’t have anywhere to park it. This sudden desire to design and build a little flying saucer was probably a result of too much time 3D printing various sci-fi themed projects together with having run a bunch of stop motion animation workshops as part of my contract developing STEMM programs for the local libraries.
About the Flying Saucer.
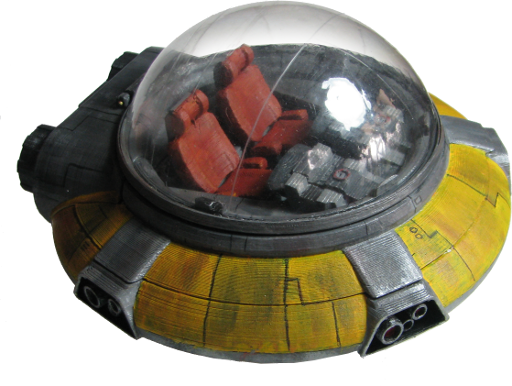
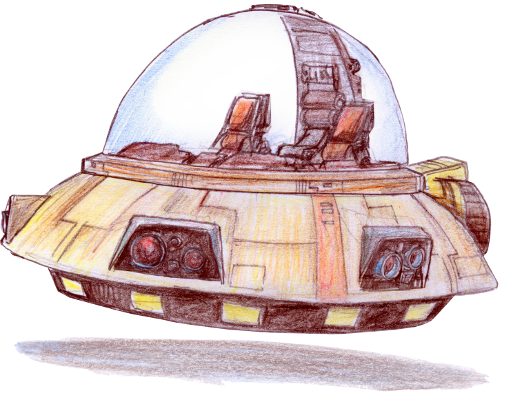
It is a two seater with, admittedly, limited cargo capacity but featuring the latest in styling! Just look at the fancy wrap around control panel with a fully digital system management display inset into an exactingly curved dash that contrasts stunningly with the blocky structure used elsewhere.
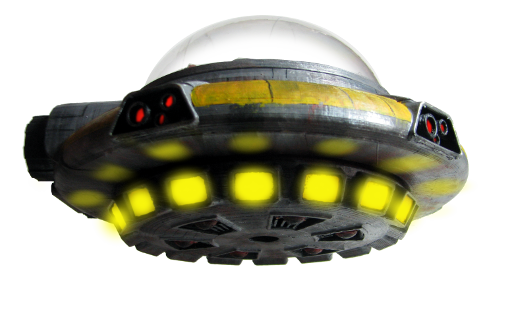
Getting down to the good stuff, the perimeter is punctuated by five sensor ports fitted with the latest sensors for detecting things. The tail end is also fitted with two large and excitingly retro styled thrusters for boosting the vehicle along at a worryingly reckless speed. In order for any flying saucer to levitate and make spacial jumps, it needs a Spatchcock Flange. This little vessel features a fully external Spatchcock Flange allowing the gravitational distortion to achieve a very uniform enclosure of the ship.
A bit about Spatchcock Flanges
The diagram below shows a variety of other flying saucers pointing out the different locations and styling of the Spatchcock Flange. The absence of a Spatchcock Flange is a sure way of identifying fake flying saucer images.
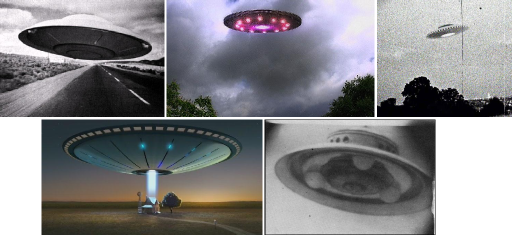
A variety of flying saucers. Can you identify the hoax? Yes, it is the one that looks like a hubcap that doesn’t have any glowy bits.
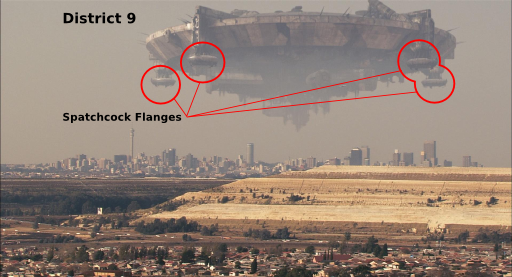
If you have read any of Dominic Green’s “Ant and Cleo” series you will already be familiar with Spatchcock Flanges and the common components of flying saucers. While Green’s general descriptions are excellent, he has taken some liberties when he describes the time distortion effects around old and damaged Spatchcock Flanges. In reality there is no such effect. Approaching a damaged Spatchcock Flange will not cause you to regress to being an infant or any other problems associated with chrono-leakage. Most of the gravitational distortion effects from the operation of a Spatchcock Flange are from a directed Norff-Effect where coupled quantum pairs are independently acted upon by an intense magnetic flux. These induce an out of balance excitation on the pair. The forced mismatch in the states of the members of the quantum pair is expressed as a controllable gravitational distortion. Typically a flying saucer will only require a single Spatchcock Flange. In the case of very large flying saucers several Spatchcock Flanges may be required. An example of this is the “Prawn’s” mothership that features in “District 9”.
Inspiration
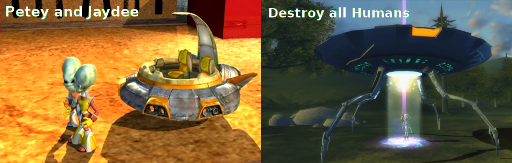
The inspiration for this model was a small flying saucer that featured in the particularly messy “Petey and Jaydee” videos. A small flying saucer model designed to be flown by a small character who was interacting with the human-size world was an appealing idea for a simple stop motion animation exercise. It had been a toss up between something like Petey and Jaydee’s flying saucer and Krypto’s from “Destroy all Humans”. In the end it was the mini-like style of Petey and Jaydee’s that determined the design direction I followed.

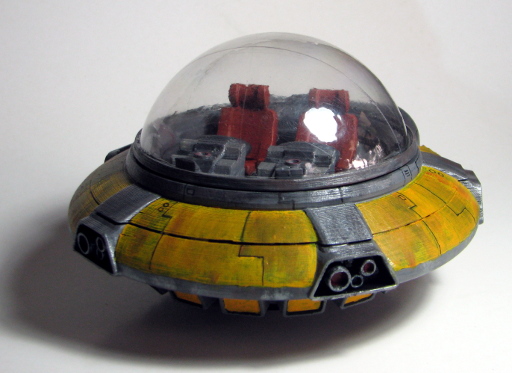
The final size was dictated by the size of dome I could obtain or create. As it happened I was able to make a reasonable 125mm diameter dome. I have described the process here: Vacuum Formed Thin Plastic Domes
The design was done in Blender. The original .blend file is included in the zipped up model files linked later in this project description.
The finished model was assembled using an epoxy resin. A thinner and slightly flexible craft glue was used to hold the dome on the windshield ring. So that the windshield can be opened, the windshield ring is pinned at the back with a short rod of about 1.5mm diameter. There was a bit of drilling required to get this installed and the holes aligned properly. The five small detailed bits in the recesses around the perimeter of the saucer cover holes where dowels can be inserted to support the model when “flying”. I used bluetack to hold these in place so they could be removed when access was needed to the dowel sockets.
A nut is embedded in the underside of the flying saucer body and the Spatchcock Flange is screwed into this so that it can be turned during animation. A dot of glue was applied to end of the screw before it was threaded into the nut, to prevent from it loosening when the Spatchcock Flange is turned.
It was painted using the paint combinations described in my article on painting 3D Printed miniatures. The base coat was a black metal etching primer, while the coloured coats were various water based enamel housepaints and student art paints.
Printing
I printed the model on our Ultimaker 3D printer using the last of a roll of particularly awful yellow filament. The colour was fine, it was just a poorly performing filament. Printing went pretty smoothly except for when it came time to print the main body of the flying saucer. It was going to be a long print and as I had arranged to meet my partner for lunch I decided to leave the printer doing its own thing. It had been printing well all morning, so I felt it likely that things would run along nicely while I was out. Apparently Murphy turned his eye to it about fifteen minutes after I left the house. When I returned the whole spool had been dragged up to the printer and the filament in the feeder was now thoroughly chewed as it continued to print nothing but air. Damn!
So, I quickly booleaned the digital model of the flying saucer body at the level printing has stopped to produce a new model that was the unprinted part of the saucer body. I printed this off and then glued it to the bottom bit. It is not a great solution, but I wasn’t about to trying printing it all again.
Where to Find the Models
On the off chance you’d like to print out your own edition of this model, here are the two locations where you can find them.
Right here on this website: FlyingSaucer-Blender.zip and FlyingSaucer-STLs.zip
From Youmagine: Youmagine: flying saucer for stop motion
The zip files contain the .stl models as well as the Blender file. I used Blender 2.58, and so it will be able to be opened by all but the really old versions of Blender.

Bill of Materials
- 6mm diameter machine screw
- Nut to fit 6mm screw
- Ashort length of 1.5 – 2mm metal rod. (A section of small nail would do)
- Hemisphere with a diameter of 125mm cut down to an opening size of 115mm diameter. The best idea is probably to see what you can find and then scale the model to suit.
3D printed bits:
- FlyingSaucerv3a-base.stl – aka the Spatchcock Flange. 1 of these.
- FlyingSaucerv3a-Detail.stl – detail inserts to go into the perimeter openings. 5 of these. Do not glue in place.
- FlyingSaucerv3a-Nozzles.stl – the exhausts. 2 of these.
- FlyingSaucerv3b-body.stl – the main body. 1 of these.
- FlyingSaucerv3b-Console.stl – the control consoles. 1 of these.
- FlyingSaucerv3b-EngineMass.stl – the back end of the main body. 1 of these.
- FlyingSaucerv4a-CanopyRing.stl – The dome fits into this. 1 of these.
Have fun with this.


This design by Hamish Trolove is licensed under a Creative Commons Attribution-NonCommercial-ShareAlike 4.0 International License.