A Scribus Script to Load Text from a List
As I alluded to in an earlier page on the Inkscape script, I am creating a story telling card game. In order to be focused on creating the content, I wanted to come up with some tools to take a text list and distribute it across a series of pages to make cards and then add a background image to each card. Doing this by hand with such a huge deck of cards is a bit of a chore, and so I developed some scripts to help me. One is for applying an image multiple times to a series of pages, and is described on this page, and the other script described below is for distributing the contents of a text list across the pages. The Inkscape script I had developed for this purpose worked OK, but Inkscape only allows one page per SVG file. This would mean that multiple SVG files would need to be generated to carry all of the cards envisaged. The more SVG files, the more room for errors. A better tool for the job is Scribus, a publishing package that I came to appreciate when when writing newsletters for the Wellington Potters Association. Scribus has python as its scripting language, and despite the documentation I could find being quite patchy, I was able to figure out how to get it to meet my needs successfully. Below is the script for taking a text file and turning each line into a separate text box and distributing them across a grid based on the size of a business card and spread over multiple pages. The script also raises the text boxes to the top layer so that they are above anything else that may be added.
I have designed this script for business card size cards which are 55mm x 90mm. An A4 landscape format page can hold ten of them if the margins are set at 11mm for the sides, and 15mm for the top and bottom. For different sized text boxes it is just a matter of changing the variables w and h to the desired size. To adjust the card size alter the number in the x and y expressions to reflect the margins used, and the new card size. At this stage the text box size matches the card size, but in use for my game cards I shall make the text boxes smaller to allow some space around the edges of the text. The image below shows which constants to change in the script in order to do this. In the illustration, I wanted a smaller text box of 36mm x 36mm located in the centre of each card. To find the rough location of where the text box should appear, sit the cursor on the target location and look at the coordinates at the bottom of the Scribus window.
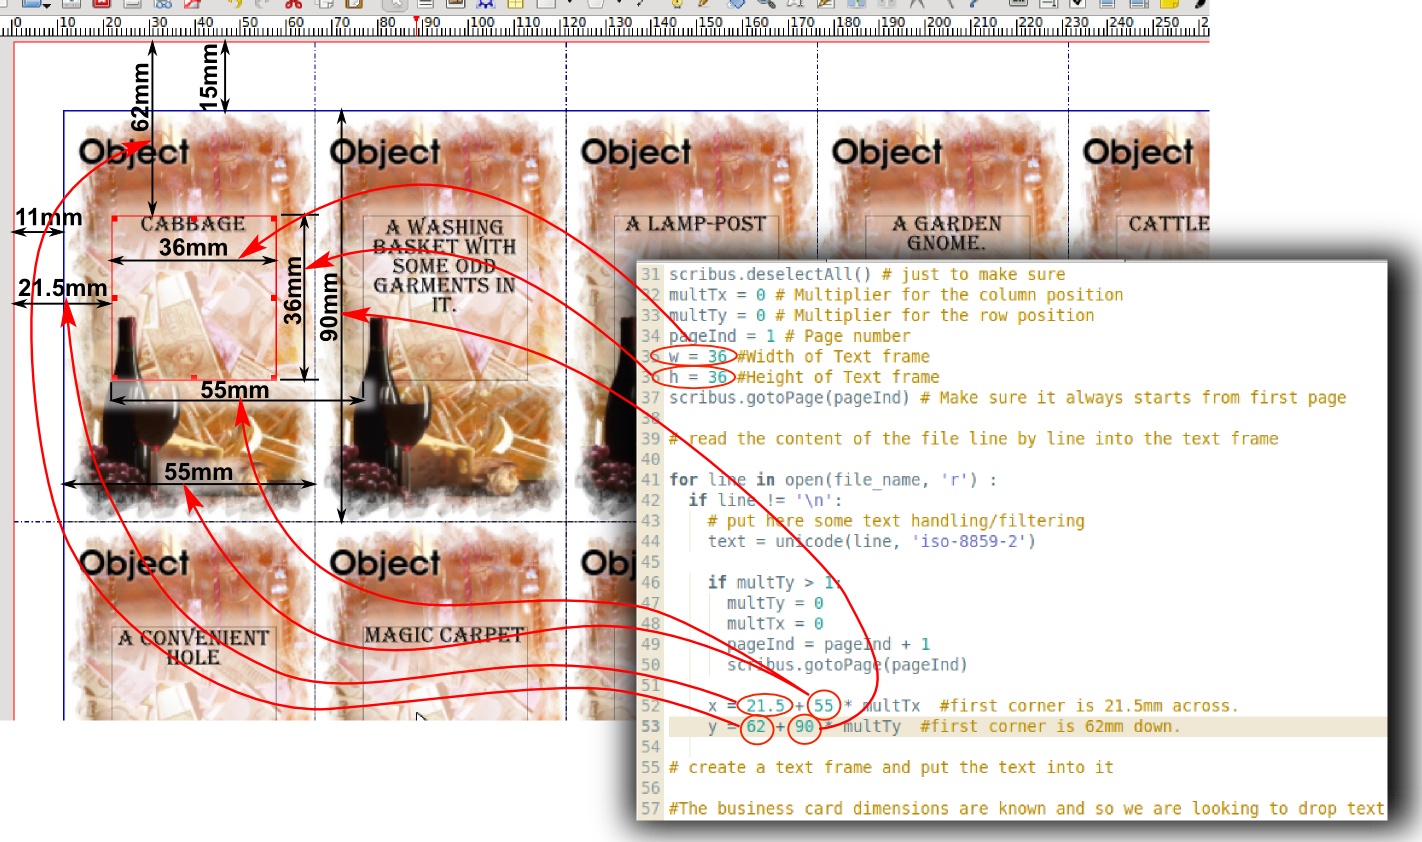
Click on the image for a higher resolution view
Although I have not included it in this edition of the script I see it as being a simple modification to the code to skip all even pages so as to allow space for images on the backside of the cards if it is printed double sided.
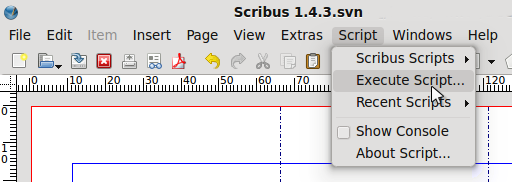
In order to run the script from within Scribus you will need to start a new project with the page format described above and with enough pages in it to contain all of your cards. If you have already started a project and used the background image laying script you can just run this script within that document file to apply the text over the background images. Access the scripts through the Scripts>Execute Script menu item.
You can download the script from here: TXT_to_TextObjectv4.py
The script
#!/usr/bin/env python
"""
this script reads a text file line by line, puts in a
text frame spacing is set up for business card sized cards.
Each line is a seperate text object and spaced across a page
appropriately.
There are 10 cards to a page.

You will need to ensure there are enough pages in your document
to hold all of the cards you generate.

  @author: Hamish Trolove
  @website: www.techmonkeybusiness.com
  @version: TXT_to_TextObjectv4.py
  @copyright Creative Commons - by nc sa

"""

import sys

try:
  import scribus
except ImportError:
  print "This script only works from within Scribus"
  sys.exit(1)

file_name = scribus.fileDialog("Find your TXT file please", "*.txt")

file = open(file_name, 'r')

text = "";
scribus.deselectAll() # just to make sure
multTx = 0 # Multiplier for the column position
multTy = 0 # Multiplier for the row position
pageInd = 1 # Page number
w = 55 #Width of Text frame
h = 90 #Height of Text frame
scribus.gotoPage(pageInd) # Make sure it always starts from first page

# read the content of the file line by line into the text frame

for line in open(file_name, 'r') :
  if line != '\n':
    # put here some text handling/filtering
    text = unicode(line, 'iso-8859-2')

    if multTy > 1:
      multTy = 0
      multTx = 0
      pageInd = pageInd + 1
      scribus.gotoPage(pageInd)

    x = 11 + 55 * multTx  #first corner is 11mm across.
    y = 15 + 90 * multTy  #first corner is 15mm down.

# create a text frame and put the text into it

#The business card dimensions are known and so we are looking to drop text into this size
#Text frame.


    frame = scribus.createText(x, y, w, h)
    scribus.setText(text, frame)
    scribus.setTextAlignment(1,frame) # ALIGN_CENTERED = 1
    scribus.setFont('Algerian Regular',frame)
    scribus.setFontSize(14,frame)
    scribus.setLineSpacing(12,frame)

    scribus.selectObject(frame)
    scribus.moveSelectionToFront()
    scribus.deselectAll()

# Control to index around the page.

    if multTx > 3:
      multTy = multTy + 1
      multTx = 0
      x = 11

    else:
      multTx = multTx + 1
A fun modification to this script can be found here: Python and Scribus Scripts to Deal Story Cards
This script takes the various story element cards and text and generates a random card spread to use for story generation inspiration.