Robotics 1d - mBot Sensors
To go back to the Overview page click here.
To go to The Next Session - Robotics1e - More mBot Sensors
To download this as a .pdf:

A robot will have a tough time if it cannot sense the world around it. The mBot has a number of sensors already onboard which help it respond to things it might encounter as it moves around.
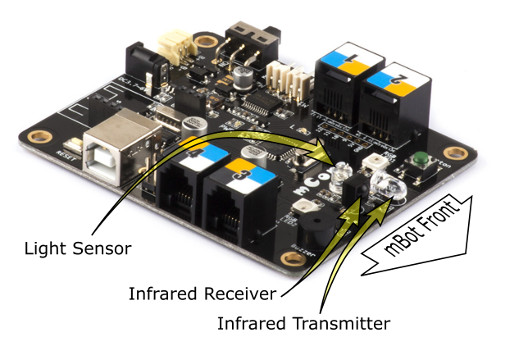
On the mBot main board there are Light Sensors, an Infrared Receiver and Infrared Transmitter for communication between mBots and for receiving signals from the infrared remote.
In the mBlock interface there are code blocks that match each type of sensor in the standard mBot kit as well as extra sensors and devices that can be added.

You will notice that these blocks are all designed to fit where you would put a number in the Scratch operators and control blocks. This means they can be used directly to control program loops, motor speeds, and anywhere else where you might use a number.
Test the Ultrasonic Sensor
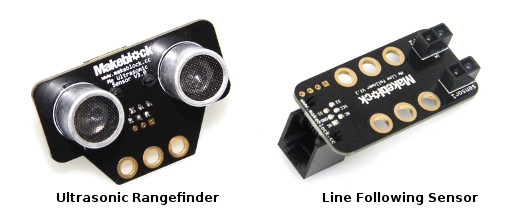
We’re going to focus on the Ultrasonic range finder.
How does it work?
The ultrasonic range finder works by sending out pulses of sound at a very high frequency. The sound bounces off objects and returns to the sensor as an echo. The sensor measures the time between sending the pulse and hearing the echo. Because the sensor knows the speed of sound is 340m/s it can calculate the distance to the object that a sound wave reflected off and report that to the mBot. It is using echolocation in much the same way a bat does.
The sound emitted by the sensor is 40khz. This is too high for us to hear. Our hearing range is typically between 20Hz and 20kHz. A dog could hear it because a dog can hear up to 45kHz. A bat could also hear it because they can hear up to 200kHz. Would it confuse a bat?
The Manufacturers Specifications state that the sensor can do the following;
- It has a measurement resolution of 10mm.
- It has an angle over which it can detect things of 15°
- And it can measure distances between 2cm and 4m
The reading from the sensor is in centimetres.
Setting up a test
To test it we will make use of an extra device we can add to our mBot. We have some nifty 4-digit displays. If you don’t have a 4-digit display, use the onboard LEDs to light up if they detect something at a particular distance.
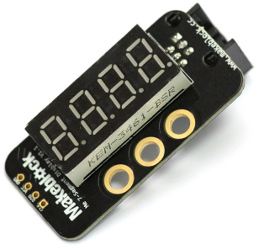
We’ll connect the 4-digit display to Port 1 on the mBot.
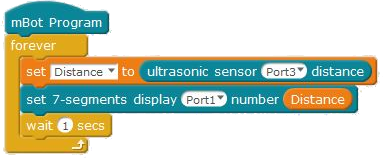
Amongst the mBlock code blocks we can find the following block to interact with the 4-digit display.

Create a simple program to read the Ultrasonic sensor and display the distance it is measuring. Upload this and see that it responds to your hand in front of it. Note: We have created the variable called Distance for holding the reading from the sensor. You can put the distance sensor block directly into the 7-segment display block if you wish. To do this, just drag and drop the Ultrasonic sensor block into the place occupied by the number “100” in the image above.
Let’s test its sensitivity.
Here are some simple tests to try with this arrangement. The 4-digit display will show the distance in cm to the object the mBot is detecting.
- How far away and how close does it detect distances? You may need to point it at a wall to measure longer distances. How does that match the manufacturer’s specifications?
- What is the measurement resolution? Measure how much the sensor reading changes if you move something towards it by 10cm, 20mm, 10mm, and 5mm?
- How big does the object need to be before it can be detected?
- Are there shapes it has trouble with?
- What is the angle of view over which the mBot can detect things?

Do we know more about the limitations of this sensor?
Obstacle Avoidance
Let’s recreate the obstacle avoidance behaviour of the default program. The program requires the following measurements and decisions to be made by the mBot.
Logic for Obstacle Avoidance
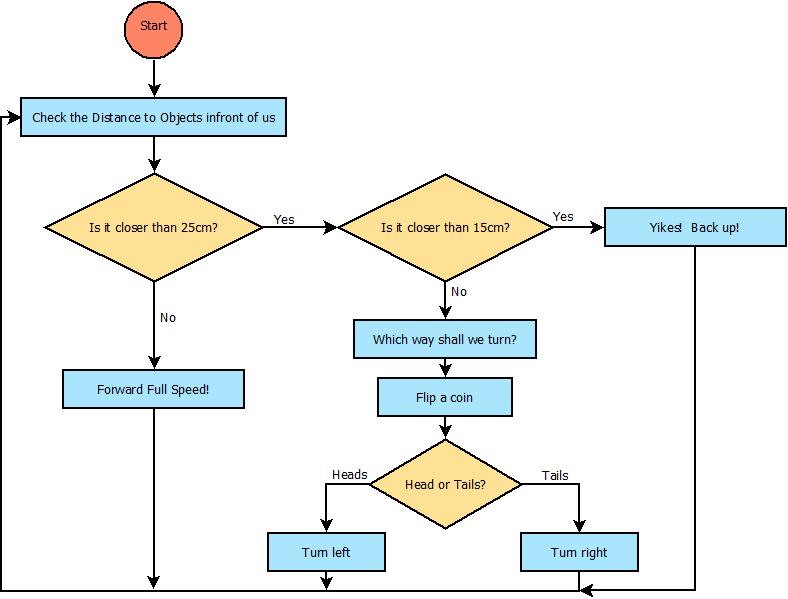
Click on the image for a larger view
Okay so a flow chart like this is really “Old School”, but have a go at using this flow chart’s decisions yourself as you walk around the room.
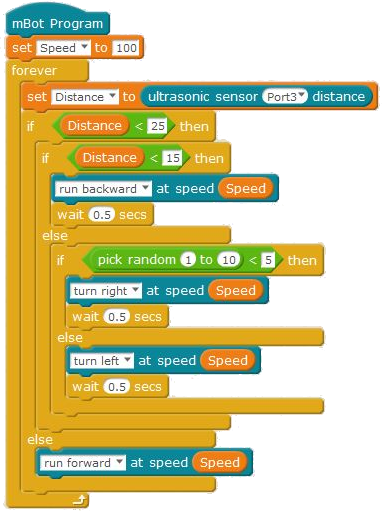
Now try to build an mBot sketch that will do the same. Remember to add in the Wait command to ensure you have sufficient time for the motors to move enough.
Here is one possible solution to the problem.
Your Challenge
Is your mBot afraid of the dark? No? Well it - should be. There’s monsters out there.
Use the on-board light sensor to make your mBot speed up to get out of dark places quickly.
End of this Session
We’re done for this Session
Next time we’ll look at the on-board line-following sensor.
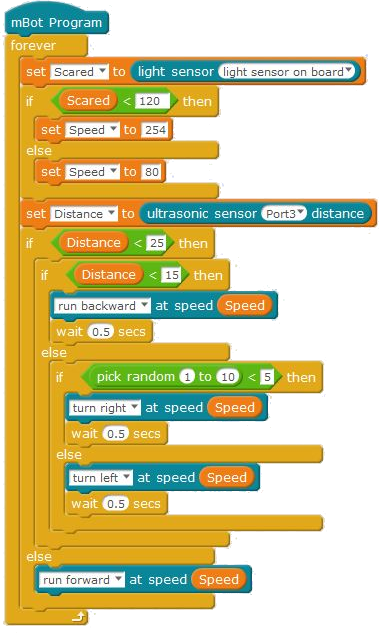
Challenge Sketch
Here is a suggested sketch to adapt the sketch above to make it run faster if the light levels are low.


This document “Robotics 1d - mBot Sensors” by Hamish Trolove is provided under a creative commons license - Attribution, Share Alike.