Robotics 1b - Building an mBot Program
To go back to the Overview page click here.
To go to The Next Session - Robotics1c - Programming a Guided mBot
To download this as a .pdf:

Some prior experience with building programs in Scratch is assumed. You can find some introductory materials here: http://www.mblock.cc/edu/
The mBot Blocks
The mBot has some of its own special Scratch blocks to help is make its way in the world. These include;
- Making the motors run,
- Lighting LEDs,
- Detecting obstacles with the ultrasonic rangefinder,
- Following lines with the line following sensor, and
- Playing tones.
There are a heap of other blocks we can use that allow us to interact with other sensors and actuators we can add to the mbot. Here is the list of blocks available.

Click on the image for a higher-res image.
Connecting to the mBot
When working with robots you will need to connect them to a computer at some point to program them. With the mBots we do this through the USB connection. Because the mBot will immediately start running whatever program is loaded when it is turned on, we will need to stop it running away or doing anything strange. To do this we will use the simple solution of sitting the mBot on some blocks so its wheels can’t touch the ground or turning it upside down. To upload programs to your mBot connect it to one of the USB ports. I would suggest you use the same one consistently to make things easier for yourself in the future. Depending on whether the mBot has been used on that USB port before there may be a delay while Windows figures out what port you have connected to and gives it a name. The names given will vary but will look something like COM4 or COM10 etc.
Start the mBlock software and minimise the “Stage” – that’s the area with the Panda. You can do this with the Edit menu dropdown at the top of the screen.
Turn on the mBot. And be prepared to grab it if it decides to run away. Hopefully it should have its default program loaded and it will beep a little but otherwise behave.
To upload a program to the mBot, select the correct port from the “Connect” menu item at the top of the screen. We are using a Serial connection. Look for COM 10 or similar and click on that.

Click on the image for a higher-res image.
Now use the “Edit” menu item to pull up the “Arduino mode”. From the top menu bar go Edit > Arduino Mode.
On the right hand side of the screen is a button marked “Upload to Arduino”. If we had a program ready to go we would hit this button to begin the upload process. If it fails to work, just try a different COM port.
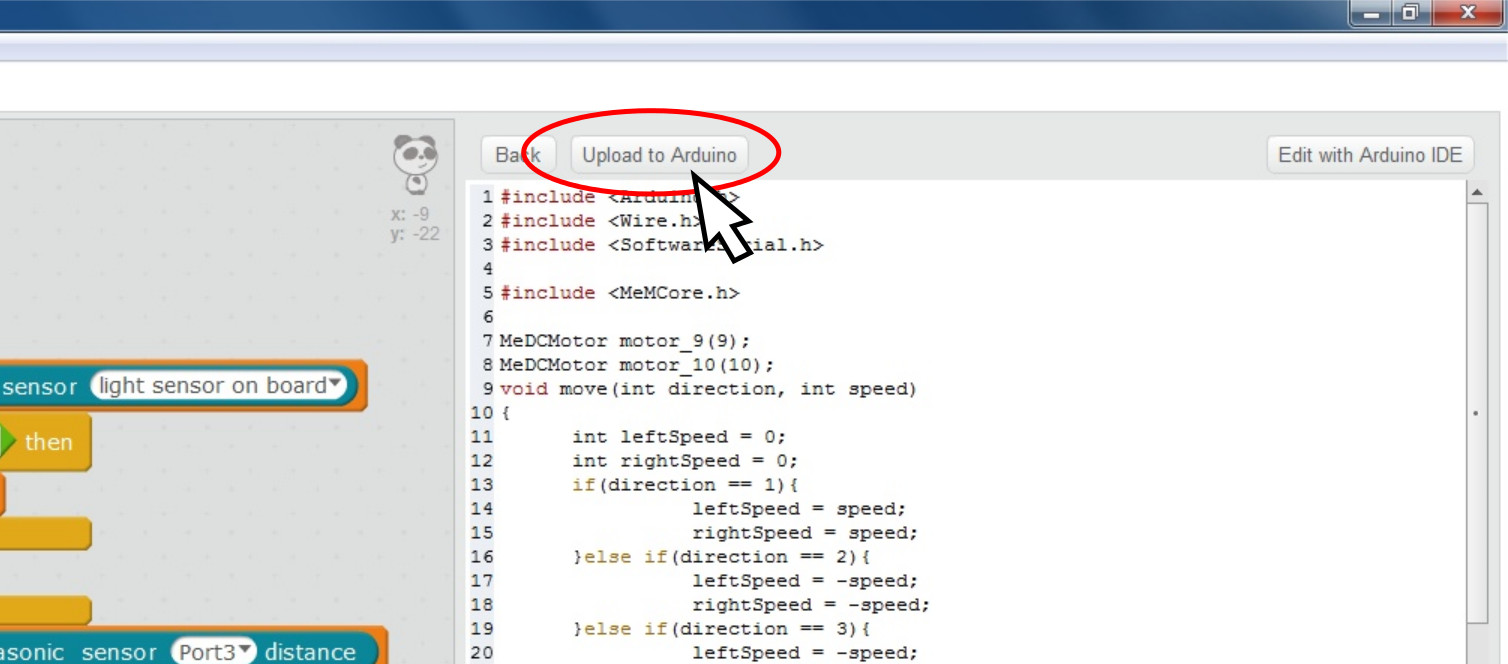
Click on the image for a higher-res image.
Building and Loading a Program
Build your programs using exactly the same drag-and-drop method you use when programming Scratch, but in this case start the programme with the block called “mBot Program” or “When on board button pressed.”

mBot Program: starts the program running as soon as the mBot is turned on. I would suggest if you are going to use this one, add a 5 second delay into the program at the start to give you enough time to put the mBot on the floor before the action begins. You will find a Delay or Wait block in the Control series of blocks in the Blocks Palette in the top left-hand side of the screen.
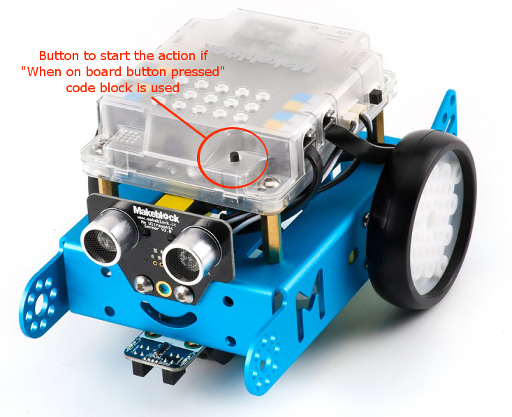
When on board button pressed: Starts the program running when the black button on the front end of the mBot’s top bit is pressed.
Investigating the motors
Unlike computers, robots are physical things and so they do real stuff. In order to understand how our mBot works and what the code blocks really mean we shall do an experiment.
The available Scratch code blocks for controlling the motors are;
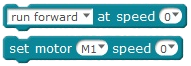
The two blocks above have slightly different functions. Use one or other to achieve the motor control you are after.
The “run forward at speed …” block controls both motors. You can tell the mBot to run forward, run backwards, or turn left or right by using the drop down box. We put a number for the speed into the space at the right-hand end of the block.
The “set motor M1 speed …” block controls one motor only. The motors are called M1 and M2. You can select either motor with the drop down and put a number into the right-hand end space to control the speed.
If we put a number into the space at the right hand end of these code blocks, this will make the motors move at a particular speed, but we don’t know what that speed is. Is a speed of 100 really fast? Note: The maximum speed is 255.
A bit of physics
What is speed? Speed is the distance something travels in a particular time. For example a car travelling at 50km/h goes 50km in one hour.
*Speed = distance ÷ time *
Or

How far does it travel in two hours?
Distance = Speed x Time
Adding meaning to the Speed number
To find out what the speed numbers in our code blocks mean we will write a program to run the motors at a particular speed for a known time and then measure the distance travelled.
The program
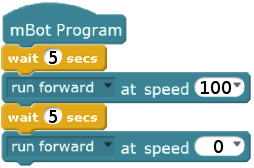
Program the mBot to run at a speed of 100 for five seconds (or less) and measure how far it goes.
Things you will need to include;
- A delay or wait at the start of the program to give you time to put the mBot down somewhere.
- A speed of 0 at the end of the program to stop the mBot.
Things to watch out for: Once you tell the mBot to move with one of the speed blocks it will continue to move until it is told to do something else. This is why we use a wait block after the “run forward at speed X” block. The mBot will keep going at speed X until the time in the wait block is up. If you don’t tell it to do something else (like speed 0) it will just carry on running and you will have to chase it.
Your program will look something like this:
Our results
When the mBot stops moving , measure how far it went in the time you gave it. You can get a real speed from this by using the equation;
Say it went 50cm in 5 seconds, then we can say its speed was

If our speed value in the block was 100, then we know that 100 is the same speed as 10cm/s. So that is an example, use your measurements to find out what the real speed is?
So using the example above, if we want to move our mBot a particular distance (75cm for example) then we will need to run our mBot at a speed of 100 (10cm/s) for a time that we can find through a simple calculation.

So

For our mBot set to a speed of 100 and travelling at 10cm/s it will need to run for 7.5 seconds to cover a distance of 75cm. Try the same calculation with your mBot using the real speed values you have calculated.
Turning
Turning the mBot is simply done by running one motor forward and the other backward. Like the speed problem we don’t know how long we need to run the motors to turn 90°.
You get to the Turn controls using the same block as the “Run Forward at Speed X” but we use the drop down to change it to turn right or turn left.
Do some experiments.
Create a program to make the mBot turn on the spot. See what combination of speed and time achieves a 90° turn.
The bit to make the mBot turn should end up looking something like this;
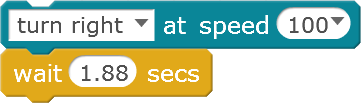
but don’t forget to to set the speed to zero after the wait.
If you want to be fancy, set up a program that tests a number of different speeds and times to see which works best. Separate each test with a “Run Forward at Speed 0” and a wait of several seconds.
When you know the speeds and times, write them down somewhere. We will need them in future sessions.
Done
Well done! That’s us for this session.
Next time we’ll look at creating a program to guide the mBot through a path. We will need our speed and time measurements for this.


This document “Robotics 1b - Building an mBot Program” by Hamish Trolove is provided under a creative commons license - Attribution, Share Alike.