Parametric Railway Turnouts

After having produced the parametric railway straight rails and curved rails models, something nagged at the back of my mind for quite some time. It was the need to produce a set of points or turnouts. I kept putting it off with the promise that maybe I’d just model them directly and that would do. I knew it would be tricky. It was. The tool presented here is not an all-singing-all-dancing turnout, but rather the 90%-of-the-way-there model. The remaining 10% you will have to do with a modelling package or CAD program. The reason for doing it this way is that there are far too many options to try to come up with a truly parametric solution for the pivots and methods of controlling the switches.
The OpenSCAD model presented here produces a left hand turnout. If you need a right hand turnout, all you need to do is create a mirror version of the one produced with this tool using your favourite modelling package or with your slicing software.
In order to produce the complete model you will need to render the turnout rails and sleepers and then render again to produce just the switch arms. There is a variable to select which part you want to render (SwitchBodyYN).
Throughout this article I’ll admit to being a bit loose with the terms “Switch”, “Points” and “Turnout”. This is partly to accommodate the different terms used in the US and the UK. Here in NZ, we call these things “Points.” As I understand it the mobile bit that selects which track is to be used is called the “Switch”, but I could be wrong.
The Variables
The following describes the functions of the variables used. The defaults are set to produce a turnout compatible with my own rail standard. Had I known earlier, I would have made it compatible with the Open Source Railway System. I have used the same variable names as in my other rail models.
Basic Dimensions
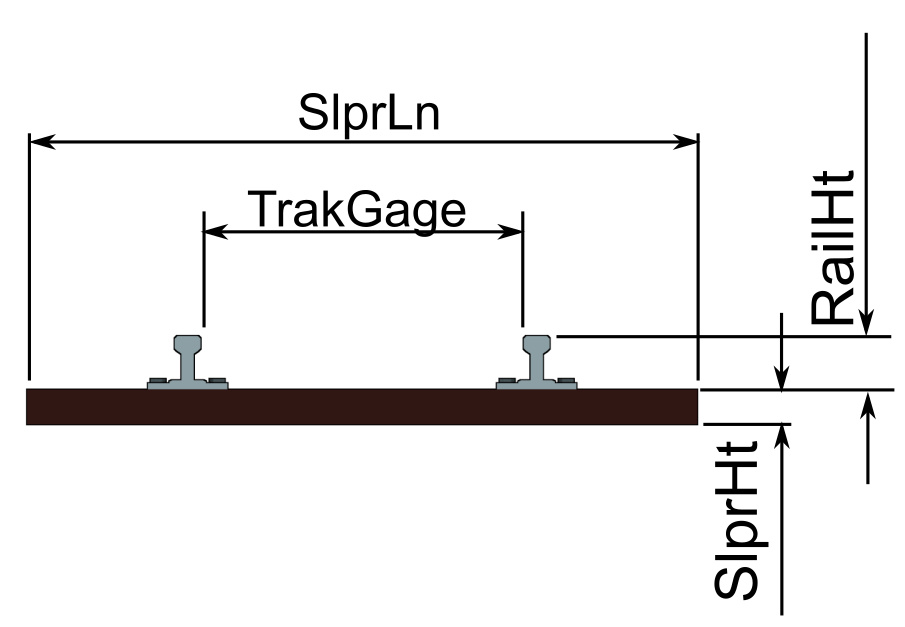
- RailHt: This is the height of the track above the sleeper.
- TrakGage: The gauge of the railway as measured to the inside surface of the rail. The default is 36mm but the Open Source Railways System standard gauge is 32mm.
- SlprLn: Length of the sleeper. The default is 55mm but the Open Source Railway System is 50mm.
- SlprHt: Height of the sleeper. The default is 3mm.
Please click on the image above for a higher resolution image.
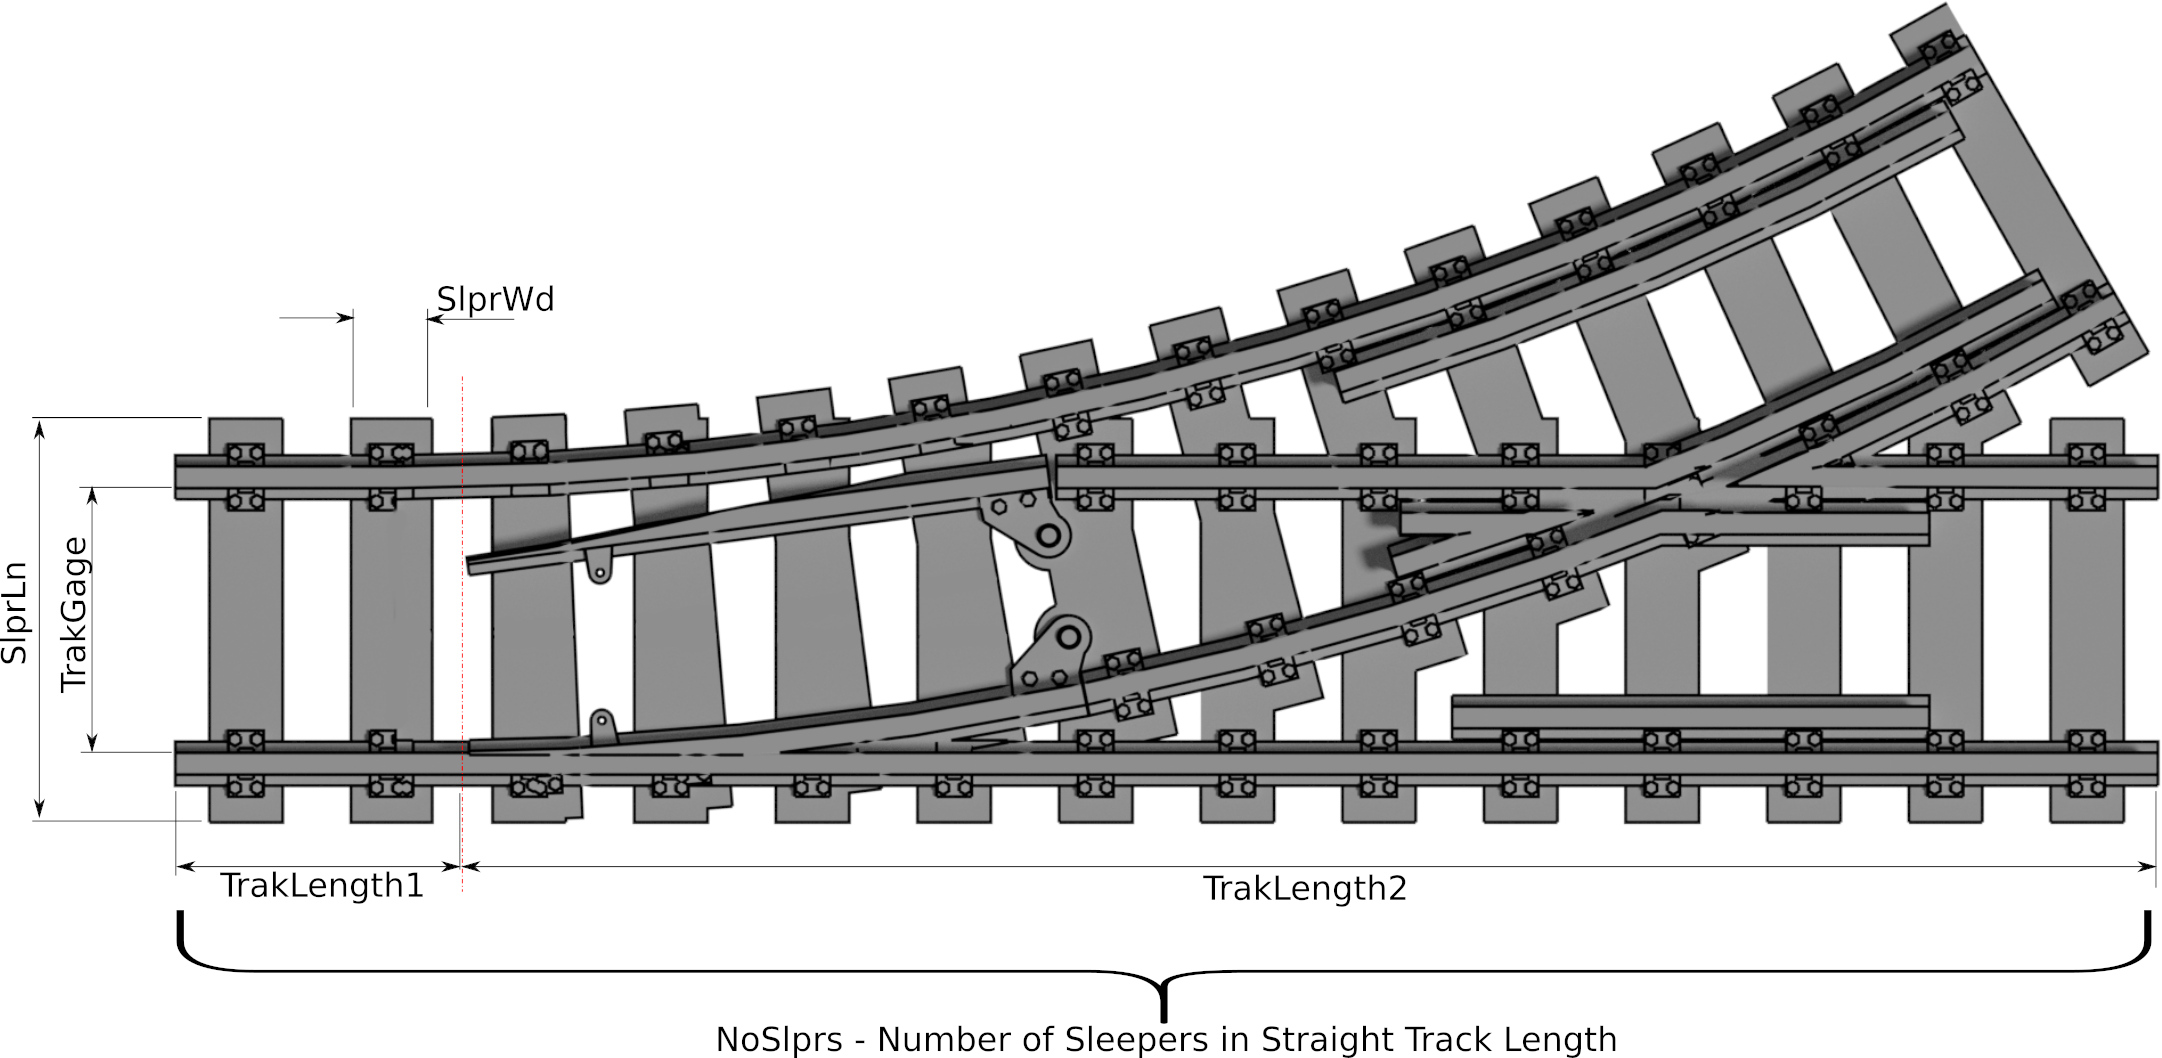
- NoSlprs: Number of Sleepers in the straight section of the track.
- SlprWd: The width of the sleepers. The default is 10mm for both systems.
- TrakLength1: The length of straight track leading into the turnout.
- TrakLength2: The length of the straight section of track from the tips of the switches.
Curved Section Dimensions
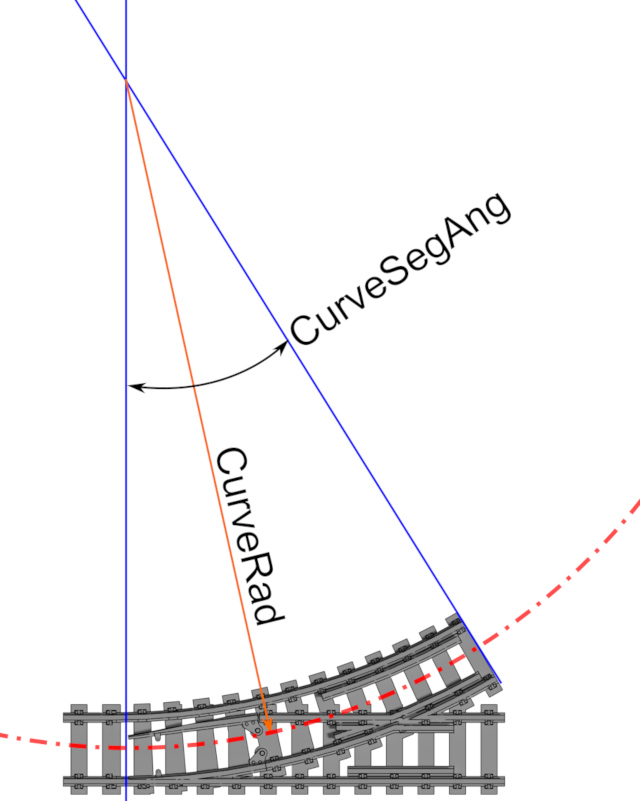
- CurveRad: Radius of the curved section centreline
- CurveSegAng: The angle the curved section covers
Switch and Frog Details
Please forgive me the terms I’m using. Hopefully I’ve named the various parts correctly. The following variables are probably better demonstrated than explained.
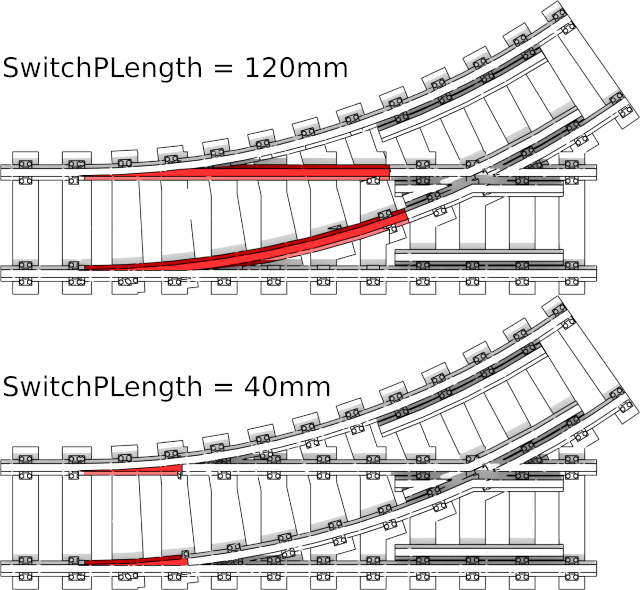
- SwitchPLength: This is the length of the switch arms. There are some trade-offs here so that there is enough room for the wheel flanges to get through. As you can see from the demonstration above, the 40mm length is too short and there is nowhere for the wheel flanges to go through. The longer 120mm long switch arms will work well but may not be a realistic size and may cause problems for fitting in the pivots.
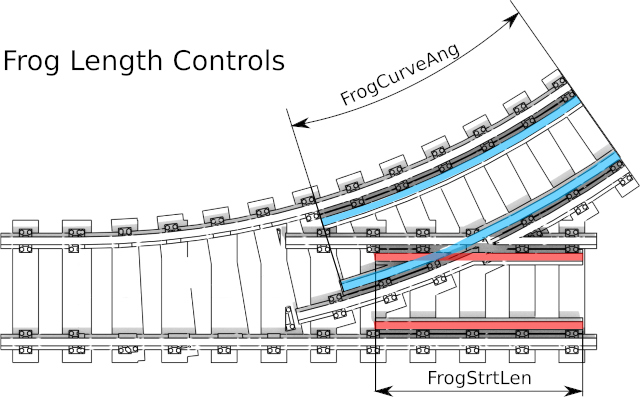
- FrogCurveAng: The angle around which the frog and guides run along the curved section.
- FrogStrtLen: The total length of the frog and guide in the straight section.
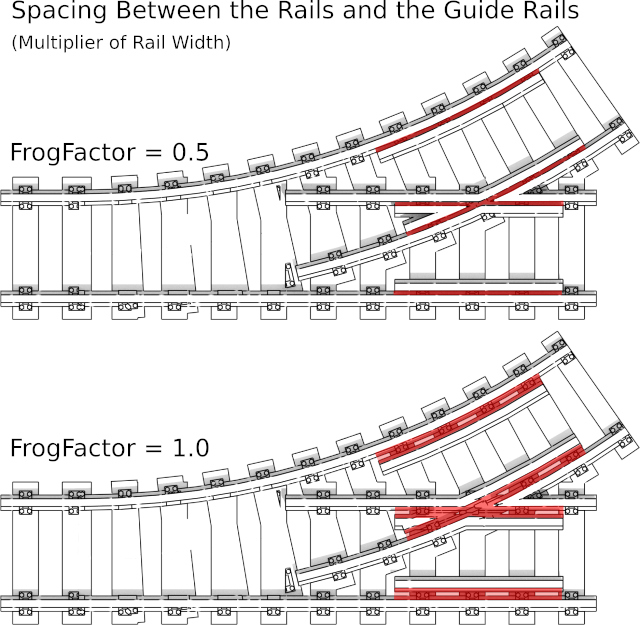
- FrogFactor: This is the control for the gap between the rail and the guides. It is expressed as a multiplier of the rail width. The bigger the FrogFactor, the wider the gap. However if you go too wide then things start going a bit weird and will require some cleanup either manually post-printing or with a modelling package prior to printing.
Options
The following variables are used to set rendering options.
- SleepersYN: This is a flag for rendering the sleepers or not. 1 = Yes, 0 = No.
- TrkTyp: Track end style. 1 = The track joins are between the sleepers. 2 = track joins on the sleepers. It gets a bit problematic with the curved section trying to match everything else.
- SwitchBodyYN: This is a flag to render the turnout body or just the switch points. 1 = Render the turnout rails and sleepers. 2 = rendering the switch arms only.
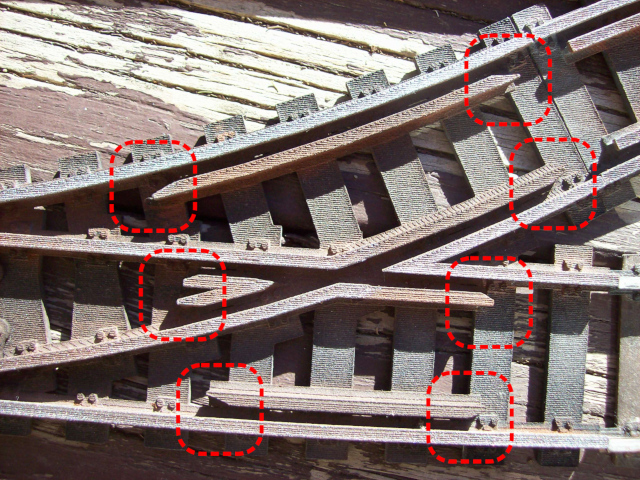
Manual Refinements
You will find that there will be a little need to refine the shapes in places as the model isn’t prefect. Of note are some angles on the lead-ins to the sections of guide rails and frogs. The photo below shows what I’m referring to. The angles shown here were cut with a scalpel.
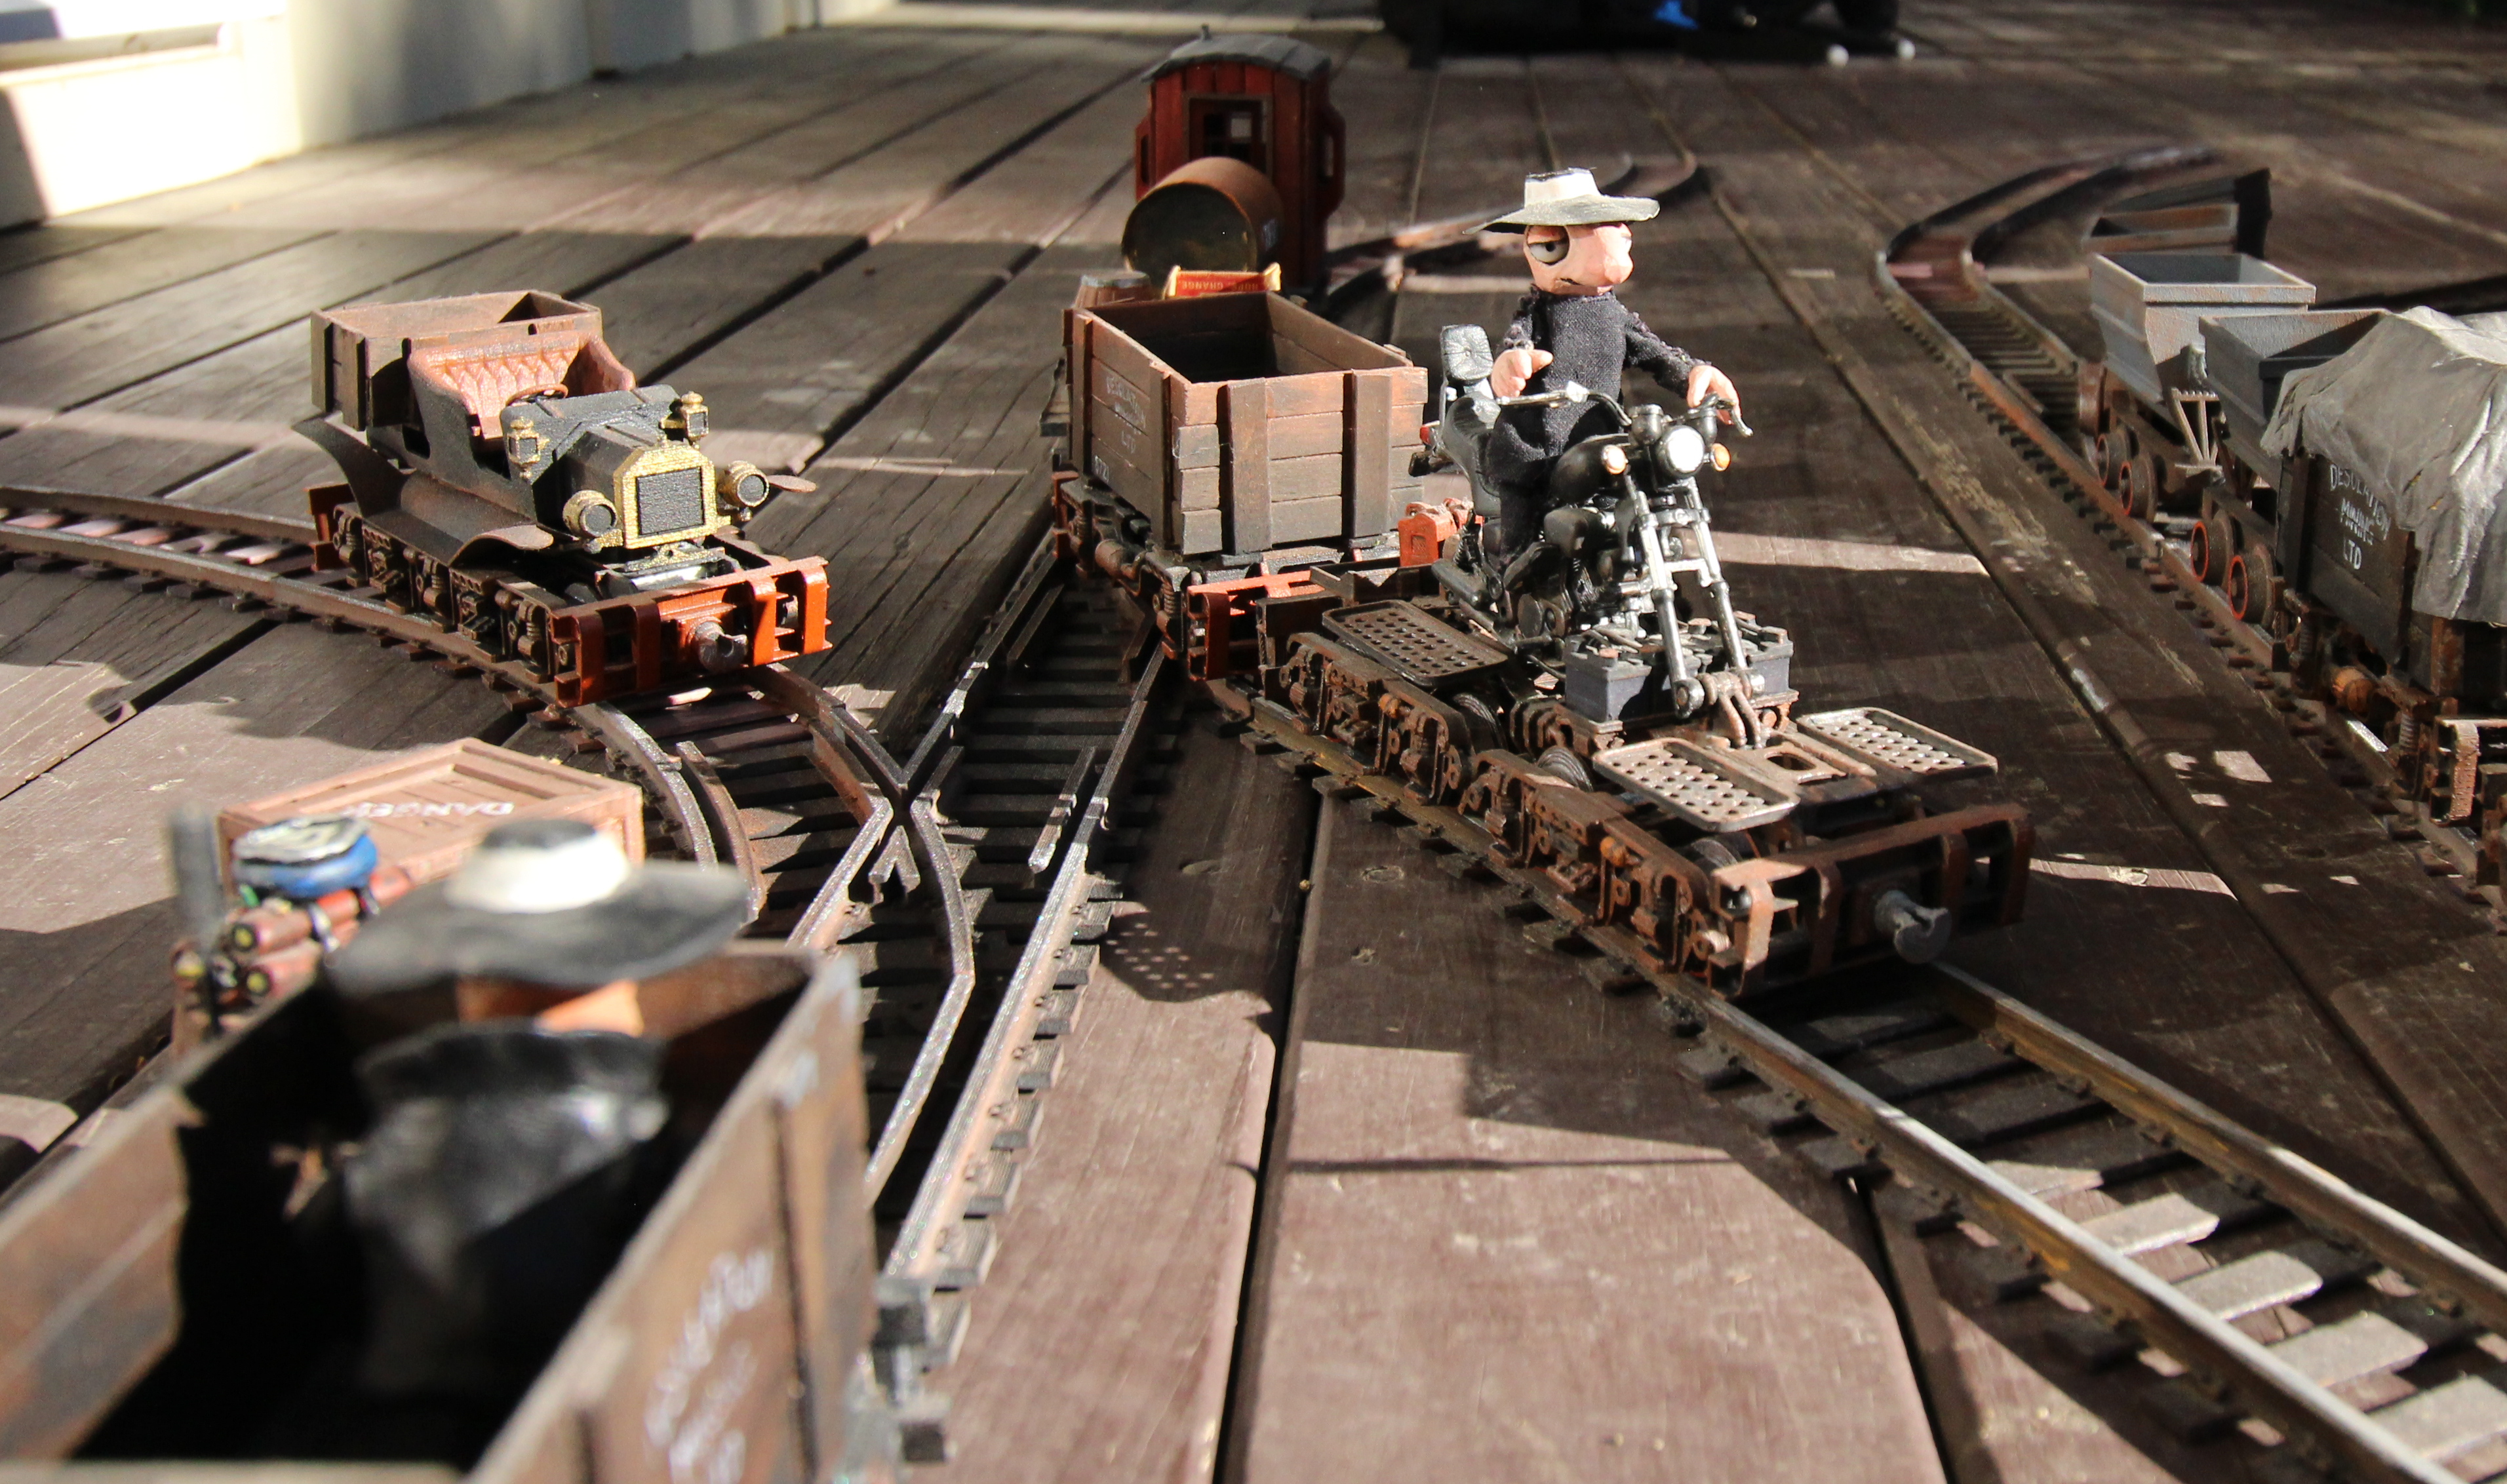
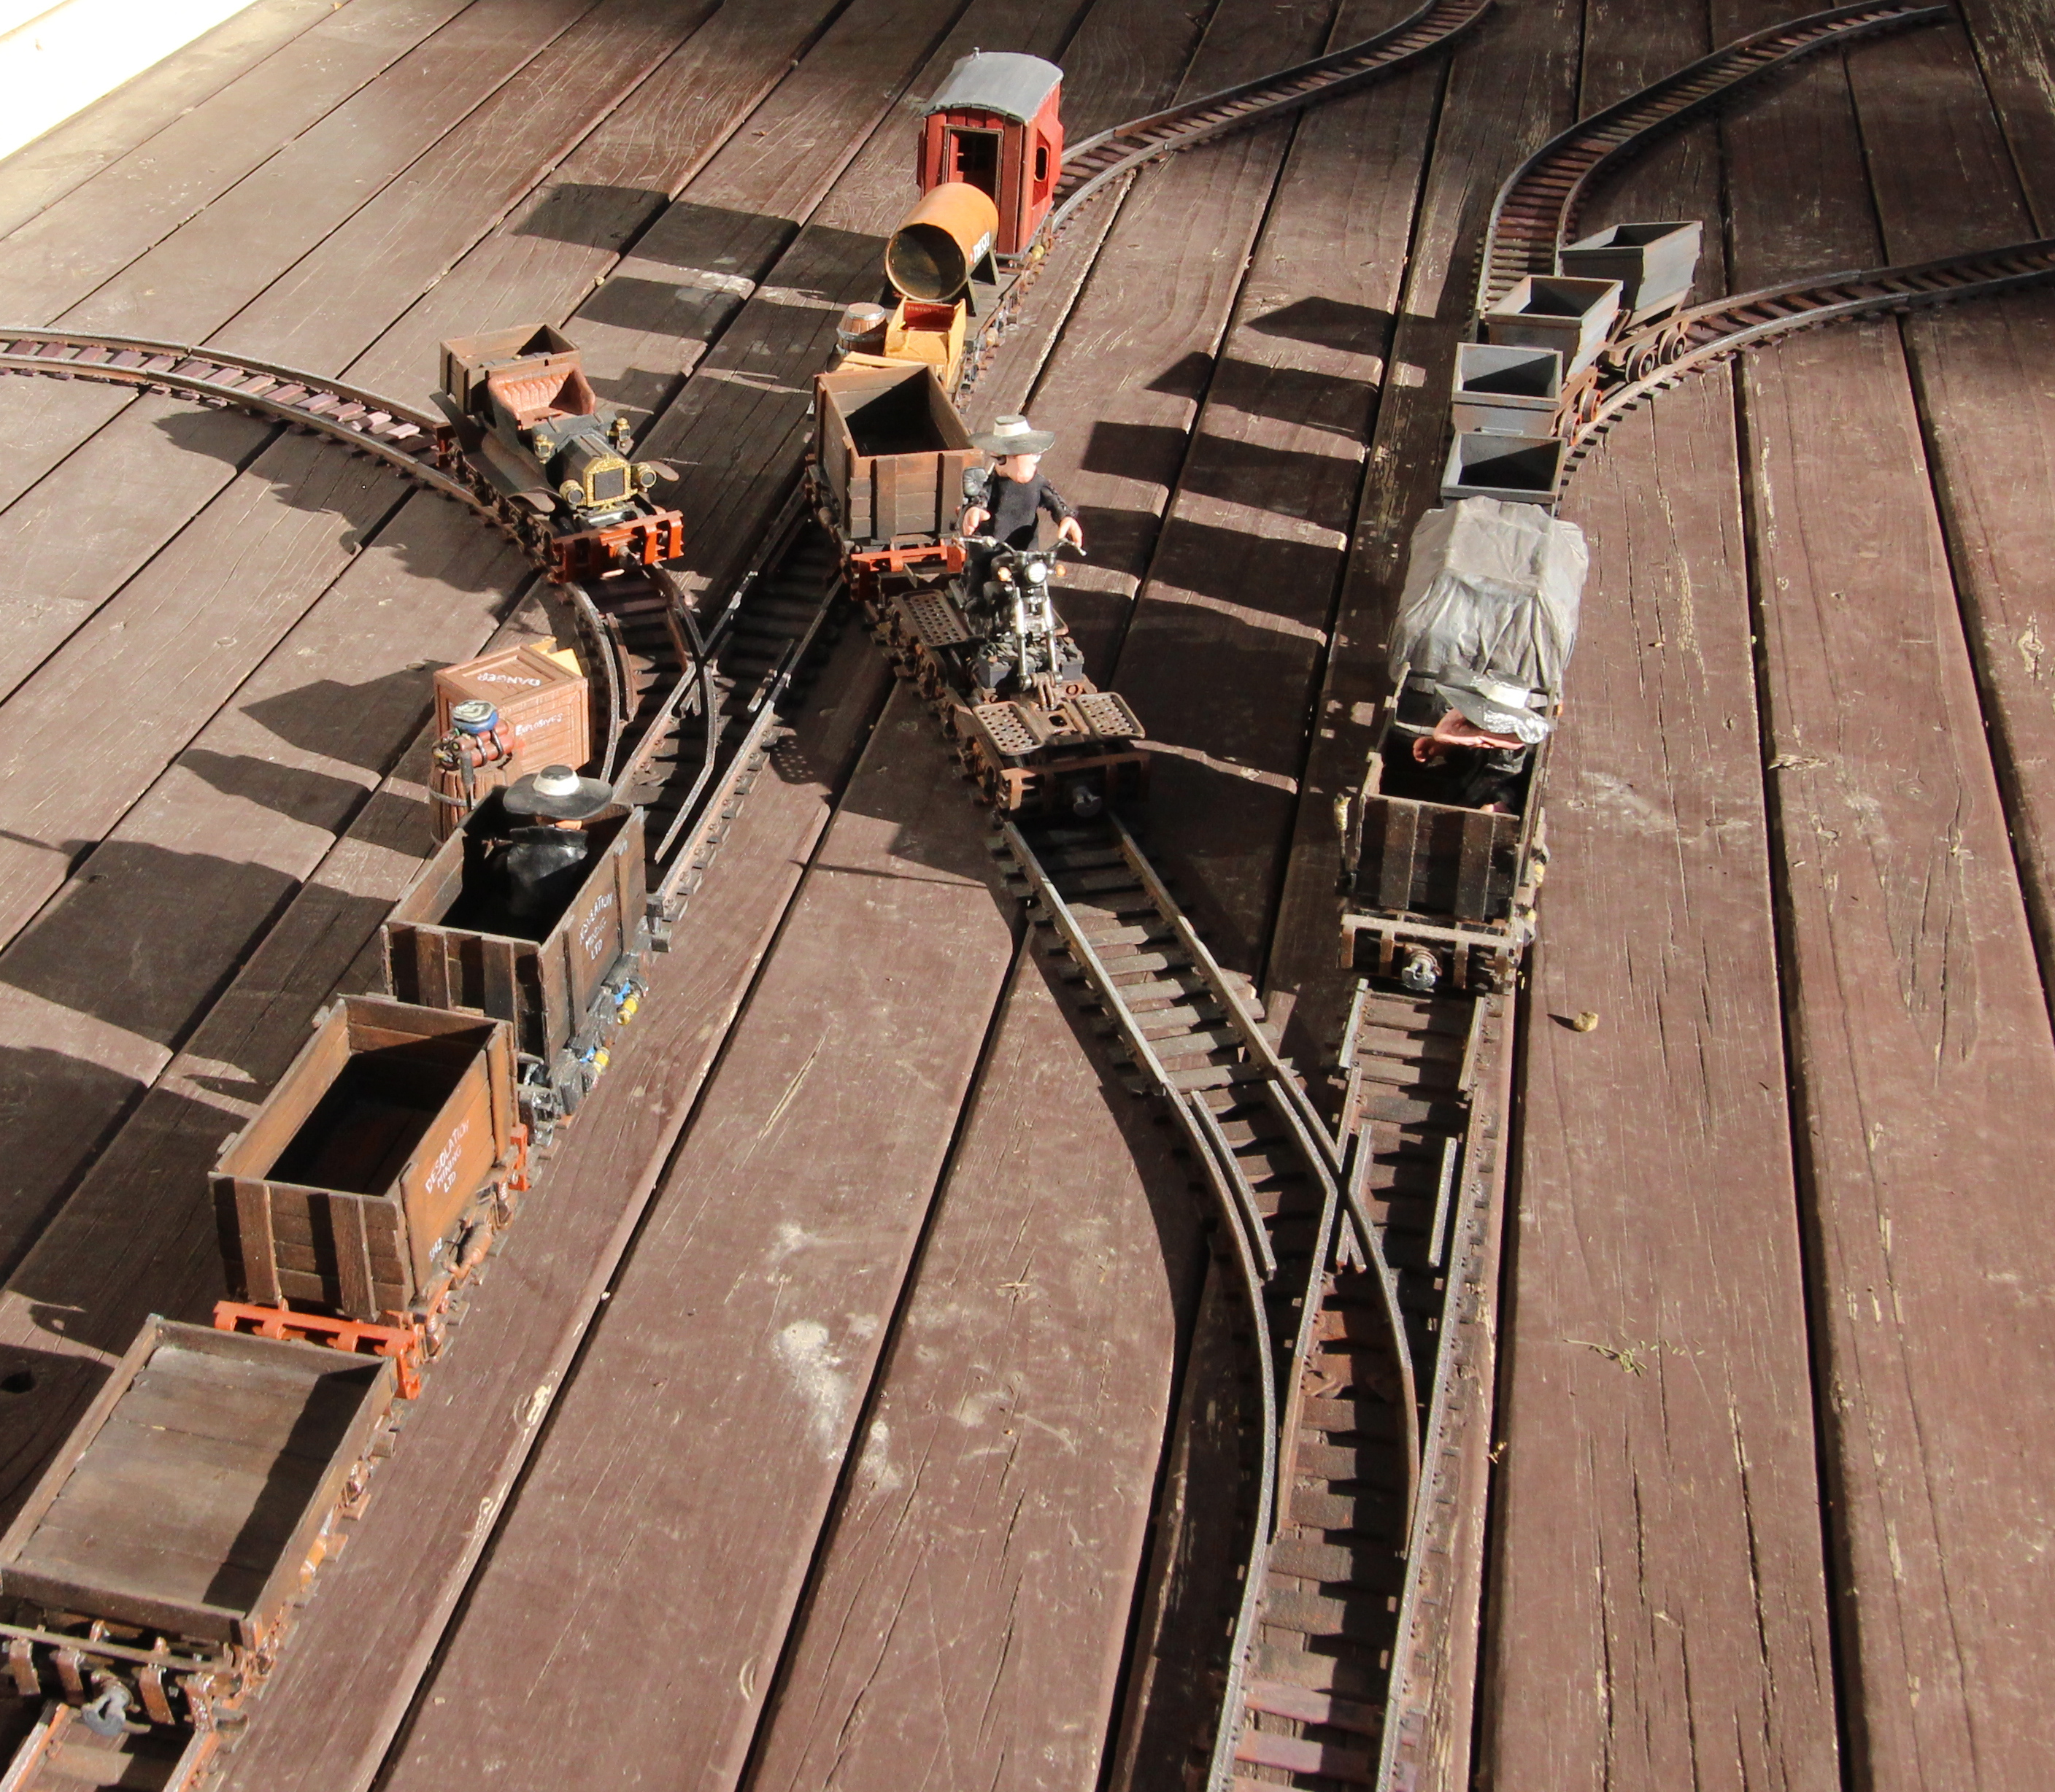
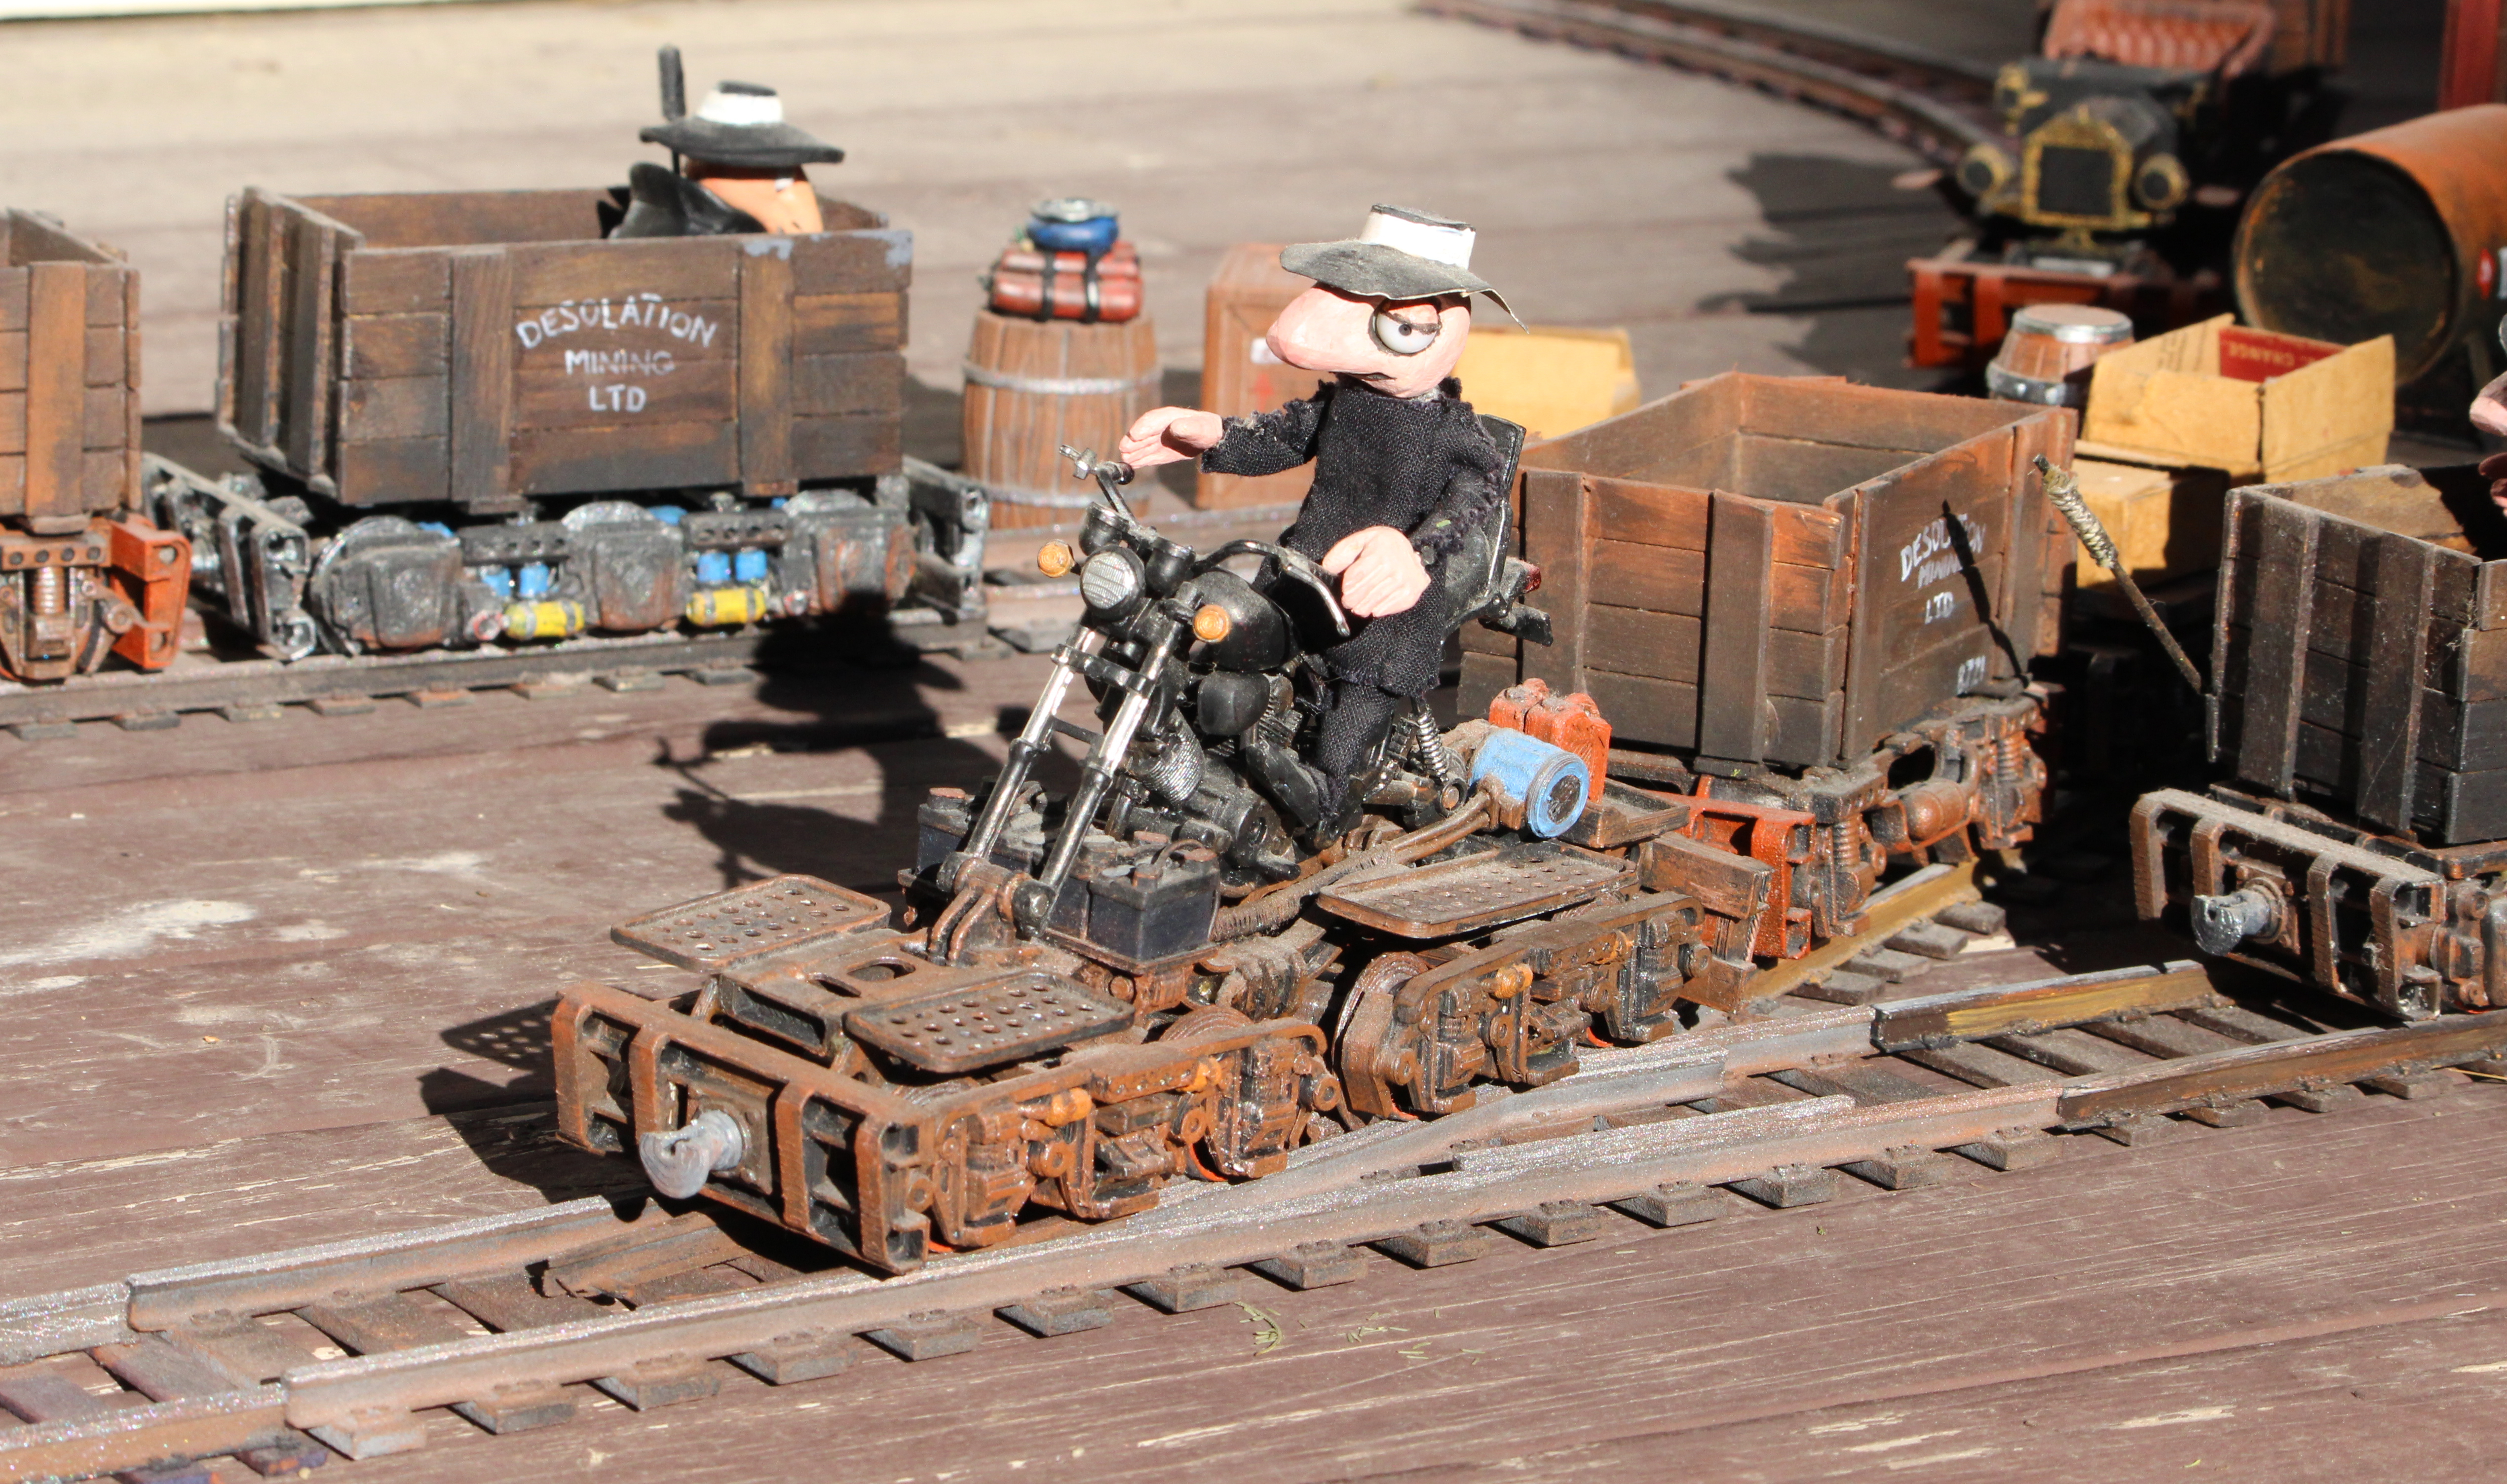
The Turnouts in Use
Here are a few images of the turnouts in use together with straights and curves generated from some of my other parametric rail scripts. The models used are all published on Thingiverse or Techmonkeybusiness – although a couple are yet to be released. Click on the images for a high resolution image.
The Code
Here is the code, but you can download it from here too: Parametric_RailsSwitchv8.scad
//Parametric_RailsSwitchv8.scad
// A script to generate 3D printable railway switch that can be set for any
// gauge.  This script has been created to be compatible with OpenSCAD versions after 2015


RailHt = 6;	//Height of the Rail
NoSlprs = 12;	//Number of Sleepers in Total Straight Track Length
TrakGage = 36;  //Track Gauge (OS Railway System is 32mm)
SlprLn = 55;	//Sleeper length (OS Railway System is 50mm)
SlprWd = 10; //Sleeper Width (OS Railway System is 10mm)
SlprHt = 3;	//Sleeper height (OS Railway System is 3mm)
CurveRad = 350;	//Radius of railway centreline
TrakLength1 = 30; //Lead-in Straight Length
TrakLength2 = 200; //Other bit of straight track
CurveSegAng = 35;	//Segment angle
SwitchPLength = 80;  //Length of the switchpoints
FrogCurveAng = 12;  //Length of frogs
FrogFactor = 0.8;  //Multiplier for gap between tracks for Frog section
FrogStrtLen = 65;  //Length of Frogs on Straight section
SleepersYN = 1;  //This is a flag for having sleepers or not. 1 = Yes
TrkTyp = 1;	//Track end style.
		//Type 1 is join between sleepers,
		//type 2 is join on sleepers
 SwitchBodyYN = 1; //The is the flag to render the switch body or just the switch points
    // 1 = Render the switch
    //2 = Points only

SpacingD = (FrogFactor+0.3)*RailHt;
SLPRStrtStp = (TrakLength1+TrakLength2)/NoSlprs; //Sleeper spacing on straight section
SLPRAngStp = asin(SLPRStrtStp/CurveRad);  //Angular sleeper spacing along curve
NoSlprsAct = round(CurveSegAng/SLPRAngStp);
SwitchCutAng = asin(SwitchPLength/CurveRad);

TrimCSidesLn = SlprLn*1.2; //End trimming cube length across tracks
TrimCSides = RailHt*1.5+SlprHt*2; //End trimming cube sides

//Conditionals for the different types of track sleeper placements
ShiftSlp = (TrkTyp==1)? (0):(-0.5*SLPRAngStp);
ShiftSlpStrt = (TrkTyp==1)? (-0.5*SLPRStrtStp):(0);


//Rail profile
module RailProfile()
{
	scale([RailHt,RailHt])polygon(points=[[-0.5,0],[-0.5,0.05],[-0.2,0.1],[-0.125,0.15],[-0.125,0.65],[-0.2,0.7],[-0.25,0.75],[-0.25,0.95],[-0.2,1],[0.2,1],[0.25,0.95],[0.25,0.75],[0.2,0.7],[0.125,0.65],[0.125,0.15],[0.2,0.1],[0.5,0.05],[0.5,0],[-0.5,0]], convexity = 10);
}


module FrogProfileCutter()
{
    difference()
    {
        translate([-0.5*SpacingD,0.01*RailHt])square([SpacingD,1.1*RailHt],center=false);
        union()
        {
            translate([-0.5*SpacingD,0]) RailProfile();
            translate([0.5*SpacingD,0]) RailProfile();
        }
    }
}
//Generate a reusable block for the sleeper ties
module SleeperPad()
{
	union()
	{
		translate([0,RailHt*0.175,0])rotate([90,0,0])linear_extrude(height = RailHt*0.35)
			{
			scale([RailHt,RailHt])polygon(points=[[-0.35,0.05],[-0.35,0.15],[-0.3,0.175],[0.3,0.175],[0.35,0.15],[0.35,0.05],[-0.35,0.05]]);
			}
		translate([0,0,RailHt*0.06])cube([RailHt*1.5,RailHt*0.8,RailHt*0.12],center = true);
		translate([RailHt*0.55,RailHt*0.25,RailHt*0.16])cylinder(r = RailHt*0.15, h = RailHt*0.08, center = true, $fn = 6);
		translate([RailHt*0.55,-RailHt*0.25,RailHt*0.16])cylinder(r = RailHt*0.15, h = RailHt*0.08, center = true, $fn = 6);
		translate([-RailHt*0.55,RailHt*0.25,RailHt*0.16])cylinder(r = RailHt*0.15, h = RailHt*0.08, center = true, $fn = 6);
		translate([-RailHt*0.55,-RailHt*0.25,RailHt*0.16])cylinder(r = RailHt*0.15, h = RailHt*0.08, center = true, $fn = 6);
	}
}

//Create an object with two sleeper pads and sleepers correctly placed
module Slprs()
{
    union()
    {
        translate([-0.5*TrakGage-0.25*RailHt+CurveRad,0,0])SleeperPad();
        translate([0.5*TrakGage+0.25*RailHt+CurveRad,0,0])SleeperPad();
		if(SleepersYN == 1)
		{
			translate([CurveRad,0,-0.5*SlprHt])cube([SlprLn,SlprWd,SlprHt],center = true);
		}
    }
}


module Cutter()
{
	translate([0,0,-(RailHt+SlprHt)*0.25])linear_extrude(height = (RailHt+SlprHt)*1.5)
	{
		polygon(points=[[0,0],[CurveRad+TrakGage+SlprLn,0],[CurveRad+TrakGage+SlprLn,(CurveRad+TrakGage+SlprLn)*tan(CurveSegAng)]]);
	}
}


module CurvedRail()
{
	rotate_extrude(angle = CurveSegAng, convexity = 10, $fn = 140 ) translate([-0.5*TrakGage-0.25*RailHt+CurveRad,0,0])RailProfile();
    rotate([0,0,SwitchCutAng]) rotate_extrude(angle = CurveSegAng-SwitchCutAng, convexity = 10, $fn = 140 ) translate([0.5*TrakGage+0.25*RailHt+CurveRad,0,0])RailProfile();
}

module CurveFrogBit()
{
	rotate([0,0,asin(sqrt(2*CurveRad*TrakGage-pow(TrakGage,2))/CurveRad)-0.5*FrogCurveAng]) rotate_extrude(angle = FrogCurveAng, convexity = 10, $fn = 140 ) //Note: angle
   // does not work for pre 2016 versions of OpenSCAD.
	{
		translate([-0.5*TrakGage+FrogFactor*RailHt+CurveRad,0,0])RailProfile();
		translate([0.5*TrakGage-FrogFactor*RailHt+CurveRad,0,0])RailProfile();
	}
}


module StraightRail(TrakLengthA)
{
	rotate([90,0,0])linear_extrude(height = TrakLengthA) translate([-0.5*TrakGage-0.25*RailHt,0,0]) RailProfile();
    //rotate([90,0,0])linear_extrude(height = TrakLengthA) translate([0.5*TrakGage+0.25*RailHt,0,0])RailProfile();

}

module StraightFrogBit(TrakLengthFrog)
{
    rotate([90,0,0])linear_extrude(height = TrakLengthFrog)
    {
        translate([-0.5*TrakGage+FrogFactor*RailHt,0,0]) RailProfile();
        translate([0.5*TrakGage-FrogFactor*RailHt,0,0])RailProfile();
    }
}

module StrtFrogGapCutter()
{
    translate([-0.5*TrakGage+0.25*FrogFactor*RailHt,sqrt(2*CurveRad*TrakGage-pow(TrakGage,2))+0.5*FrogStrtLen,0])rotate([90,0,0]) linear_extrude(height = 10*RailHt) FrogProfileCutter();
}

module CurveFrogGapCutter()
{
    rotate([0,0,asin(sqrt(2*CurveRad*TrakGage-pow(TrakGage,2))/CurveRad)-0.5*FrogCurveAng]) rotate_extrude(angle = FrogCurveAng, convexity = 10, $fn = 140 ) //Note: angle
   // does not work for pre 2016 versions of OpenSCAD.
	translate([0.5*TrakGage-0.25*FrogFactor*RailHt+CurveRad,0,SlprHt])FrogProfileCutter();
}


module PointsCutterTidyUp()
{
    //Yeah I know this is a bit of a cop-out to tidy up some things.  This takes a sliver off the
    //base to clean up the bottom track remnants after the cutting operation above.
    //CurveTidy
    translate([-CurveRad,0.01,0.01])
    rotate_extrude(angle = SwitchCutAng, convexity = 10, $fn = 140 )
    translate([CurveRad,0]) difference()
    {
        translate([-0.5*(TrakGage+0.5*RailHt),-0.01*RailHt])square([0.5*(TrakGage+RailHt),1.2*RailHt],center=false);
        translate([-0.5*TrakGage-0.25*RailHt,0])RailProfile();
    }
    //StraightTidy
    translate([0.5*TrakGage+0.62*RailHt,SwitchPLength,0.01]) rotate([90,0,0]) linear_extrude(height = SwitchPLength)
   difference()
   {
        translate([-0.5*TrakGage-0.25*RailHt,-0.01*RailHt])square([0.5*TrakGage,1.2*RailHt],center=false);
        translate([-0.15*TrakGage+0.5*RailHt,0]) RailProfile();

    }
}


if(SwitchBodyYN == 1)
{
    difference()
    {
        union()
        {
            difference()  /// Curved Track assembly
            {
                translate([-CurveRad,0,0])
                intersection()
                {
                    union()
                    {
                        CurvedRail();
                        CurveFrogBit();
                        for (SlprCount = [1:1:NoSlprs+1])
                        {
                            rotate([0,0,SLPRAngStp*(SlprCount-1)+ShiftSlp])Slprs();  //
                        }
                        StrtFrogGapCutter();
                    }
                    Cutter();
                }
                StrtFrogGapCutter();
            }
            difference()  //Straight Track Section
            {
                union()
                {
                    StraightRail(TrakLength1);
                    translate([TrakGage+0.5*RailHt,0,0])StraightRail(TrakLength1);
                    rotate([0,0,180]) StraightRail(TrakLength2);
                    translate([-TrakGage-0.5*RailHt,SwitchPLength,0])rotate([0,0,180]) StraightRail(TrakLength2-SwitchPLength);
                    translate([0,sqrt(2*CurveRad*TrakGage-pow(TrakGage,2))+0.5*FrogStrtLen,0]) StraightFrogBit(FrogStrtLen);
                  if(SleepersYN == 1)
                    {
                        //Add sleepers
                        if(TrkTyp ==1)
                        {
                            translate([0,-TrakLength1,0])rotate([0,0,180])
                            for (SlprCount = [1:1:NoSlprs])
                            {
                                translate([0,-(SlprCount-1)*SLPRStrtStp+ShiftSlpStrt,-SlprHt*0.5])cube([SlprLn,SlprWd,SlprHt],center = true);
                                translate([0.5*TrakGage+0.25*RailHt,-(SlprCount-1)*SLPRStrtStp+ShiftSlpStrt,0]) SleeperPad();
                                translate([-0.5*TrakGage-0.25*RailHt,-(SlprCount-1)*SLPRStrtStp+ShiftSlpStrt,0]) SleeperPad();
                            }
                        }
                        else
                        {
                            translate([0,-TrakLength1,0])rotate([0,0,180])
                            for (SlprCount = [1:1:NoSlprs+1])
                            {
                                translate([0,-(SlprCount-1)*SLPRStrtStp+ShiftSlpStrt,-SlprHt*0.5])cube([SlprLn,SlprWd,SlprHt],center = true);
                                translate([0.5*TrakGage+0.25*RailHt,-(SlprCount-1)*SLPRStrtStp+ShiftSlpStrt,0]) SleeperPad();
                                translate([-0.5*TrakGage-0.25*RailHt,-(SlprCount-1)*SLPRStrtStp+ShiftSlpStrt,0]) SleeperPad();
                            }
                        }
                    }
                }
                translate([-CurveRad,0,0])CurveFrogGapCutter();
            }
        }
        PointsCutterTidyUp();
    }
}
else
{
    //Curved Section
    difference()
    {
        translate([0,SwitchPLength,0])rotate([90,0,0])linear_extrude(height = SwitchPLength) translate([-0.5*TrakGage-0.25*RailHt,0,0]) RailProfile();
        translate([-CurveRad,0,0])rotate_extrude(angle = CurveSegAng, convexity = 10, $fn = 140 ) translate([-0.5*TrakGage-0.25*RailHt+CurveRad,0,0])RailProfile();
    }

    difference()
    {
        translate([-CurveRad,0,0]) rotate_extrude(angle = SwitchCutAng, convexity = 10, $fn = 140 ) translate([0.5*TrakGage+0.25*RailHt+CurveRad,0,0])RailProfile();
        translate([TrakGage+0.5*RailHt,SwitchPLength,0])rotate([90,0,0])linear_extrude(height = SwitchPLength) translate([-0.5*TrakGage-0.25*RailHt,0,0]) RailProfile();
    }
}


This design by Hamish Trolove is licensed under a Creative Commons Attribution-NonCommercial-ShareAlike 4.0 International License.