Hand Installing pySerial into Python Installations

This is just a description of how I have managed to get pySerial into the Blender Game Engine and the standalone Pyzo python environments. It is certainly not a guide on how you get pySerial into every python installation. Having said that, chances are this method will work for other python installations. This method avoids the need to grapple with other installer utilities such as easy install or pip when you are using an application like Blender which has its own embedded python installation.
The intention is for this to be the route used for taking sensor data from an Arduino and applying it to the camera object in a Blender Game Engine environment as part of a Homebuilt VR system.
What is pySerial?
PySerial is a Python library that allows python to interact with a computer’s serial ports. This means that you can read from and write to the serial port using python. This is great if you have something like an Arduino on the other end communicating via the USB/Serial.
Where to get it.
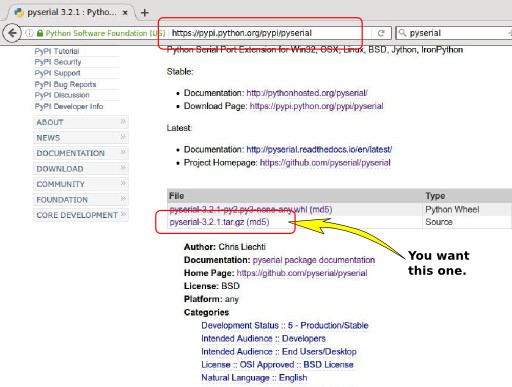
You can get the pySerial library from the following website:
https://pypi.python.org/pypi/pyserial
There you will see some options for download. Go for the source code which will have a name something like pyserial-3.2.1.tar.gz.
Once you have downloaded it, unzip it. You will end up with a structure like that looks like the image below. The bit we’re interested in is the directory called serial. The general method for installing this in your python installation is to copy this whole directory and paste it into the “site-packages” directory of the python installation.

The instructions given below are for Linux environments. Generally the same methods should apply for Windows. Here is a good tutorial for reading Arduinos through pySerial in Windows environments. petrimaki.com “Reading Arduino Serial Ports in Windows”
Installing pySerial into the Blender Game Engine
I tend to use the standalone Blender packages rather than the installed ones, but the method described here should work for the installed versions …. it will just be a matter of finding where in your file system the installed Blender location is.
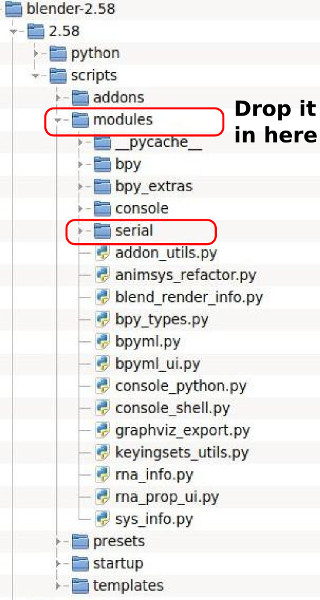
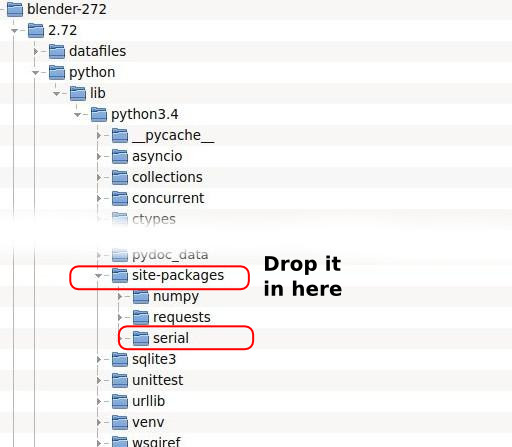
The directory to paste the serial directory into varies with the different versions of Blender.
In Blender 2.5x drop it into the blender-2.58/2.58/scripts/modules directory as shown below.
in Blender 2.7X drop it into the blender-272/2.72/python/lib/python3.4/site-packages directory as shown below.
I have not tried it with Blender 2.6X but the location shown for Blender2.7X above should work. Try it and see.
To check that it is installed start Blender. For this quick test you will not need to start Blender using the terminal. Change one of the Blender windows to the Python Console.
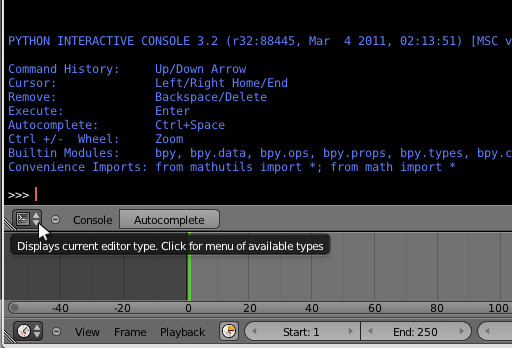
At the »> prompt key in:
import serial
If all is OK, it will just give you another »> prompt.
If it is not finding the pySerial library it will respond with an error;
Traceback (most recent call last):
  File "<blender_console>", line 1, in <module>
ImportError: No module named serial
In this case, just try pasting the serial directory into an other location in the scripts or Python directory within the Blender file structure.
Installing pySerial into Pyzo.
If you were wanting to gather data from an Arduino and display it on a real-time graph or something then you won’‘t need Blender. For scientific programming using python, Pyzo is a good option. http://www.pyzo.org/. This is a self-contained package with a bunch of fantastic tools for scientific visualisation, but it lacks pySerial . Adding it is as easy as it is for Blender.
Look for the site-packages directory and paste your serial folder from the unzipped pySerial source package. Again it is located in different places with different versions of Pyzo. Go to your installed Pyzo directory and look for the directory called site-packages or for older versions; pyzo-packages.
Version 2013
pyzo2013b/Lib/pyzo-packages
Version 2015 and later.
pyzo2015a/lib/python3.4/site-packages
To check that it is installed, start Pyzo and at the command prompt type in:
import serial
If it just gives you another »> prompt, all is good.
Checking that it is REALLY working.
To check that you really have serial communication happening you will need to hook up something that can issue messages over the USB serial port. Load a sketch onto your Arduino and have that issue the stream of serial messages. You will find a sketch for this in the next section.
With your serial message source in place and Pyzo open or Blender running, key in the following commands at the python command prompt:
>>> import serial
>>> arduino = serial.Serial('/dev/ttyUSB0', 9600)
>>> arduino.readline()
If it is all working this will yield the first line received from the serial port. If you are using the sketch described below on your Arduino the received message will look like this.
b'Data: ,0,500,\r\n'
The “b” at the front indicates binary data.
If you are using a Windows machine then you will need to replace the “/dev/ttyUSB0” with the appropriate COM port name for your Arduino. It will look something like arduino = serial.Serial('COM3', 9600, timeout=0)
In order to read the stream of data continuously you will need a Python program. An example is shown later in this article.
An Arduino sketch to dish up a stream of data down the serial line.
The following sketch outputs data to the Serial port in the form;
Data: ,3,497,
Data: ,4,496,
Data: ,5,495,
Data: ,6,494,
Data: ,7,493,
Data: ,8,492,
Running a python program using pySerial will see something that looks like this;
b'Data: ,3,497,\r\n'
b'Data: ,4,496,\r\n'
b'Data: ,5,495,\r\n'
b'Data: ,6,494,\r\n'
b'Data: ,7,493,\r\n'
b'Data: ,8,492,\r\n'
The Arduino Sketch
You can download the sketch from here: SerialJunk.ino
/*
SerialJunk.ino

This is a real quick sketch to put some serial data
out through the serial port for pySerial to read.
No extra circuitry is required.

*/


void setup()
{
    Serial.begin(9600);
}


void loop()
{
  int ItemA = 0;
  int ItemB = 500;

  while (ItemA<500)
  {
    delay(50);
    Serial.print("Data: ,");
    Serial.print(ItemA);
    Serial.print(",");
    Serial.print(ItemB);
    Serial.println(",");
    ItemA++;
    ItemB--;
  }
}
A Python Program to Read the Serial Stream
The following is a quick program to run in Pyzo. It will access and report the stream of Data from the Arduino running the sketch listed above. Its output is not all that pretty but is shows the data coming in and being spit into a couple of useful variables.
You can download this python script from here: PythonSerialChatv1.py
'''
PythonSerialChatv1.py

    @author: Hamish Trolove
    @website: www.techmonkeybusiness.com
    @copyright: Nah – Do what you like with it.

This is a script which will ultimately be used in the Blender Game Engine.
It takes a stream of data in a CSV form that has been issued by an
Arduino through the serial port. At this stage the code just
listens to the Serial port, reads the incoming data stream and
splits it up into some useful variables.

When run in the Blender Game Engine or Pyzo you will need to have
pySerial installed in your Blender Python or Pyzo Site-packages directory
for this to work.  See www.techmonkeybusiness.com.
You will also need an Arduino connected and running a sketch to issue
serial messages with the following format.  This development program
was run in Pyzo2105 with the pyserial library copied into the pyzo2015a/lib/python3.4/site-packages location.

Data: ,3,497,
Data: ,4,496,
Data: ,5,495,
Data: ,6,494,
Data: ,7,493,
Data: ,8,492,

In this case the header is "Data" and the next two numbers are simulations of
what might be issued from XY joystick potentiometers attached to the
Arduino Analogue pins.

Python reads this from the serial port

b'Data: ,3,497,\r\n'
b'Data: ,4,496,\r\n'
b'Data: ,5,495,\r\n'
b'Data: ,6,494,\r\n'
b'Data: ,7,493,\r\n'
b'Data: ,8,492,\r\n'


'''


import serial

port0 = "/dev/ttyUSB0"     # For a Linux machine.
port1 = "/dev/ttyUSB1"     # Just in case

try:
    arduino = serial.Serial(port0, 9600)
except serial.serialutil.SerialException:
    arduino = serial.Serial(port1, 9600)

runMe = 1
ArduRunSig = 1

while runMe:
    data = str(arduino.readline())
    print ("Got:", data)
    ArduData = data.split(",")
    print(ArduData)
    print("X",ArduData[1],"Y",ArduData[2])
    ArduRunSig = ArduRunSig + 1
    XaxisVal = int(ArduData[1])
    YaxisVal = int(ArduData[2])
    print(XaxisVal,YaxisVal)
    if ArduRunSig > 800:
        runMe = 0

print("Finished")

The sketches and python stuff described above is provided by Hamish Trolove with no restrictions whatsoever. After all it is through the generous sharing of others on various forums and the existence of the nicely set up pySerial library that I managed to cobble this together.