A Homebuilt Virtual Reality System

Of late I have been contracted to the local regional Libraries to develop some of their STEMM programmes. The main focus has been robotics, but in the long term they would like to do something with Virtual Reality. Initially they had been keen on using the GearVR or some equivalent to introduce the public to the idea of VR and what it can do, and what role it might play in the future. The intention is to expose the public to the technology so they have experienced it and have had a chance to think about it. When debate about VR and its effects and value happens (and it will), at least they be able to take part in the debate from an informed point of view.
When we went out for prices of the GearVR, the price of the phone put it out of reach. In addition to this, the short lifetime of smart phones and apps suggested this would be a huge risk of becoming obsolete very quickly without providing much learning opportunity for the money spent. So another option was suggested which was to run DIY VR workshops. I am hoping that once I have the tech sorted out, this will be able to be done within a $200 per unit budget and allow the participants to take away a VR unit. This would have the added advantage of teaching people that they don’t need to be technology takers in this. While it would not have the fine resolution of the GearVR and other smartphone based systems, it would still provide a great 3D VR experience AND they would also be able to use it to explore their own virtual environments they could create with the various Game Engines available.
The original plan was to base it on Adafruit’s 3D Printed Wearable Video Goggles (3d-printed-wearable-video-goggles.pdf and Thingiverse Thing No.417201). Instead of 3D printing the goggles we would modify something like ski goggles for reasons of reliability, comfort, and to avoid a bottleneck at the 3D printers. Unfortunately the nice hi-res screens Adafruit were using are now very hard to come by and I was unable to find an equivalent at a reasonable price that the sellers would freight to the bottom end of the world.
So, a new concept emerged that used an FPV drone pilot’s headset, attached motion sensors to it, and use that to control the viewpoint in a game engine.
Now I need to see if the whole idea is workable (workable in the sense that it is not so outrageously tricky that it couldn’t be done in a weekend workshop). I should say too that this is a work in progress. I certainly wouldn’t want to suggest this device is finished in any way. I am exploring the ideas and expect some of the avenues followed may end up at roadblocks and some alternative route will need to be followed.
Concept Details
The concept at this early stage in the process is shown below (Note: this has been revised from a concept that used Processing as an intermediate step to turn the Serial messages from the Arduino into mouse movements.)
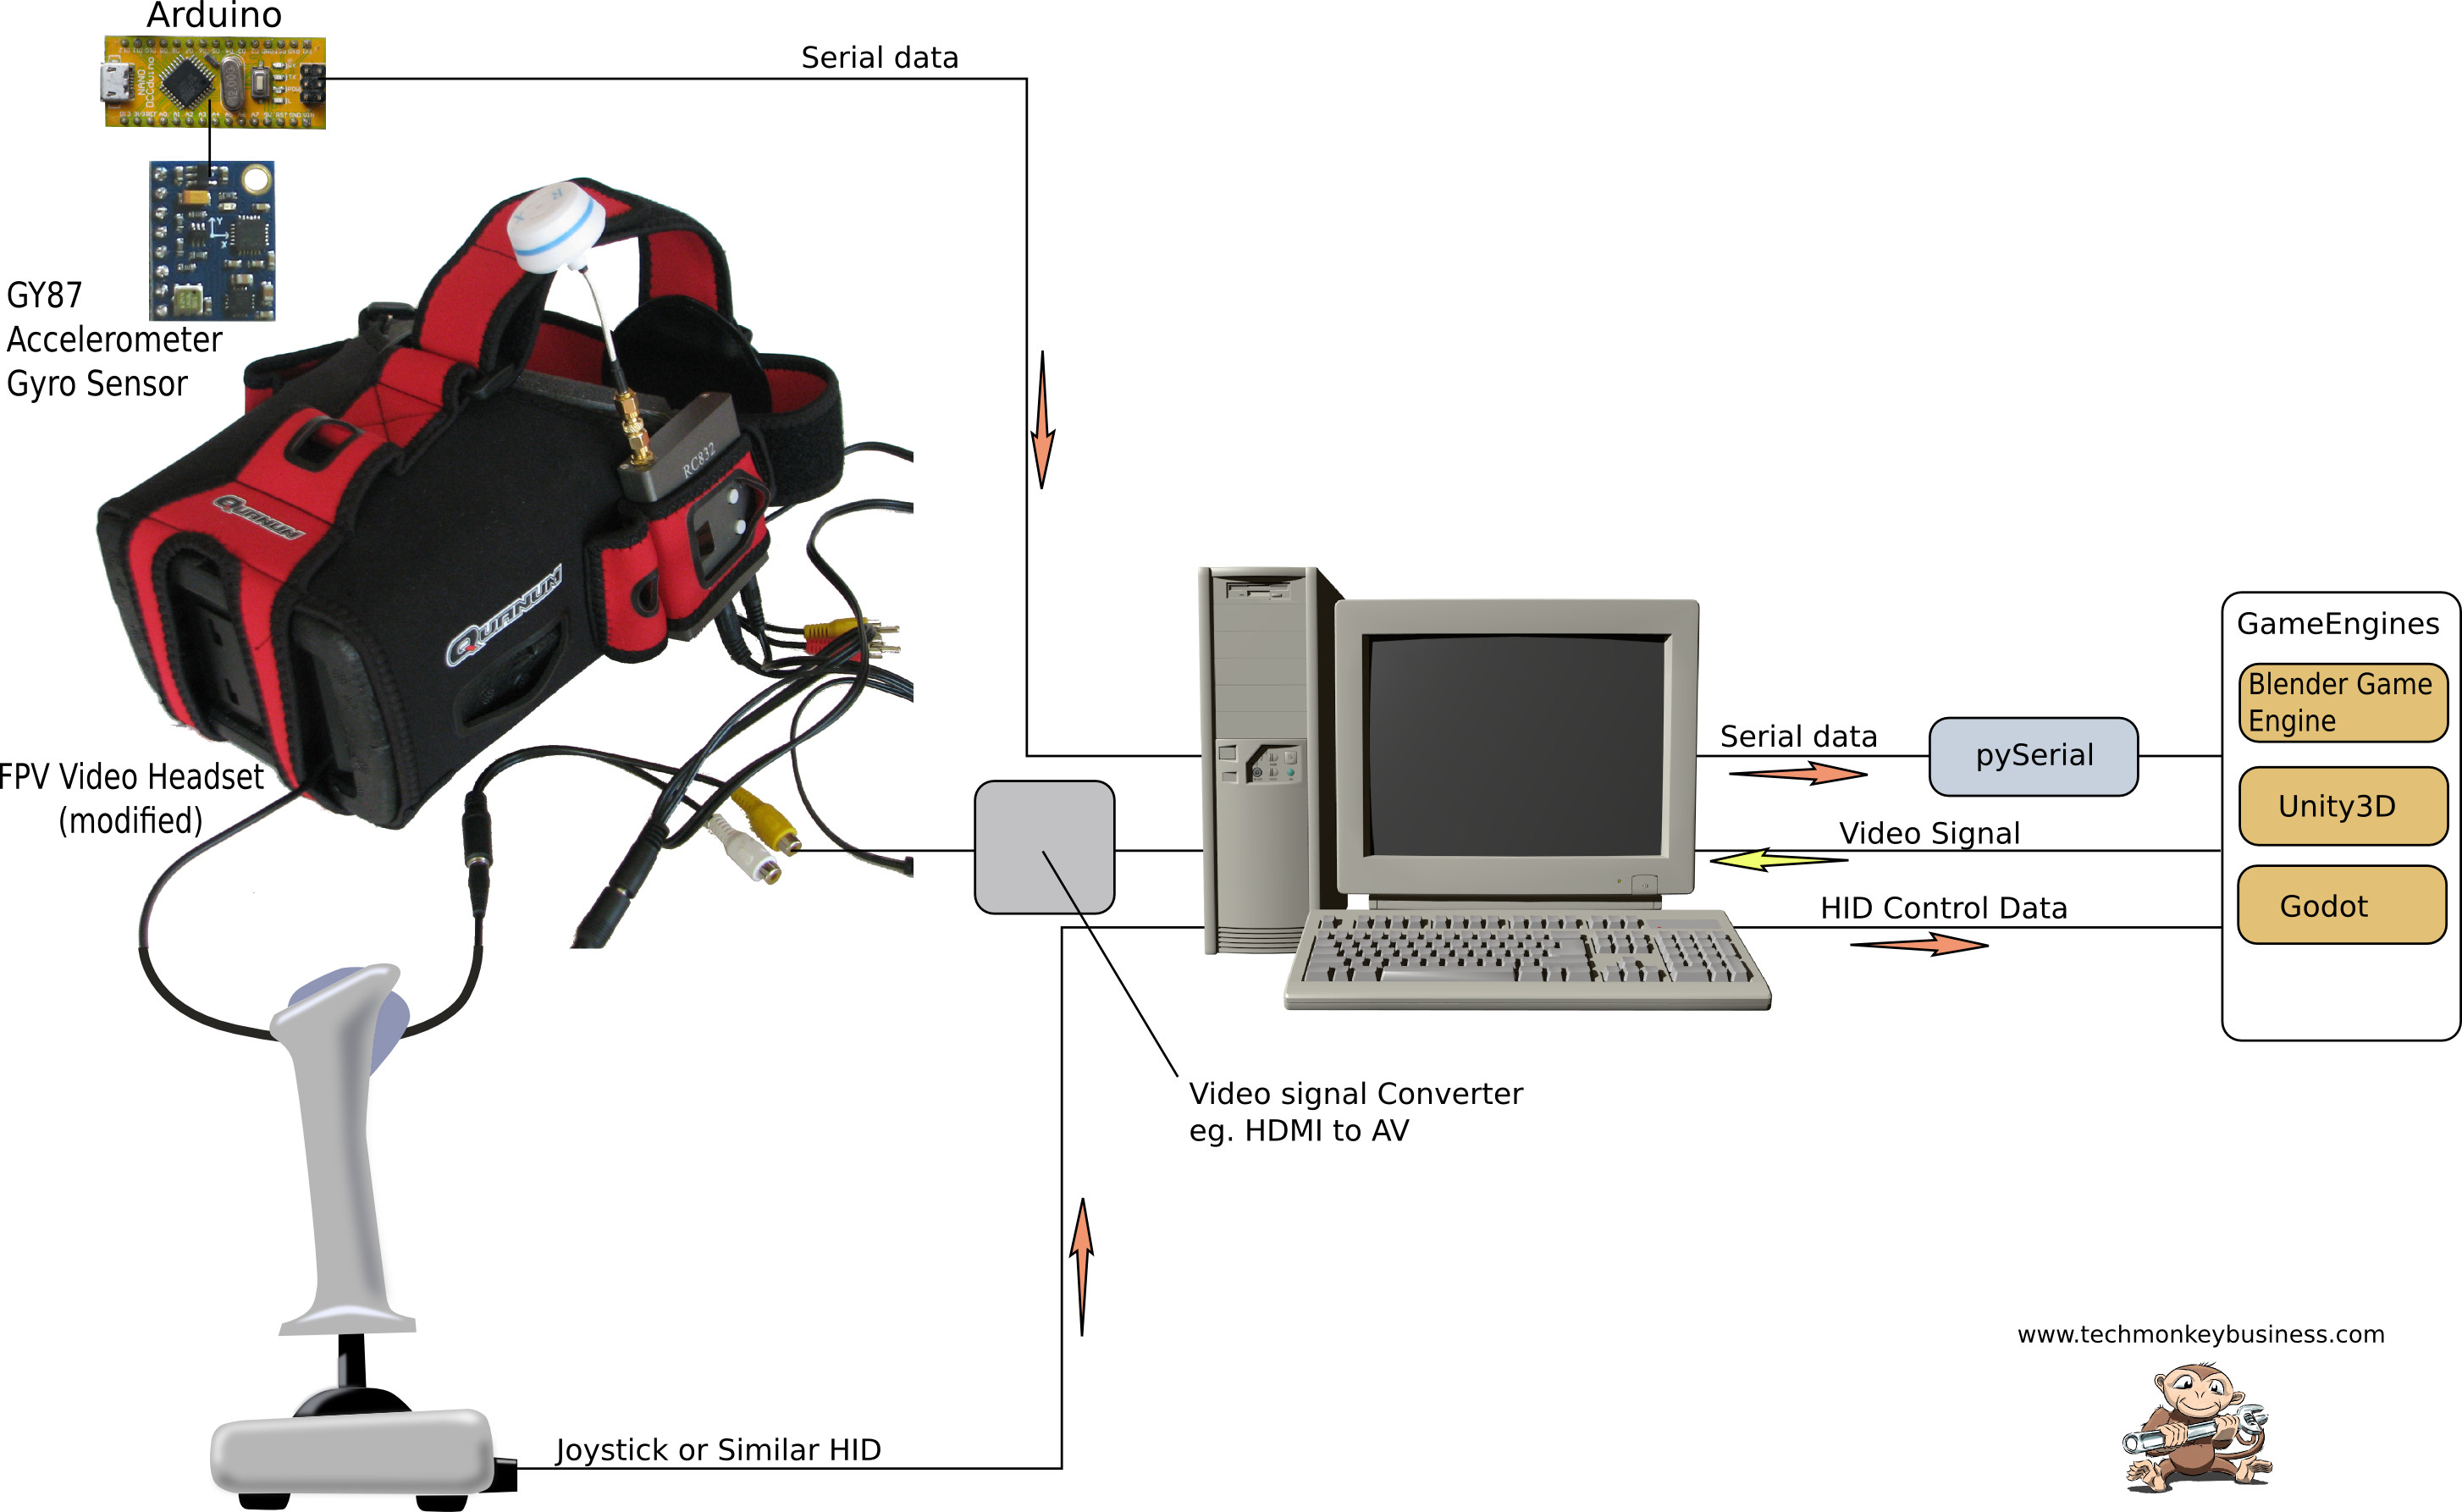
This concept uses an Arduino to read a motion sensor (GY87 – 10 Degree of freedom sensor board) and send the data to the computer via the USB. The messages are captured by pySerial within the Blender Game Engine or within any other game environment supporting python. At this stage I am only looking at python solutions, but obviously other programming languages will have analogous solutions. An earlier concept used Processing to turn the received serial data into mouse movements, but this seems like a clumsy and unnecessary step. By using pySerial within the Blender Game Engine, any data received from the arduino can be directly applied to moving the camera or other actors within the virtual environment. A joystick is used to translate the users viewpoint around. For a 3D view the game engine used would need to be able to produce a stereoscopic output (Unity and Blender Game Engine can do this). The video is fed back to the FPV headset screen – probably through some sort of converter to get it to analogue video (AV) which most FPV monitors use.
A more sophisticated, but possibly simpler idea may be to make a small joystick and button handset that links to the VR headset’s Arduino so all movement in the virtual environment is coming from the Arduino. This will need further investigation I think.
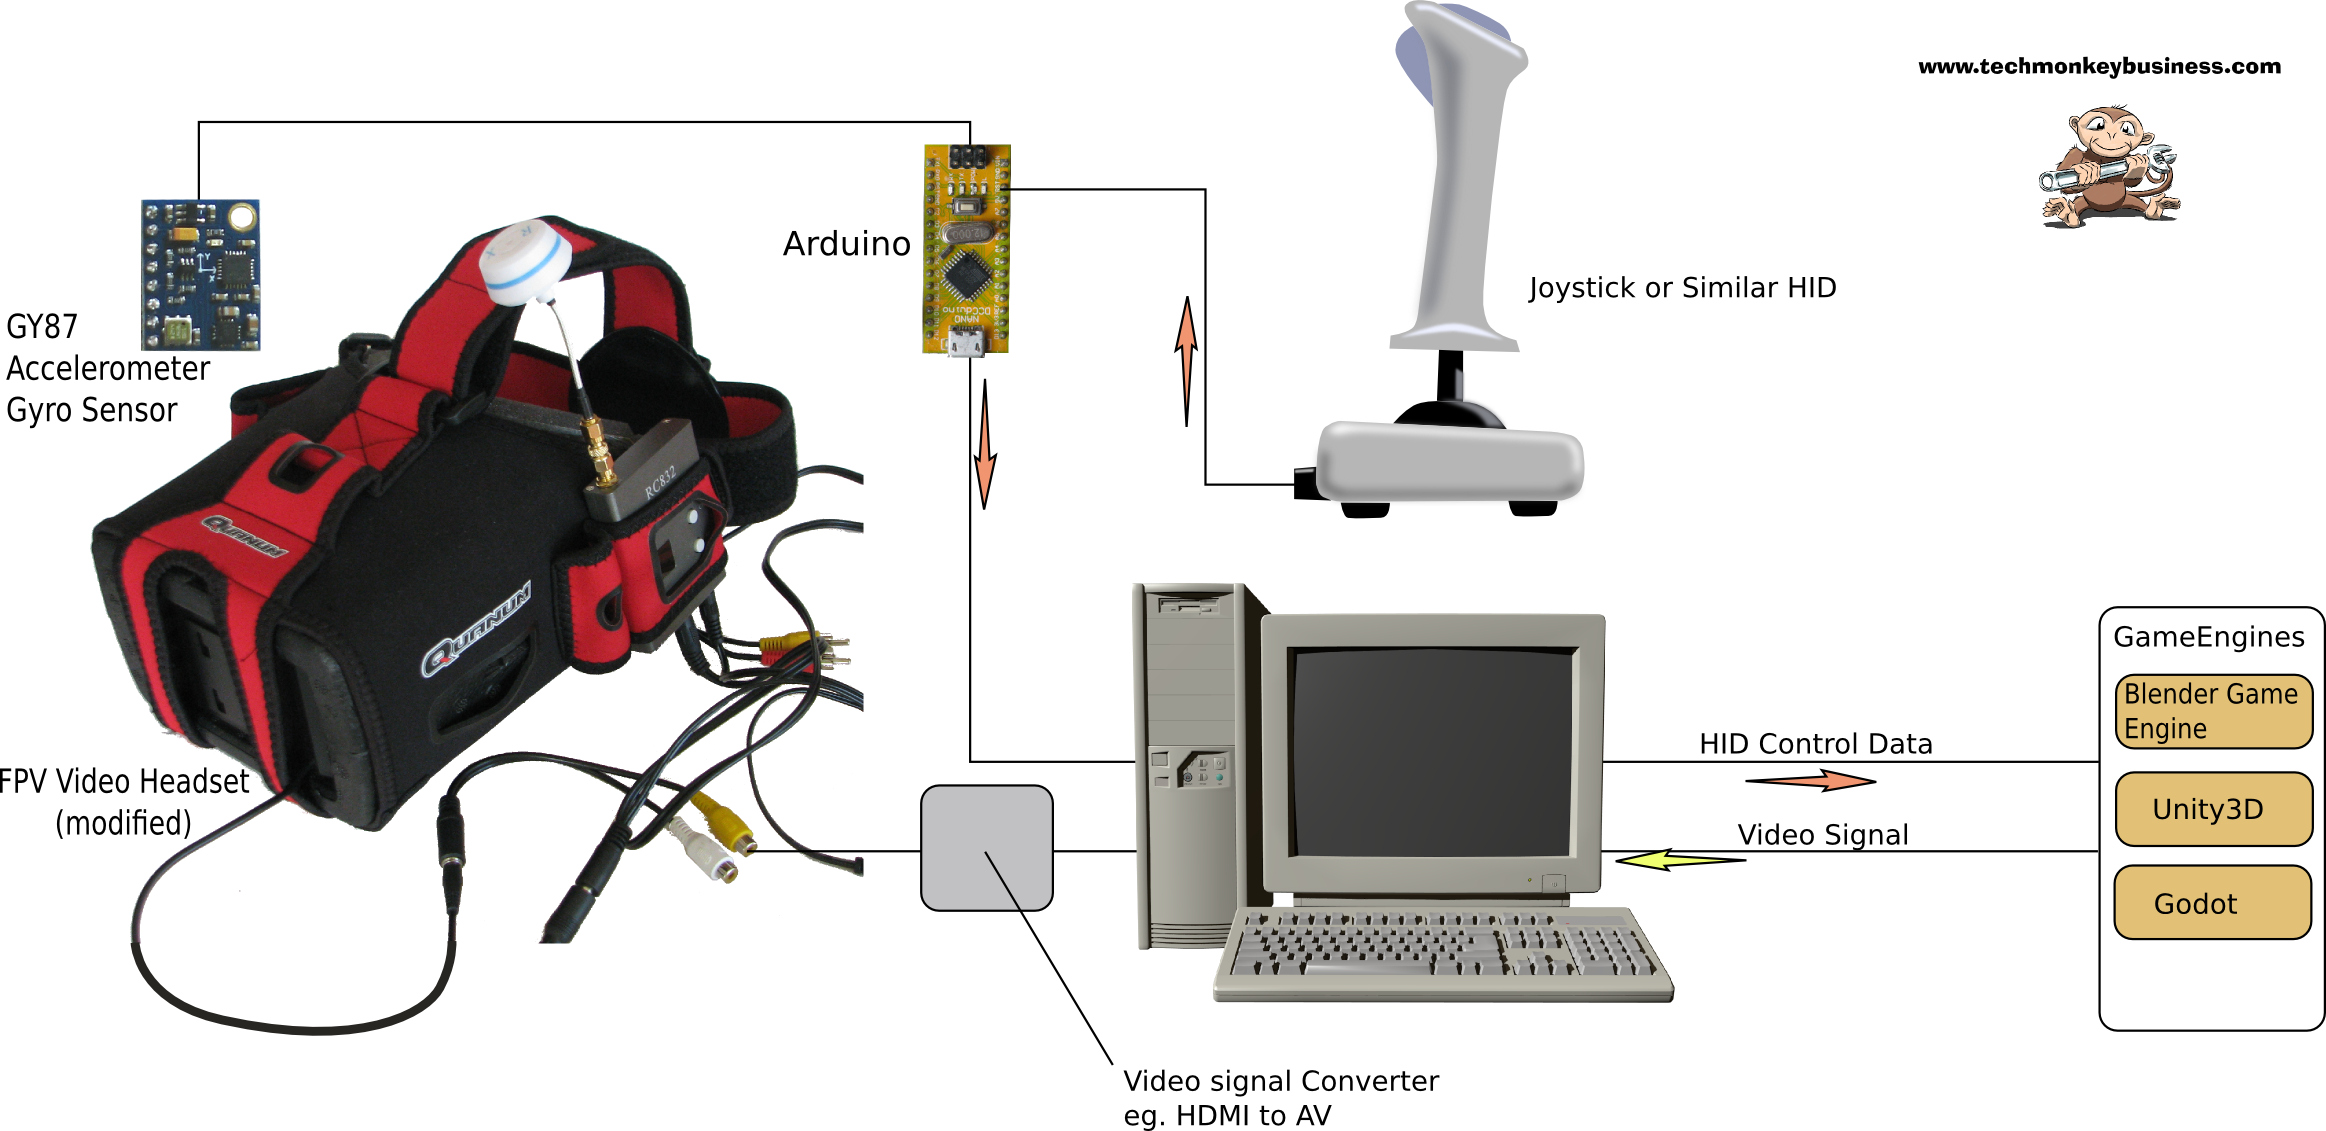
Alternatively some Arduinos (not the Arduino Nano unfortunately), can be re-flashed to appear as Human Interface Devices (HIDs) to the computer. This may be a more efficient solution. Again the users movement in the virtual environment could use a seperate HID device or use a handset that is connected to the arduino on the headset.
Is it going to be pretty? Hell no!
Investigations
I have a number of bits and pieces gathered up to try out now and will be working through it in an fairly random manner trying to get them all to play nicely and do what is expected of them. Luckily the components I am using at present a quite common because they are heavily used in the drone world. This means there is plenty of good information out there I will be able to draw on.
The Monitor / Headset
For want of a better name, the chassis for this VR system will be based on an FPV drone pilot’s headset. Hobbyking stock some very nicely priced ones that can be assembled from a kit (which means we can easily access the bits we want). The particular one I picked up was the Quanum DIY FPV Goggle V2 which has a nice little 5inch 800 x 480 screen and runs off 12V batteries.
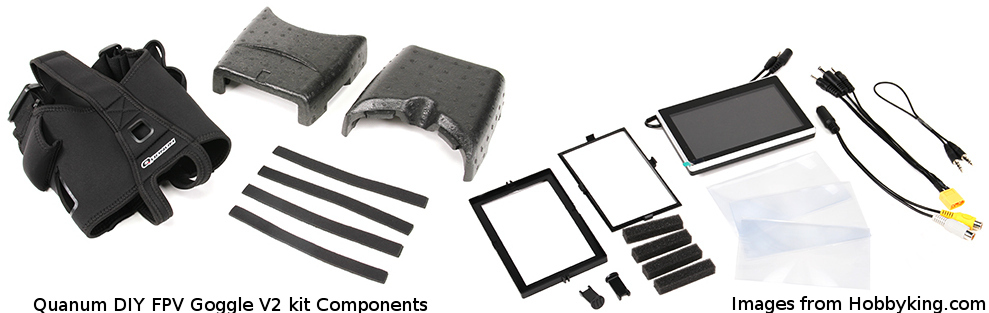
Obviously this arrangement is not stereoscopic, but I figure it can be used as is for non-stereoscopic VR or the monitor transferred into a slightly shortened version and the single wide lens replaced with a couple of small 50mm focus length lenses for a 3D stereoscopic arrangement.
Motion Sensor
The Adafruit DIY VR Headset project made use of a 9 degree of freedom motion sensor. The one they used was the Adafruit 9DOF IMU Breakout Board which incorporates an LSM303DLHC 3-axis accelerometer + 3-axis magnetometer and an L3GD20 3-axis gyroscope. These appear to be quite fine resolution but not nearly as common as the alternative and somewhat cheaper GY85 and GY87 motion sensors used in the OpenVR project and on quadcopters. For this development I purchased a 10degree of freedom GY87 from Banggood.
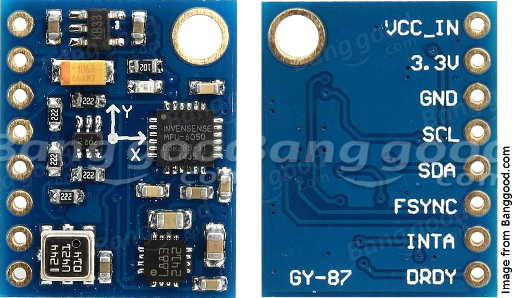
The GY87 incorporates;
- MPU6050 – 3 axis accelerometer + 3 axis gyro
- HMC5883L – 3 axis compass
- BMP180 – barometric pressure sensor which also includes a temperature sensor.
I can’t quite think what I’d use the pressure sensor for, but it’s there anyway.
It uses I2c to communicate and there are a few good libraries around for these sensors. Below you can find some of the development work around using this sensor.
Arduino
I have selected an Arduino Nano for this development mainly because they are small and I have a couple of them. My understanding is that only the Arduino Uno, Mega, Leonardo, and a couple of others have the right serial communication chips that will allow them to be re-flashed to act as HID devices. This means that while I am using the Arduino Nano it will be necessary to use pySerial to capture the data and make it available within the python based Game Engines.
Software
Other than programming the Arduino, there are two other software components required for this system.
Python and PySerial
Python is the scripting language used in the Blender Game Engine. The Blender Game Engine includes its own Python installation rather than relying on the system already having python present. PySerial is a library for Python that allows the Serial ports to be interacted with. By installing the pySerial library into the Blender-Python installation, the serial port can be read (and written to) from within the Blender Game Engine.
Game Engines
There are a number of good game engines around that could be used for this project. Seeing as I am aiming to get the output from Processing to be mouse pointer movements, this should a common enough way of controlling the view direction in a virtual environment that any 3D game engine will be able to make use of it easily.
I will be using the Blender Game Engine because it is capable of producing a stereoscopic output and is relatively easy to build simple virtual environments. The game engine’s scripting language is Python and it is easy enough to install and use pySerial within the game engine itself.
Another good alternative is Unity3D. I believe there is a Linux port for this but I haven’t tried this on my machines. I am not sure what programming languages it can accept.
While I was looking around I came across the open source Godot game engine. This is not capable of producing stereoscopic output, if the headset described above is used with the screen and lenses in their original configuration it should still give a good virtual reality experience.
Video Feed
The video feed from the computer will tend to be an HDMI or DVI. If I had the original monitor Adafruit used in their DIY video headset then this would not be a problem. Because the FPV monitor I am using only accepts Analogue Video I will need to find some sort of converter device to go between the computer and the FPV monitor.
Handset
An integrated* handset will probably be a useful addition to the project but for now I shall concentrate on getting the VR-looking-around bit happening.
*Not integrated into the headset that is. That would look pretty silly.
Other DIY VR systems
While researching the technology for this project I came across a number of other interesting projects in the same space. By making use of some of the ideas from these projects I can avoid reinventing what others have done successfully.
OpenVR
The openVR project makes use of the same monitor that is described in the Adafruit project, but then makes use of the FreePIE project to implement the head tracking functions.
The link for this is – http://mclightning.com/openvr/
Adafruit 3D Printed Video Goggles
and of course the Adafruit 3D Printed Wearable Video Goggles
HID Projects
There are also a number of projects around that concentrate on building your own custom Human interface Devices (HID). These are useful both for the heat tracking functions of the VR headset and any hand controller that may be developed to help the use navigate their way through virtual space.
FreePIE
FreePIE is an open-source project that allows users to create devices that can interact with a computer environment. For instance it would allow users to create a very different sort of mouse pointing device, or their ultimate joystick, or create a tilt sensitive platter for playing games as a waiter in a virtual restaurant, etc.
The project website is https://github.com/AndersMalmgren/FreePIE/wiki.
A Build-Your-Own USB Joystick Project
Flight simulator users are prime candidates for creating their ultimate joystick (or model cockpit of their favourite aircraft if they get really carried away) and so there are a few projects around describing in good detail the steps to create a custom USB joystick. While I have not looked thorugh the details, one such project that looks good is this one;
How To Build Your Own USB Joystick
Sparkfun ProMicro HID Device Project
As always Sparkfun have some good guides. The following project would also be a good starting place for a hand controller device to accompany the VR headset.
Turn your ProMicro into a USB Keyboard/Mouse
UnoJoy
The UnoJoy Project is a development for turning Arduino Unos and Megas into various types of joystick / multijoystick devices.
The project homepage is here: UnoJoy Github Page
There is a good tutorial on using Unojoy here: Garagelab - Tutorial - UnoJoy: Use your Arduino Uno as a Joystick