Setting up the Walkera WK703 Radio Set
The Walkera WK703 Transmitter and WK702 Receiver were not easy to set up and get going. This was mainly due to the really poor instructions that came with the set and the fact that not many people use them. Anyway here is how I managed to get mine working after much trial and error.
Starting the transmitter.
The transmitter must have a good quality supply of power. This can either come from the batteries or from the external supply. The external supply I use is a 12V DC lead acid in a back pack, if using a set of AA batteries they must be able to produce 9.6-12V, which precludes the use of NiMH batteries (in my view this is very poor design and encourages waste). Alternatively a 3S LiPO battery will do the job.
I had many problems with a warning alarm when I first turned on the transmitter. i eventually figured out that the mode switch needs to be set correctly (if it has been bumped). This is the three position switch on the top right shoulder of the transmitter. Push this into it’s rear-most position and the alarm should stop.
Before doing anything with the receiver, make sure the Transmitter Aerial is attached and fully extended. You will have no success at anything until it is. Luckily the transmitter is not all that powerful so you are unlikely to burn anything out if you do turn it on accidentally without the aerial installed.
Getting the Receiver Going
This was painful and frustrating because there was nothing in the manual at all on any of this. First extend out the receiver aerial to its full length. When installed in the plane, make sure it is as long and straight as it can be.
Connecting the Battery Pack
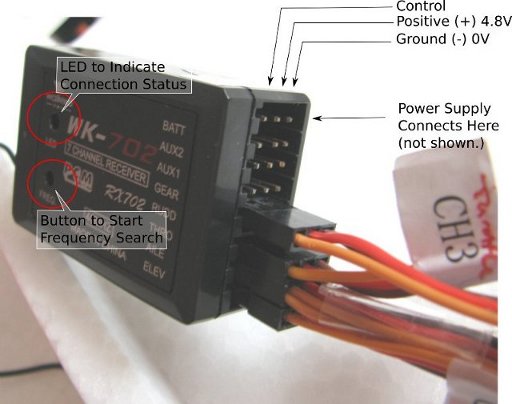
The battery pack is connected to the receiver such that the negative (black) is on the right hand side of the connections if you are looking at them end on. Refer to picture.
Connecting the Servos and Motor Control
Unfortunately the servos in my Fox Glider are colour coded in a weird way. Brown is Negative, red is Positive, and Yellow Ochre is the control signal line. Connect the servos to match the control names on the receiver with the brown wire on the right hand side of the connections if you are looking at them end on. Look at the picture if this is unclear. On my system I also needed to invert the control for the ailerons - this is done through the menu on the transmitter.
Getting the Receiver to Recognise the Transmitter
Again, painful. This only needs to be done once (if the transmitter and receiver are always going to be used together.) Switch on the transmitter and put power on to the receiver. The transmitter aerial must be fully extended. There will be a red LED flashing on the receiver. Using a thin object, press the button under the LED momentarily. The LED should flash green for a bit. When it stops flashing it should revert to a solid red LED. The connection has been made. If the receiver moves out of range of the transmitter, the LED will blink red, but when moved back into range it will return to a solid red LED indicating that the connection is present.
Accessing the Menu on the Transmitter
To get into the menu for the transmitter, hold the EXT button and hit the ENT button. To get out of it, do the same. Navigate using the UP and DN and the + and - buttons. Here you can change your channel if others are operating in the same frequency band as you, and also set up the controls to correspond to the type of movement you are after. The Walkera is set for 40MHz.