Turnigy TXs as Trainers
Setting up Turnigy Transmitters as a Training System for a Wicked Wing XL Slope Soarer
The two Turnigy controllers are the Turnigy 9X and the very versatile Turnigy 9XR. The Wicked Wing XL slope soaring glider is a two channel glider that uses Elevons to control its flight. As the Turnigy 9X controller was the one usually used to control the glider, this was set up to be the Instructor’s unit while the Turnigy 9XR transmitter was set up to be the student’s controller. The two transmitters were connected with a stereo cable with 3.5mm pins at each end. When the instructor needs to assume control, they hold up the Trainer Switch (right back switch labeled TRN) on their controller while using their controls. When they want to return control to the student, they release the Trainer Switch.
Both controllers were set up with new profiles for the exercise, and both set up with control mixes that match the control surfaces of the glider. This is described below.
Setting up the Turnigy 9X Transmitter
The controller needs to be set up with an Elevon Mix.
Start a new model, by pressing and holding the Menu Button until the menu comes up.
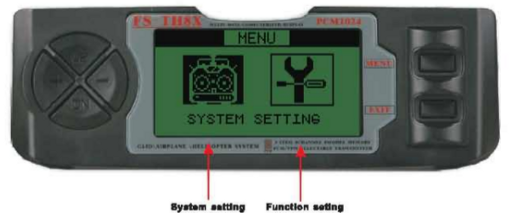
Hit the Menu button again to access the System Settings where you can select your model.
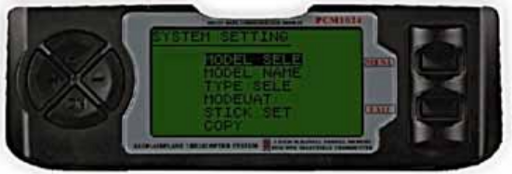
Choose “Mode Sele” and then select an unallocated slot. Hit Menu to accept that. Change the name of the model, and possibly change the type of model with the “Type Sele” if you wish but either the “Acro” or “Glid” will work for this model. We have treated it as powered model and so used “Acro”. Exit out of this menu to get back to the first menu. Now go into the Func Settings the one with the spanner and screwdriver emblem.
In the Func Settings we will set up the transmitter as the Instructor’s controller, and the Elevon mix.
#Setting the Turning 9X Transmitter as an Instructor’s Box.
Step down the menu until you get to Trainer (this will be near the start of the menu list if you have set the model up as “Acro” and near the end of the list if you have set it up as a “Glid”.
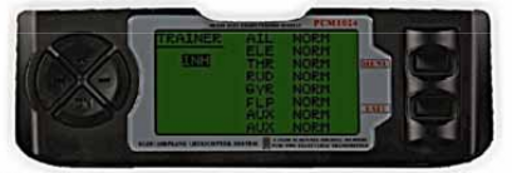
Set the State to INH if it isn’t already. Step down the list of controls and set the ones to NOR (normal) for those that the Student will control – use the “+” and “-” buttons to do this. In this case I have set the Ailerons, Elevator, Throttle, and Rudder to NOR even though the glider has no throttle or rudder. This is just for completeness. All of the channels marked as OFF are those that only the instructor can control. When you are happy with the set up hit the Menu button to take you back out to the Func Setting menu. That’s it for setting this controller up as a trainer.
Setting the Turning 9X Transmitter for a Wicked Wing XL.
The Wicked Wing XL is a 1.5m wingspan slope soaring glider in a combat wing configuration so that it can take the pounding. Being a combat wing with Elevons it must have channel mixing applied to get the correct response to the controls. The correct mix is noted in the Wicked Wing XL instructions. Here is how that is translated to the Turnigy 9X transmitter controls.
The Wicked Wing XL instructions recommend a mix something like 50% for the ailerons and 30% for the elevators. Something like that anyway. This seems like a good mix for any aircraft that uses Elevons and so I suspect these are probably fairly standard.
While you are in the Func Setting menu step down through the menu and somewhere on page 2 you will find the Elevon menu. Enter this with a press on the Menu button and you will be faced with a sort of table. This is where you enter your mix settings.

First set the State to ACT and then step down through the settings for the channels. The first column settings are;
| AIL1 | 050 |
| AIL2 | 050 |
| ELE1 | -030 |
| ELE2 | 030 |
To get the other column in the AIL1 and AIL2 entries hold the right control stick over to the left and while you do that use the “+” and “-” buttons to get the values. The settings for this column are;
| AIL1 | 050 |
| AIL2 | 050 |
If you are happy with this tap the Menu button to accept those settings. Just make sure these settings have been recorded by stepping back into the Elevon menu and then exiting again if they are OK.
We’re all done so exit out of the menus by pressing Exit a few times.
Onto the Turnigy 9XR which will be the student’s controller.
Setting the Turning 9XR Transmitter for a Wicked Wing XL.
The Turnigy 9XR is a superb controller and because it is open source it is well designed and has an outrageous amount of freedom in how it is configured and therein lies the challenge.
To get going create a new profile for your Wicked Wing XL trainer. To do this, hold down the Menu button infinitesimally longer than a straight press. Step down the menu until you come to a vacant spot in the list.
Press the selector button to the left to enter the “Setup” screen (2/11). Here you can change the name. Do that and then step down to the “Trainer” entry and make sure it is saying “On”. I think it is in the default but just to make sure.
Go back up to the top of the menu until the page number (2/11) is highlighted then hit the left button a few times until you get to the “Mixer” page (5/11). Step down to the first entry which in the default is probably CH1 100% THRottle. Which you don’t really want if you are running a Mode 2 controller.
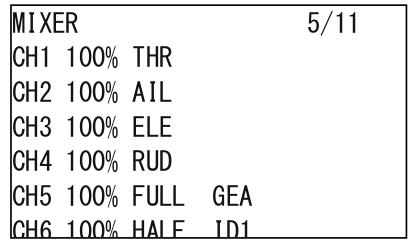
To change it highlight the 100% by stepping down to it and then press and hold the Menu Button to enter the “Edit Mix” Screen.
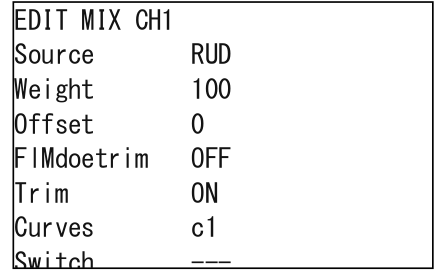
Step down to the Source entry and change this to ELE for the elevators.
Step down and change the Weight to 50%.
Hit the Exit button to get back to the Mixer menu.
Stepdown but you will see that the cursor is a line between CH1 and CH2, this means you can add another control to the mix. To do this press press and hold the Menu Button to enter the “Edit Mix” Screen again. Now set up the Source to be AIL for the ailerons and the weight to be -50%. To get the negative values drop the figure down to zero with the right selector then press the right selector again and it will enter the negative numbers.
Do the same for CH2 but this time put 30% weight into the ELE and 30% into the AIL control you will need to insert. Your Mixer screen will look something like this;
Mixer				(5/11)
CH1		50%	ELE
	+	-50%	AIL
CH2		30%	ELE
	+	30%	AIL
CH3		100%	THR	(OK I changed this one too)
CH4		100% 	RUD
If you happen to enter a control mix into a channel inadvertently, select the unwanted entry and press and hold the Menu Button to enter the “Edit Mix” Screen. Scroll down to the bottom of this menu and it will give you an option to delete the mix. When this is highlighted just press the Menu button. This will drop you back into the Mixer screen and the unwanted entry will have been removed.
If you are having strange control responses to your inputs when the system is operating you may have to reverse one of the channels. I found I had to. Step along to the Reverse page (7/11), and change the appropriate channel. I found that reversing CH1 fixed it.
We’re done. As the Transmitter 9XR is being used as the student controller, nothing else needs to be done.
Try it out
Connect the two controllers with your stereo cord. A long cord is better than a short cord so that the student and instructor can get enough room to move around as needed and also get the glider launched.
Both controller will switch on automatically as soon as the plug is inserted. For safety switch on the Turnigy 9X Instructor’s box anyway. If the Turning 9XR controls are manipulated (and the battery is in the glider) the control surfaces should move as expected. If they don’t then check the glider’s batteries (movement erratic), the connector between the two boxes (no movement at all), or that the channels may need to be reversed (incorrect directions for the elevon motions).
If the Turnigy 9X instructors box controls are moved, there should be no response unless the TRN switch is held. That’s it. If this is what happens, then you are set to go and hit the slope.
Some of the images included in this document have been taken from the “Turnigy 9XR User Manual” and the “Eurgle 2.4GHz 9 Channel Digital Programmable LCD Radio Gear – rcps61207” Manual downloaded from the HobbyKing Website.