A Simple DeltaWing
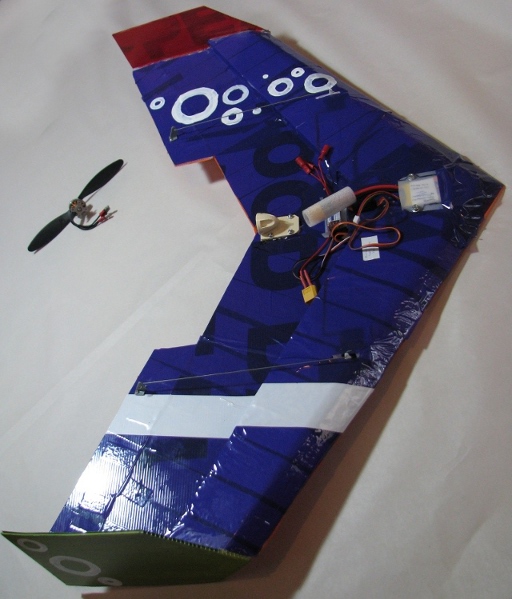
I was inspired to build my own Radio Control DeltaWing after the successful flight of my 1.5m Wicked Wing XL Slope Soaring glider. Successful means it was fun, and flew well. I had seen a guide for a DIY wing called the “Tea Towel” on Instructables. This was made out of Coreflute sheet and was reported to be nearly indestructible – a feature that quite appealed to me. We had some coreflute waiting for a suitable project, and so this seemed like a good use for it. On a closer look at the Tea Towel it did not appear that there was any real aerodynamic effect keeping it up, it was just that it was being pushed through the air by the prop and stayed up in much the same manner that a kite stays up in the air when you run with it.
I kept on looking and found heaps of really cool delta-wing plans on the web for some quite sophisticated aircraft. I settled upon building one that featured in a video by the designer of a smallish deltawing. The video showed it flying slow enough that someone running with a camera could almost keep up with it – they also had a video tutorial on how to make it. IntenseWalkera had taken the video description of the design and produced a drawing. Based on IntenseWalkera’s drawing I manufactured my DeltaWing from coreflute and some waste polystyrene cut to shape with a hot wire cutter. I went to work with Blender to design up a printed tray for the battery and ballast and a motor mount.
The Thingiverse webpage for this design can be found here along with some redrafted the CAD drawings. The CAD drawings are supposed to be printed out at A3 size. Thanks to IntenseWalkera for the original plans that I worked from. You can also download the collected project files from here. there are several variations of the motor mount to choose from. The one I would recommend is MotorMount6-Variant-PopsicleStk.stl which makes use of a stub of popsicle stick through it to add significantly more strength than the purely 3D printed version can achieve.
Anyway, the original websites were;
- https://sites.google.com/site/projectflightd/delta-pusher
- http://www.intensewalkera.webspace.virginmedia.com/ for the original pdf plan.
- http://flitetest.com/articles/delta-pusher-design-flight-and-build-video#sthash.C8sJpBo1.dpuf.
A big point of note with this DeltaWing is that it uses the unusual Kline-Fogelman airfoils; in this case a KFm2. The distinctive step in the wing is obvious from the photos. This supposedly gives a much greater level of lift while not unduly increasing the drag. It also makes it very stall resistant.
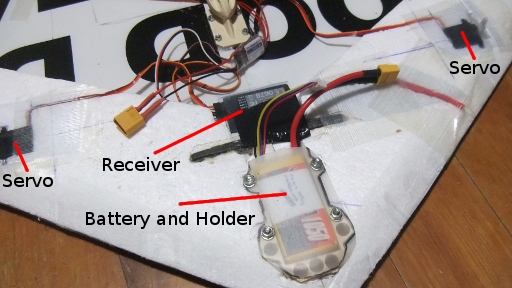
Other than the addition of the printed bits I have made a couple of other changes to the original design. These include embedding the receiver in the wing more firmly and turning the servos on their sides and embedding them in the wing to give a more flush finish. Although it is not shown here in this photo I have embedded a battery alarm in the wing too. The servos and receiver were covered with small patches of waste milkbottle plastic to protect them and firmly hold them in place.
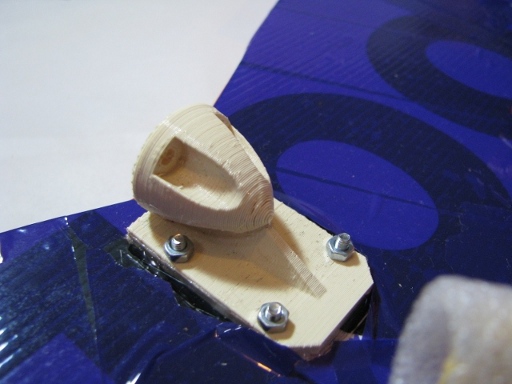
The first edition of the 3D Printed motor mount.
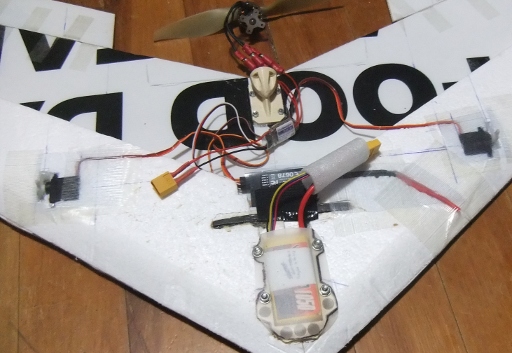
The printed bits are held in place with M4 or M3 machine screws and nuts, while the battery and balance weight holder has a cover cut from Polyethylene milk bottle – something nice and tough. The balance weights were made out of some lead sand cast into 8mm diameter rods and cut to size with a craft knife – don’t worry its easy to do. If you’re not keen on casting the lead, just get some fishing weights and hammer them to shape. I used the milk bottle plastic to cover the receiver body and hold it in place as well as make a small holder for the speed controller so that it was firmly held while also allowing air to get around it and keep it cool.
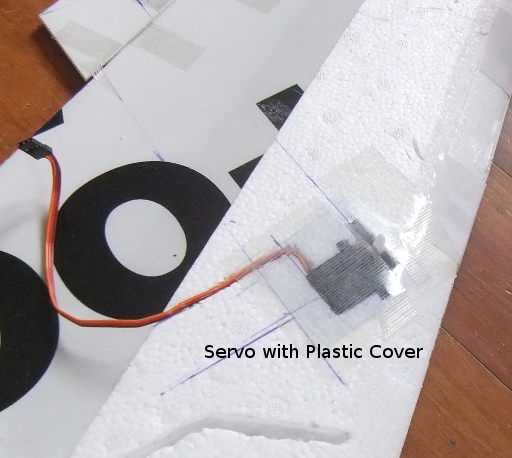
The servo installed in the wing and covered with a small section of milk bottle plastic.
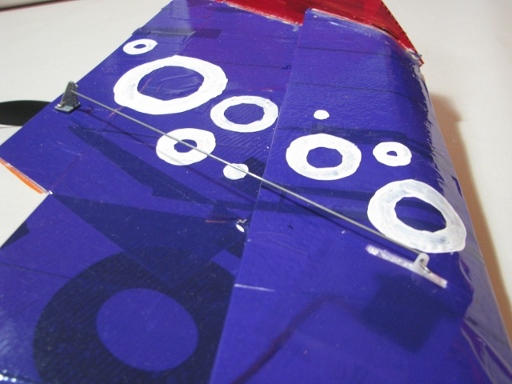
Servos Embedded in the Wing.
There is a 4mm thick plastic plate on the underside of the coreflute layer of the wing under the battery and balance weight holder. This was to give extra rigidity for the bolts to hold against rather than just relying on the coreflute to prevent the bolts pulling through. This was made out of waste plastic rather than printed so there are no STLs for this. It was made just big enough for the four bolts to pass through. It could just as well have been washers or wood or even a couple of layers of milk bottle plastic. Basically make it out of whatever you have to hand.
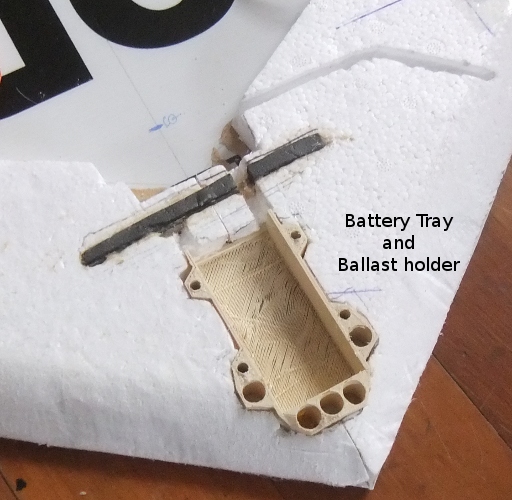
Battery Tray and Balance Weight Holder in Place.
The centre of gravity has been described as being between 7 – 8 inches from the front. I found that I was fighting to keep its nose up so reduced the amount of weight in the nose thereby moving the CoG back.
With regard to the bits and pieces on my plane here is what I have currently installed.
- Motor: hexTronik 24gram Brushless Outrunner 1500kv
- ESC: TURNIGY Plush 10amp 9gram Speed Controller
- Battery: 1050mAh 11.1V Lipo Battery
- Prop: 8x3.8
- Servos: HobbyKing 939MG Metal Gear Servo 2.5kg/ 12.5g/ 0.14sec – two of these obviously
- Receiver: Turnigy 9X 2.4GHz 8Ch Receiver (V2)
- Extras: On Board Lipoly Low Voltage Alarm (2s~4s)
This motor is a bit smaller than recommended by the designers, but the calculations I did using the WeboCalc calculator suggested it would be fine and the Hobbyking specifications indicated that the motor/ESC/Prop combination has enough thrust. This appears to be the case because it has a reasonable rate of climb and is fairly lively in the air. One the downside the relatively large prop appears to provide a bit too much torque and you need to counter that with some opposite roll when running at full power - setting up a mix on your controller would be a solution to help alleviate this as would a smaller prop and higher rev’ing motor.
The recommended ESC/Prop/Motor combinations from the original designer are;
- Motor: 1300 kV blue wonder
- Prop: 8x4
- ESC: 18A
- Battery: 1300 mAh 11.1V 3S lipo
or
- Motor: RCHotDeals 2212-13 1000 kV ~ 50 gram motor
- Prop: 10x5
- ESC: 18A Volcano Exceed RC
- Battery: 2500 mAh 11.1v 3S 25C
I suspect this last combo could make anything fly.
Here are some shots taken during construction to try to show the layout and the use of plastic sheet to cover the servos, battery tray, and receiver.
Some post-flight observations and updates.
The third flight attempt at keeping it in the air was successful but I needed to redesign the motor mount in order to get it to fly. I gave an 8degree pitch to the motor mount so that it was driving more or less through the centre of gravity rather than over it. Yeah OK, go easy on me it is my first DIY aircraft OK?
I reduced the amount of weight in the nose to just that which would fill the front three slots in the printed weight holder. This means that the centre of gravity is somewhat further back than recommended. Without measuring it too closely I would estimate it to be around the 200mm from the nose position.
The motor/prop/ESC combination was pretty good and out of my 1050mAh battery I got a good long run which would have been about 15 – 20 minutes.
The KFm airfoil is an interesting thing, when I let the plane glide it had a glide ratio of about 1 in 5 which is not fabulous but it is very stall resistant. The plane when coming down in an almost flared angle drifts down gently without falling left or right or losing control. As an experiment I filled the gap behind the step with some hot wire cut polystyrene wedges to help create a rough airfoil and covered it with tape. With this in place the flight performance did not improve all that much but the stall resistance appeared worse. Part of this may be due to the plane being heavier with the extra polystyrene and the additional weight required to balance the plane not to mention the fairly poor airfoil profile created.
When running with the original KFm2 “airfoil” the plane handles well with very clean turns, probably owing to the nice big tails.
I have had a few problems with breaking the motor mounts due to my rotten piloting. The mounts tend to break along the printed layer lines and so to get around this I have created two other motor mount variations to add strength - one uses an M4 bolt through it which is probably unlikely to break, and the other is designed to make use of the wholesome goodness of wood and so has a slot through it for a stub of popsicle stick. These new motor mounts are printed with the base plate flat in an attempt to get a bit more strength from the printed bits. This means there is a bit of overhang to deal with but they print OK. I printed them with a 25% fill. Of these two variants I recommend the one that uses the stub of popsicle stick.
The relevant files for this project can be downloaded directly from here - DeltaWing_with_Printed_Bits.zip, obtained from the Thingiverse webpage or my Box.net repository.