Customised Gthumb Web Galleries
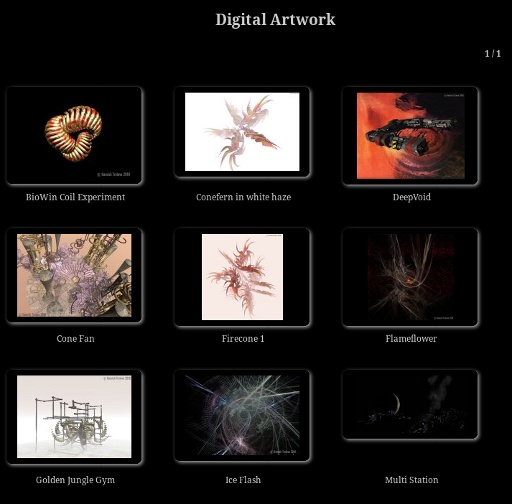
This is a brief description of the method I used to create a moderately customised static gallery using gthumb. The beauty of the gthumb gallery is that it is quite slick, simple, and avoids the use of Java script. All it is generating is a set of html webpages showing images of various sizes linked between themselves, and a style sheet for the layout and text formats. It is really simple, robust, and fast. If you are simply after the theme then there is a zipped up generic version available here-BlackRound.zip. Just unzip it somewhere and copy the BlackRound directory into the /usr/share/gthumb/albumthemes/ directory and you’re good to go.
Having said that the theme used for my galleries is now the fabulous theme by Elfnor called Responsive Dark. The theme rearranges the page layout depending on the screen size and screen orientation. You can download the Responsive Dark theme and find out how it works from Elfnor’s website www.elfnor.com
Adding Info to the Images
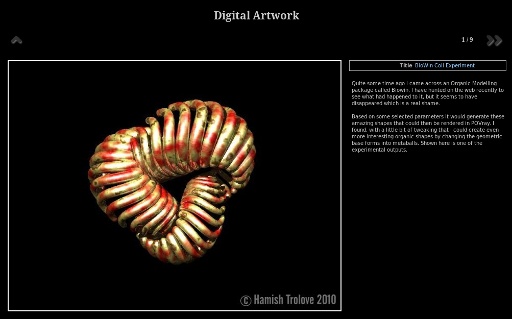
Firstly, the I used gthumb to add information into the images EXIF data. With the image selected and open just hit the Comment button to access the dialogue for adding information to the EXIF. Most of the information went into the description field and a title in the title field. Both of these can then be drawn on from gthumb’s list of EXIF data that you wish to be shown with each image when you turn generate the gallery. The description field allows you to use html tags to help break up a block of text, add formating, and even add links if you were so inspired. I made extensive use of <BR> to generate paragraph breaks, and occassionally the tags for bold or italic lettering.
Customising the Gallery Template
Gthumb has five templates. They are pretty good but I was keen for soemthing slightly different and as I wanted to link back to my main website I needed to add to the template to save me having to do it by hand each time I regenerated the gallery after updating it.
The templates are all kept under the following directory.
/usr/share/gthumb/albumthemes/
Create a new directory within this directory with the name you want to use. This is the name that will appear in the gthumb window to select the theme when you come to that point. In my case my theme was just a modification of NeatRound so I called mine BlackRound.
sudo mkdir BlackRound
Now copy across the content of the theme you want to modify.
sudo cp NeatRound/* BlackRound/
For ease, copy it to somewhere in your home directory where you can work on it without having to deal with permissions.
The theme is made up of the following files;
back.png
bot.png
image.gthtml
index.gthtml
layout.css
left.png
next.png
preview.png
prev.png
right.png
style.css
thumbnail.gthtml
top.png
Change the images to suit your needs. As they are .png format you will be able to include transparency. In my theme I simply inverted the colours.
The preview.png is the image that appears in the gthumb theme selection window. Mash something up for it, or generate one from your gallery when it is all running. Either way you will need something here so that your new theme appears in the list.
For my needs I did not make any modifications to the layout.css but if I wanted to shift elements around this is where I would do it.
style.css controls the font colours so I made some modifications here. Basically anything that appeared as black in the original I changed to white or to a pale blue so that the ext would appear against the black background I wanted. The black background is controlled by the body background colour.
body {
	background-color: #000;
	color: #ccc;
	font-size: 12px;
}
The other thing I wanted in my modified theme was a link back to the main gallery page which was external to the gthumb generated gallery. To do this I modified both the image.gthtml and the index.gthtml files by adding an html block into the footer of both files. Something to note is that the rendered index.html file in the galleries root folder needs to have a relative link address a step down from the generated image pages. This just changes the number of “../” you have in your link.
  <div id="footer">
    <a href="../../../pages/art-projects.html" title="Return to the Art Projects Page">
            <span>Return to the Art Projects page</span>
    </a>
    <div id="footer-2">
      Blender, Carrara, Groboto, Poser, and Daz Studio</div>
If you expect your gallery to have a number of index pages, then set up your index.gthtml to have the same relative link as your image.gthtml because these extra indexXXX.html files end up in the same directory as the image page files. You will need to hand edit the index.html when the gallery has been generated.
The gallery structure I use is like this;
/home/hamy/WebDev/content/galleries/Everything_Gallery/html/
and the target page (art-projects.html) is located in the following directory;
/home/hamy/WebDev/content/pages/
Copy the modified files back into the /usr/share/gthumb/albumthemes/BlackRound/ to overwrite the originals. From your working directory here is the command;
sudo cp * /usr/share/gthumb/albumthemes/BlackRound/
The theme is now in place and ready to go.
Creating the Webalbum
Start Gthumb and with the thumbnail view select all of the images you want to appear in your gallery.
Click on the Share button and select Web Album from the list.
In the first tab, select your theme and tick the “Copy Originals to Destination.” This allows the gallery to show the full sized images.
In the Index Page tab select how many thumbnails you want on a single page or even if you want them all to appear on a single page.
In the thumbnail caption section I deselect all of those that it suggests and select Title under the Comment section. This means that the image titles will show up in the index pages instead of something less meaningful such as filenames.
Similarly on the Image Page tab I select Title and Description from the list and turn everything else off. I use the “%F” code in the Footer to get the filename to show. When I am happy with that I just hit the Save button and away it goes.
Once it’s done I check the added links in the image pages and the index page and make sure they are working correctly.
Done.
Download the Theme
If you are simply after the BlackRound Theme then it is available as a zipped up generic version here- BlackRound.zip. By “generic” I mean that is does not have the link added as described above. Just unzip it somewhere and copy the BlackRound directory into the /usr/share/gthumb/albumthemes/ directory and you’re good to go.