The Baddest Mountain Dulcimer Ever
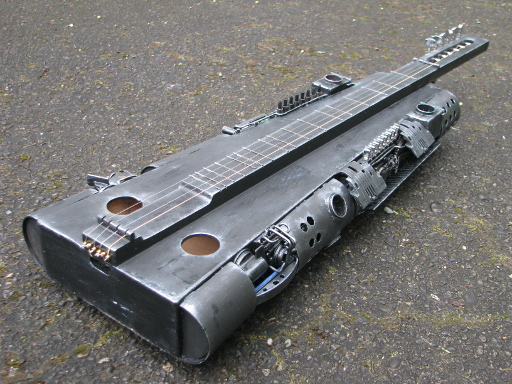
Just when you thought it was safe to go to the Folk Music Festivals, the baddest Appalachian Mountain Dulcimer was unleashed on the world. I present to you the Most Bad-Arse Appalachian Mountain Dulcimer the world has ever seen. Note: for you North Americans “Bad-Arse” = “Badass”, OK?

The Driver’s Side View of the Dulcimer.
Operation of the Dulcimer
Disclaimer: Operation of this instrument can cause severe disruptions to causality and the stability of reality. The designer does not accept responsibility for any accidental loss, damage to property, growth of extra limbs, and general weirdness as a result of its inappropriate use. Please read the instructions and warnings carefully before attempting to play it.
Warning: Never open the Temporal-Flux Director Valve (TFDV) without first closing the Multicognic Oscillator (MO) and engaging the Reverse Temporal Phase Synchrotron (RTPS). (I did this by mistake, and it took at least a week trying to get out of the rather nasty event cycle loop and reconnect to the normal time flux direction. Luckily nobody can recall that incident because for everyone else it never happened. Phew! Lucky that.)
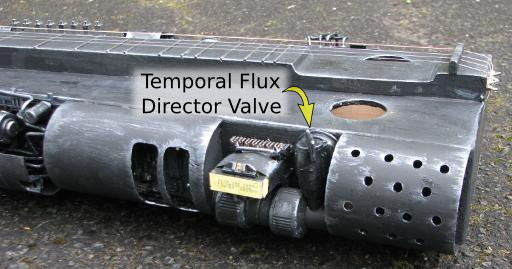
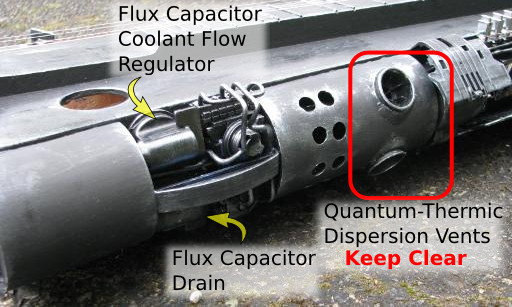
Warning: On no account cover the two high velocity exhausts. The back pressure may cause an overload of the Axial Phase Compressor (APC).

Warning: The heat rejection panels on the side facing away from the player get very hot. To avoid burns do not pick it up by this side until it has fully cooled. Typically allow four or five hours for it to cool after playing.

Warning: Always wear appropriate personal protective equipment (PPE) when operating this instrument. This includes but is not limited to: safety glasses, flame proof gloves, sun-block, lead-lined fire retardant coveralls, and steel-capped boots.
Controls
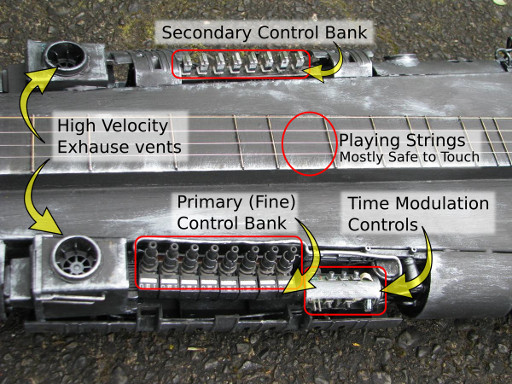
Figure 1: An Overview of the Dulcimer Controls.

Figure 2: The Primary Control Bank.
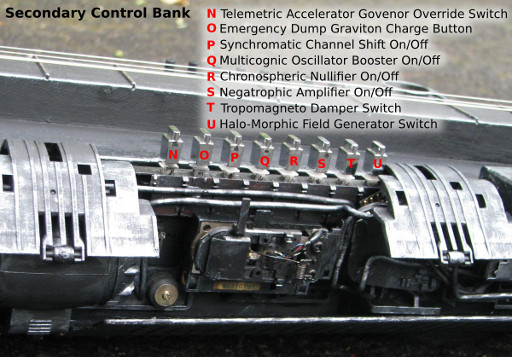
Figure 3: The Secondary Control Bank.

Completely Superfluous Controls.
How to Play
To play the Baddest Arsed (Assed) Appalachian Dulcimer in the World, lay it across your lap (or on a fire-proof level surface) with the tuning keys to your left and strum across the strings. Depressing the melody string (the one closest to you) between the frets will change the note played to one of the diatonic notes (White keys on a completely non-threatening piano). To play chords instead find a cylindrical object to press down on all of the strings. Normal Appalachian Mountain practice is to use a beer bottle … or so I believe.
Should you feel burning or reality changes while playing this instrument please consult your doctor or your nearest quantum physicist.
Preparation and Initial Settings – READ THIS FIRST
To avoid catastrophic chronotropic resonance building up, it is important to prepare the instrument for play. The process takes approximately two days for the initial noise to settle within the Stasis Field Nodes (one of these can be seen in the lower right corner of Fig 3) followed by four days for the Flux Capacitor Electrolyte to thaw and begin absorbing the necessary charged Gravitrinos. For safety the instrument should be locked in a sealed and shielded room for this initial period due to the high risk of it developing a highly charged Tau Field during periods of over-excitation in the Magnehelic Cross-Over Inductor Coils. If this state should persist beyond the sixth day you may need to encase the room in concrete permanently.
Once the initialisation process has been complete, crack open the Flux Capacitor Coolant Flow Regulator. You should hear the coolant as it enters the Flux Capacitor and it begins to cool. You should only open the Flux Capacitor Coolant Flow Regulator enough to hear a faint sizzling and boiling sound. DO NOT OPEN THE TEMPORAL-FLUX DIRECTOR VALVE at this time. If you hear a loud “Crack” and rapidly increasing rumble we suggest you leave the room and follow the instructions for persistent Tau Field Overload Event outlined above.
To stabilise the pressure in the Hyperbaric Nozzle it is recommended the operator uses the three Axial Phase Filter controls (See Fig. 2 A, B, and C) to balance the Halo-Morphic flux flowing from the Multicognic Oscillator. You will know you have achieved a stable pressure when the Quantum Thermic Dispersion Vents begin to glow a dull red and develop a visible distortion in causality around their immediate area.
For the next few steps, speed and precision are crucial as the device passes through several unstable operation points. It is important to pass through these as quickly as possible. The following sequence must be followed exactly.
- DISENGAGE the Tropomagneto Damper Switch (Fig. 3 T)
- Turn OFF the Chronospheric Nullifier (Fig. 3 R).
The next eight steps need to be completed within six seconds to ensure resonance in the Halo-Morphic Flux does not exceed safe levels.
- Switch ON the Reverse Temporal Phase Synchrotron (Fig.2 M).
- Switch ON the Telemetric Accelerator Governor Override Switch (Fig.2 N).
- Set the Synchrotronic Lock Seeker (Fig. 2 F) in the direction you wish it to seek. The setting has a coarse and fine adjustment for the accuracy of the lock.
- Switch ON the Negatrophic Amplifier (Fig.3 S) and switch OFF the Halo-Morphic Field Generator (Fig.3 U) simultaneously. The Halo-Morphic field should be self-sustaining by this point. If it isn’t, immediately hit the Emergency Dump Graviton Charge button, Switch OFF the Reverse Temporal Phase Synchrotron (Fig.2 M) and Switch OFF the Telemetric Accelerator Governor Override Switch (Fig.2 N).
- Switch ON the Multicognic Oscillator Booster (Fig.3 Q).
- Switch OFF the Telemetric Accelerator Governor Override Switch (Fig.2 N).
- Engage the Tau Frequency Shift Condenser (Fig.3 W).
- Turn ON the Chronospheric Nullifier (Fig. 3 R).
At this point the instrument will be close to being ready to play. If reality is appearing a bit weirder than usual you may want to adjust the Gravitrino Injector Mix (Fig.2 G) and/or the Gravitrino Colour Inducer setting (Fig. 2 H).
The Phase Induction Strength Control (Fig.2 D) is only needed if chrono-anamolous-artifacts are beginning to appear.

The Reason Why
I have always had an interest in folk musical instruments (not that I can play music). Their sound and look always intrigued me. This intrigued-ness took a turn towards making instruments after getting the book “Cardboard Folk Instruments to Make and Play” by Dennis Waring out of the local library. Suddenly I realised that musical instruments did not need to be made out of specially cut wood from some rare type of tree. I could conceivably make my own instruments out of waste materials and be able to achieve a reasonable sound from them (ignoring of course that I cannot play music.)
I took part in a Steampunk Workshop run by one of the local Art Institutions. I steampunked a set of headphones which now look completely evil and super-scifi (rather than steampunk). But that got me to thinking about what else I’d like to add greeble too. Thus the idea of the Appalachian Dulcimer arose. It took an afternoon to build the Dulcimer and somewhat longer to add the greeble – particularly because I wanted to use epoxy rather than hot-glue to achieve a better and stronger bond.
Apparently there was a “Great Appalachian Dulcimer” revival in the 1970s. Did you notice it? No, neither did I. So this is an attempt to get a great Appalachian Dulcimer revival going for 2015! It’ll be a year of the biggest baddest most gnarly Appalachian Dulcimers to have ever existed. Ah hah hah haaaaa!
Tuning
It took a while thinking about the tuning for this instrument. It differs from a “regular” Appalachian Dulcimer in that it has four playing strings and two drones running underneath. Four string dulcimers are not uncommon but they tend to have two melody strings close together which are tuned to the same note. On this dulcimer, the four strings are equispaced with the intention that each will carry a different note.
Playing Strings
Most Dulcimers are tuned with a D note on the melody string(s), and then an A and another D on the two drone strings (the alternative tunings are DAA, and DAG). So I chose a DAD tuning which meant that there was still one more string to decide. A quick check on my keyboard revealed that the D and A notes were part of a D minor chord. If I included an F string then I would have a complete D minor chord when strummed across all of the strings. This also had the added bonus that each fret location was another chord if all of the strings were held down across the same fret. Easy! Finally the choice of using a D minor chord was that the three topside drones would always be providing a wistful D minor backing to whatever notes were played on the melody string.
Underside Drone Strings
Typical dulcimers don’t have two drone strings running underneath and passing through the sound box either. The two drones running through the sound box were easy enough to decide upon and are tuned to A and D so they will sympathetically vibrate with the playing strings.
Materials
The sound box is made from wood taken from an old discarded wooden pallet and thin MDF used to protect the MDF panels during transport.
The strings are proper music strings. I have used wire of various sorts but I find it tends to stretch too much and you end up with the instrument loosing its tuning too quickly.
The machine tuners are old second hand mandolin tuners I obtained from the local music shop.
All of the greeble on the instrument is comprised of things like: PVC stormwater pipe, circuit boards, bits of old copiers, bits from old CRT monitors, injet printer cartridges, wine bladder valves, and various bottle nozzles.
How Does it Sound?
What? You actually want to listen to it? Well OK.
Download a Sample of the Baddest Mountain Dulcimer Ever
You will notice I have used the Reverse Temporal Knowledge Feedback Transfer function of the Dulcimer on a couple of occassions during this piece. I prefer not to do this because it gives me a headache and gives the local reality a yellow tinge for about an hour afterwards but I was in need of the extra knowledge to override my natural musical ineptness.